What's new
Photoshop Gurus Forum

Welcome to Photoshop Gurus forum. Register a free account today to become a member! It's completely free. Once signed in, you'll enjoy an ad-free experience and be able to participate on this site by adding your own topics and posts, as well as connect with other members through your own private inbox!

Planespotting


zsoltiforgacs

New Member
Messages
2
Likes
0
Dear Members!

I'm a beginner aviation spotter. I use Lightroom for edit my photos. Now I have a problem, and I think I will need PS to fix this problem. After a spotting tour I saw the following problem with the photos. ( The lens is not mine, so I can't see the problem forward).
How can I fix the spots on the sky? These are not just a dust spot which can remove in Lightroom. Would you be so kind to help me anybody step by step? Thank you!howtofixit.png
 
Hi zsoltiforgacs
I think you can get a better result in photoshop with the better selecting masking capabilities where one can even replace the sky totally.
However, from withing lightroom, you can take an approach with the adjustment brush.
Set just the texture and clarity sliders all the way to the left and brush over the sky area with auto mask check box on. In the image below I did a very very very rough brushing of the sky and then applied the adjustment brush a second time.

More work would be needed to get exactly what you want with colors etc yet this is to show the feasibility of correcting the spotting.
Hope this idea gives you something to consider.
John Wheeler

Plane-spotting-adj.png
 
the problem of stains is not optical unfortunately the sensor has been badly cleaned my advice and take it to some assistance to get it cleaned well.
 
@zsoltiforgacs Welcome onboard onto the PSG forum.

Initial thoughts before attempting the work ahead:
Most of the spots are in the sky above and they are not present on the plane or ground. Also noting that the sky has no features except a fade from dark blue at the bottom to lighter blue on top.
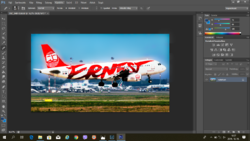
1) Make a duplicate copy of the background layer. Select the sky above, carefully avoiding the light poles. This can be done by a variety of ways, depending on how accurately you want to do the job. For best results, you would have to use the Pen tool. For the purposes of this tutorial, I used the Magic Wand tool to have a selection as follows:
Tut1.png
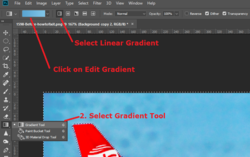
2) Select the Gradient Tool, which is in the same group as the Paint Bucket Tool. Then, select Linear Gradient. Then, click on the Edit Gradient section, as illustrated:
Tut2.png
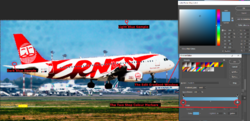
In the Gradient Editor, you find two Colour Stop markers. Double Click on the Left one and sample a darker colour towards the bottom where you have Dark Blue in the sky. Then, Double Click on the Right one and sample on the top of the sky to sample a Light Blue colour, as illustrated:
Tut3.png
3) Select a new layer on top of the background layer. Call it "Sky Gradient". Now make a gradient from the bottom of the selection area to the top, such that the dark blue at the bottom continues and merges into the light blue on top, replicating the background sky.
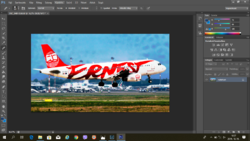
This is how my final output looks like and my Layers Panel:
Tut4.png
Note: I had some jagged edges during selection, and I have dealt with them to get this output. If you encounter any issues, raise them and we can assist you.
All the best and show us your output.
 
@zsoltiforgacs Welcome onboard onto the PSG forum.

Initial thoughts before attempting the work ahead:
Most of the spots are in the sky above and they are not present on the plane or ground. Also noting that the sky has no features except a fade from dark blue at the bottom to lighter blue on top.
1) Make a duplicate copy of the background layer. Select the sky above, carefully avoiding the light poles. This can be done by a variety of ways, depending on how accurately you want to do the job. For best results, you would have to use the Pen tool. For the purposes of this tutorial, I used the Magic Wand tool to have a selection as follows:
View attachment 107137
2) Select the Gradient Tool, which is in the same group as the Paint Bucket Tool. Then, select Linear Gradient. Then, click on the Edit Gradient section, as illustrated:
View attachment 107138
In the Gradient Editor, you find two Colour Stop markers. Double Click on the Left one and sample a darker colour towards the bottom where you have Dark Blue in the sky. Then, Double Click on the Right one and sample on the top of the sky to sample a Light Blue colour, as illustrated:
View attachment 107139
3) Select a new layer on top of the background layer. Call it "Sky Gradient". Now make a gradient from the bottom of the selection area to the top, such that the dark blue at the bottom continues and merges into the light blue on top, replicating the background sky.
This is how my final output looks like and my Layers Panel:
View attachment 107141
Note: I had some jagged edges during selection, and I have dealt with them to get this output. If you encounter any issues, raise them and we can assist you.
All the best and show us your output.
You are fantastic! I try to fix these photos with these steps, I will be satisfied when the photos will be accepted on spotter sites. I will inform you, bt I need time, because lot os photos waiting for editinng. Thank you! I
 
You are fantastic! I try to fix these photos with these steps, I will be satisfied when the photos will be accepted on spotter sites. I will inform you, bt I need time, because lot os photos waiting for editinng. Thank you! I
All the best, buddy.
 

Back
Top