What's new
Photoshop Gurus Forum

Welcome to Photoshop Gurus forum. Register a free account today to become a member! It's completely free. Once signed in, you'll enjoy an ad-free experience and be able to participate on this site by adding your own topics and posts, as well as connect with other members through your own private inbox!

Best Possible Image from Old Halftone Newspaper Pictures


UK1966

Member
Messages
13
Likes
2
First of all, I am a complete novice when it comes to photographic restoration etc., and would be very grateful for any help or advice or preferably tutelage regarding the following.

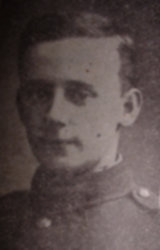
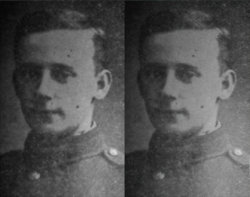
I have over one hundred and fifty old halftone newspaper pictures (photographs of the original pictures). All pictures are head and shoulder shots and reasonably small, my finished printed size will be approximately 50mm x 80 mm, portrait (please see attached).

I need to learn how to “shop” the pictures so that they will look at their best when re-printed on plain white paper.

I have recently downloaded a 30 day free trial of PSP 2020 (only because PhotoShop was a shorter trial) and have played about with Moire Pattern Removal and sharpness etc., but I don’t feel that I am getting the best out of the photographs. I just don’t have the necessary experience. When I know exactly what I need to do I will then purchase the appropriate software, whatever that may be.

Having asked for help on a PSP forum, I have learnt that my best option would be to use a Fast Fourier Transform (FFT) plug-in. I noticed on another forum that there is one available for Photoshop called “FT Pattern Suppressor”. Would this solve my problem?

Given the large number of pictures that I will need to process, I had hoped for a simpler solution, but if this is what it will require to achieve the best results with these images then so be it

Also if anyone has any tips on what could be applied to the image post Pattern Suppression to refine it further, it would be appreciated, bearing in mind that I have a large number to process.

If anyone with the relevant experience would like to “take me under their wing” and teach me how to get the best results I would be extremely grateful.

Kind regards,

Pete.
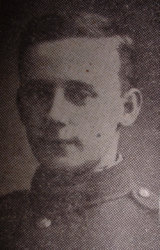
Master Image.jpg
 

thebestcpu

Guru
Messages
2,989
Likes
2,750
Hi UK1966
I think I can help you out as I have had to do the same with old newspaper images as well.
My particular newspaper clippings where of the type as your sample above where they were evenly spaced varying size black or white dot/shapes.
I came up with a technique that helps with this specific type of image and going the FFT route is in my opinion not the right option.
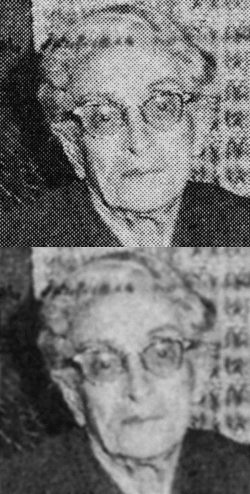
The black and white dot sizes is an encoding of the nearby gray tone and this technique is to capture that information and then spread it back out in between the dots. The type of result I have achieved is shown below and this is with no additional post processing to make it look even better such as tonal adjustments and sharpening. I have included a link to the PSD file of this example (my Great Grandmother when she was ~90).

Here are the steps
1) Scan the image at high resolution (probably 600 ppi). The intent is that the smallest dot is covered by about 5 pixels for good sampling.
2) Turn that image into a Smart Object
3) Use the box blur filter with the number set to about 1/2 the number of pixel distance between the newspaper dots. I usually increase the number one at a time until it just gets soft and then back down 1 dot while viewing at 100% or higher magnification
4) Use the Gaussian blur to take out the last bit of edges from the box blur

Note that the above step is what your eye/brain is doing when viewing the image from a distance ---basically blurring between the dots. When examining the original image very closely, the eye/brain combination is no longer blurring between the dots. Using the above approach as you can see from the GIF image below showing before and after appears to show a ton more detail. These steps do not provide any more actual detail yet the eye is no longer distracted by all the sharp dot edges to which the eye/brain is very sensitive.

Following the steps above you can proceed with normal restoration techniques such as tone related and sharpness/noise related issues as well as damage to the image. Note, you can do some image repair before these steps if you preserve the dot pattern. That is usually pretty difficult thought and I do most of my "tuning" of the image after converting the dots back to gray scale image.
Hope this helps
John Wheeler

Following if the before/after image in animated GIF and the link to the PSD for this image.

PhotoshopGurus-Newspaper.gif

Here is the dropbox link to the PSD file
https://www.dropbox.com/s/ug99thecxfmmey8/PhotoshopGurus- Newpaper Print.psd?dl=0
To see the before and after just click on the Smart Object Filter "eye" icon.
You can double click each of the filter settings by double clicking on them.
 

UK1966

Member
Messages
13
Likes
2
Thank you for the replies, unfortunately, I am having problems accessing the forum,

Pete
 

UK1966

Member
Messages
13
Likes
2
Thanks once again for the replies. i have been having problems accessing the forum, but all is fine now. Unfortunately i have run out of time and i will need to reply tomorrow,

appologies,

Pete.
 

UK1966

Member
Messages
13
Likes
2
Hi UK1966
I think I can help you out as I have had to do the same with old newspaper images as well.
My particular newspaper clippings where of the type as your sample above where they were evenly spaced varying size black or white dot/shapes.
I came up with a technique that helps with this specific type of image and going the FFT route is in my opinion not the right option.
The black and white dot sizes is an encoding of the nearby gray tone and this technique is to capture that information and then spread it back out in between the dots. The type of result I have achieved is shown below and this is with no additional post processing to make it look even better such as tonal adjustments and sharpening. I have included a link to the PSD file of this example (my Great Grandmother when she was ~90).

Here are the steps
1) Scan the image at high resolution (probably 600 ppi). The intent is that the smallest dot is covered by about 5 pixels for good sampling.
2) Turn that image into a Smart Object
3) Use the box blur filter with the number set to about 1/2 the number of pixel distance between the newspaper dots. I usually increase the number one at a time until it just gets soft and then back down 1 dot while viewing at 100% or higher magnification
4) Use the Gaussian blur to take out the last bit of edges from the box blur

Note that the above step is what your eye/brain is doing when viewing the image from a distance ---basically blurring between the dots. When examining the original image very closely, the eye/brain combination is no longer blurring between the dots. Using the above approach as you can see from the GIF image below showing before and after appears to show a ton more detail. These steps do not provide any more actual detail yet the eye is no longer distracted by all the sharp dot edges to which the eye/brain is very sensitive.

Following the steps above you can proceed with normal restoration techniques such as tone related and sharpness/noise related issues as well as damage to the image. Note, you can do some image repair before these steps if you preserve the dot pattern. That is usually pretty difficult thought and I do most of my "tuning" of the image after converting the dots back to gray scale image.
Hope this helps
John Wheeler

Following if the before/after image in animated GIF and the link to the PSD for this image.

View attachment 109605

Here is the dropbox link to the PSD file
https://www.dropbox.com/s/ug99thecxfmmey8/PhotoshopGurus- Newpaper Print.psd?dl=0
To see the before and after just click on the Smart Object Filter "eye" icon.
You can double click each of the filter settings by double clicking on them.

Hello John,
Thanks for the concise reply, it is appreciated and I have one or two questions for you if you don’t mind.
Firstly, the images I have are photographs of the original newspaper pictures and so cannot be re-scanned as required in your “first step”, will this make a difference to the result?

In step three is the value of the “Box Blur Filter” 1 or 2 or half?

Will I be able to carry out the above using Photoshop Elements as I prefer to buy the software outright as opposed to having a subscription?

Finally, and I appreciate that you are far more experienced than me with regards to this subject, but can you explain why applying FFT would not result in a better outcome?

Any help or advice would be gratefully appreciated,

Regards,

Pete.
 

thebestcpu

Guru
Messages
2,989
Likes
2,750
Hello John,
Thanks for the concise reply, it is appreciated and I have one or two questions for you if you don’t mind.
Firstly, the images I have are photographs of the original newspaper pictures and so cannot be re-scanned as required in your “first step”, will this make a difference to the result?

In step three is the value of the “Box Blur Filter” 1 or 2 or half?

Will I be able to carry out the above using Photoshop Elements as I prefer to buy the software outright as opposed to having a subscription?

Finally, and I appreciate that you are far more experienced than me with regards to this subject, but can you explain why applying FFT would not result in a better outcome?

Any help or advice would be gratefully appreciated,

Regards,

Pete.

It should make little difference by rescanning the photograph instead of the original. The image you provided is pretty good by itself yet you might just get a little more detail with a slightly higher scan resolution.

Sorry about the confusion on the Box Blur. The "1/2" was meant to mean "one half". So if there are 10 pixels between the major image dots, the approximate number for a good results is "5" in the box blur settings. That guideline is just to get you close and then you can try numbers above or below that.

I am not too familiar with Photoshop Elements filters yet I thought it had both the box blue and Guassian blur options. I think the only limit is that it only works with 8 bit color depth yet the results should be quite good without the need for higher bit depth processing

FFT or Fast Fourier Transform is a mathemtaical approach that works amazingly well with exactly spaced and exactly same sized patterns overlaying an image. This type of half tone is spaced equally yet the size of the dots are not the same size dots. The math behind the FFT is to convert the two dimensional pixel image into another 2 dimensional image frequency map, delete those frequencies that occur regularly and then reverse the process back to original pixels. So the FFT is trying to remove the very dots that contain the grayscale information you want to salvage. You could give an FFT a try and see the results. My experience for this type of image has been very very bad using an FFT.

The type of image where the FFT has worked great are scanned images where the original image paper had a regular imprinted regular pattern to try and creat a matte look instead of glossy look. Even with that, not all FFT filters are equal and some create odd artifacts at the edges.

Hope that helps.
John Wheeler
 

UK1966

Member
Messages
13
Likes
2
It should make little difference by rescanning the photograph instead of the original. The image you provided is pretty good by itself yet you might just get a little more detail with a slightly higher scan resolution.

Sorry about the confusion on the Box Blur. The "1/2" was meant to mean "one half". So if there are 10 pixels between the major image dots, the approximate number for a good results is "5" in the box blur settings. That guideline is just to get you close and then you can try numbers above or below that.

I am not too familiar with Photoshop Elements filters yet I thought it had both the box blue and Guassian blur options. I think the only limit is that it only works with 8 bit color depth yet the results should be quite good without the need for higher bit depth processing

FFT or Fast Fourier Transform is a mathemtaical approach that works amazingly well with exactly spaced and exactly same sized patterns overlaying an image. This type of half tone is spaced equally yet the size of the dots are not the same size dots. The math behind the FFT is to convert the two dimensional pixel image into another 2 dimensional image frequency map, delete those frequencies that occur regularly and then reverse the process back to original pixels. So the FFT is trying to remove the very dots that contain the grayscale information you want to salvage. You could give an FFT a try and see the results. My experience for this type of image has been very very bad using an FFT.

The type of image where the FFT has worked great are scanned images where the original image paper had a regular imprinted regular pattern to try and creat a matte look instead of glossy look. Even with that, not all FFT filters are equal and some create odd artifacts at the edges.

Hope that helps.
John Wheeler

Hello John,
thanks once again for taking the time to reply and answer the questions, its appreciated. I think i understand now. Out of curiosity i have posted the picture on the free editing part of the forum, to see if anyone would add FFT to the picture just too see what happens, but i suspect you will be right.
One more thing John, what would be the next step(s) with regards to further processing? I appreciate that i need to manage my expectations when it comes to pictures like this, but just how good could you get a picture like this?

regards,

Pete.
 

thebestcpu

Guru
Messages
2,989
Likes
2,750
Hello John,
thanks once again for taking the time to reply and answer the questions, its appreciated. I think i understand now. Out of curiosity i have posted the picture on the free editing part of the forum, to see if anyone would add FFT to the picture just too see what happens, but i suspect you will be right.
One more thing John, what would be the next step(s) with regards to further processing? I appreciate that i need to manage my expectations when it comes to pictures like this, but just how good could you get a picture like this?

regards,

Pete.
Hi Pete
I would rescan at higher resolution and rerun the process to fine tune the best you can get as a starting point.
From there, there are numerous restoration retouching techniques. You could provide this as a starting point as another post asking your exact question and see what Forum members can do.
Keep in mind, I believe you are trying to find out how good "you" can make the images and you already said that you have beginner skills so what "can" may be difficult for you.

After reprocessing at higher resolution, I would always check how the image looked at the actual scale you were going to print. smaller images effectively hide many of the preexisting defects.
I would also try and determine the type of end result. Many expect old images not to be studio level quality and you are trying to represent a person from long ago. You can very well get the feelings you want to come through without a lot of editing. Over editing may detract from the actual desired end result.

You also have the option to colorize the image even though it originated from Black and White. So its key for you to determine as the artist, the end result/feeling you want you audience to see/feel.

So after reprocessing and viewing at actual print size scale, here are some options
1) repair damage that might have existed in the original image (that takes a judgement call on what is damage)
2) correct for limitations of the original image. Again another judgement call yet the very dark chin and darkness around the eye could be real or an artifact of how the image was originally taken/processed.
3) Tone correction such as exposure, constract, white point, dark point, highlights, shadows, clarity, texture etc. Most of these are slider controls in the Adobe Camera Raw plugin which I believe Photoshop Elements has access.
4) Noise reduction. There are some push button noise reduction techniques for images that have consistent noise across the image. Your image does not. So had work with healing/cloning may be needed.
5) Sharpening - Note that this is perceived sharpness not real sharpness as the actual detail was lost during the newspaper half toning process. There are a myriad of sharpening techniques and tools and everyone has their favorite workflow.
6) More hand cloning/healing as needed
7) Background replacement if desired
8) Colorization if desired.

It would help if you shared with forum members the final desired product/result you seek and what level of work you feel comfortable doing e.g. pushbutton, adjusting sliders, hand corrections, etc.

So as you go down the list, the amount of work invested in the image goes up. The incremental value could be postive, neutral, or negative depending on the end artistic result you desire and also the skill level you have to implement. Note that many of the steps are not extracting original detail/sharpness from the original image yet effectively painted on desired perception you want for the image. It can make the image look worse/fake/photoshopped so not necessarily better.

Again a reminder, look at the image in the size your are going to print and ideally do some test prints to see how the end result appears. The smaller final size you mentioned will actually help.
John Wheeler
 

UK1966

Member
Messages
13
Likes
2
Hi Pete
I would rescan at higher resolution and rerun the process to fine tune the best you can get as a starting point.
From there, there are numerous restoration retouching techniques. You could provide this as a starting point as another post asking your exact question and see what Forum members can do.
Keep in mind, I believe you are trying to find out how good "you" can make the images and you already said that you have beginner skills so what "can" may be difficult for you.

After reprocessing at higher resolution, I would always check how the image looked at the actual scale you were going to print. smaller images effectively hide many of the preexisting defects.
I would also try and determine the type of end result. Many expect old images not to be studio level quality and you are trying to represent a person from long ago. You can very well get the feelings you want to come through without a lot of editing. Over editing may detract from the actual desired end result.

You also have the option to colorize the image even though it originated from Black and White. So its key for you to determine as the artist, the end result/feeling you want you audience to see/feel.

So after reprocessing and viewing at actual print size scale, here are some options
1) repair damage that might have existed in the original image (that takes a judgement call on what is damage)
2) correct for limitations of the original image. Again another judgement call yet the very dark chin and darkness around the eye could be real or an artifact of how the image was originally taken/processed.
3) Tone correction such as exposure, constract, white point, dark point, highlights, shadows, clarity, texture etc. Most of these are slider controls in the Adobe Camera Raw plugin which I believe Photoshop Elements has access.
4) Noise reduction. There are some push button noise reduction techniques for images that have consistent noise across the image. Your image does not. So had work with healing/cloning may be needed.
5) Sharpening - Note that this is perceived sharpness not real sharpness as the actual detail was lost during the newspaper half toning process. There are a myriad of sharpening techniques and tools and everyone has their favorite workflow.
6) More hand cloning/healing as needed
7) Background replacement if desired
8) Colorization if desired.

It would help if you shared with forum members the final desired product/result you seek and what level of work you feel comfortable doing e.g. pushbutton, adjusting sliders, hand corrections, etc.

So as you go down the list, the amount of work invested in the image goes up. The incremental value could be postive, neutral, or negative depending on the end artistic result you desire and also the skill level you have to implement. Note that many of the steps are not extracting original detail/sharpness from the original image yet effectively painted on desired perception you want for the image. It can make the image look worse/fake/photoshopped so not necessarily better.

Again a reminder, look at the image in the size your are going to print and ideally do some test prints to see how the end result appears. The smaller final size you mentioned will actually help.
John Wheeler

Thank you John, another excellent reply, and i agree with what you are saying.
I have been printing out some of my previous attempts at the finished size, approx 50mm x 80mm portrait and there is some difference from what you see on the screen and the finished "product".
Obviously my skill levels are basic and with 150 + pictures i would probably lean towards a more "push button" solution.
I also agree with you and have witnessed over editing on these pictures and they certainly begin to look fake/false and thats certainly not what i want.
Well John you have given me a lot to think about for now, and your help is appreciated.
Maybe i should try Photoshop Elements (more my level) and maybe see what i can acheive with that. I will no doubt be posting again.

kind regards,

Pete.
 

thebestcpu

Guru
Messages
2,989
Likes
2,750
You're welcome and I bet you will do just fine with Photoshop Elements.
Enjoy and you can always come back to forum members with more questions.
John Wheeler
 

Top