Photoshop Gurus Forum
Welcome to Photoshop Gurus forum. Register a free account today to become a member! It's completely free. Once signed in, you'll enjoy an ad-free experience and be able to participate on this site by adding your own topics and posts, as well as connect with other members through your own private inbox!
You are using an out of date browser. It may not display this or other websites correctly.
You should upgrade or use an alternative browser.
You should upgrade or use an alternative browser.
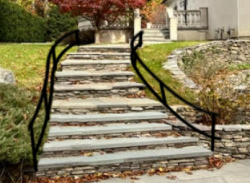
Specific Add handrails on these stairs!
- Thread starter pinkbunny
- Start date
ex_teacher
Guru
- Messages
- 568
- Likes
- 1,177
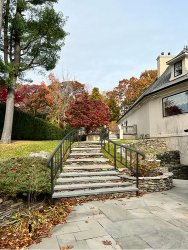
Usually I can find some 'premade' whatever(s) to warp and fit into the image and accomplish the desired task. Not this time. I like doing this type of project so I decided to do whatever it took.
The first thing was to trim that big bush and re-fabricate the steps under it. Easy
So I ended up completely drawing the railing from scratch. The verticals were fairly simple, the rest not so much. That problem of course it modeling the railing with photographic-like nuances. <SIGH> Best I can do. Usually a new day brings to light all the ills of the previous work but on this one I'm way over my head.
And I'm not even sure I did the right type of railing or on the correct side.
Still...it was a fun challenge.
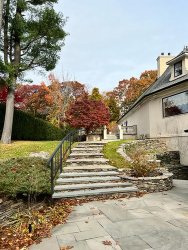

OMG that looks great! I see what you are talking about as far as trimming the bush there on the bottom, because it was in the way and that could've made it a bit more difficult to create the railing at that angle. But thank you so much regardless because this turned out better than I had expected!! You read my mind, I was thinking the railing would be best on the left and also just on one side. Again, looks great!Usually I can find some 'premade' whatever(s) to warp and fit into the image and accomplish the desired task. Not this time. I like doing this type of project so I decided to do whatever it took.
The first thing was to trim that big bush and re-fabricate the steps under it. Easy
So I ended up completely drawing the railing from scratch. The verticals were fairly simple, the rest not so much. That problem of course it modeling the railing with photographic-like nuances. <SIGH> Best I can do. Usually a new day brings to light all the ills of the previous work but on this one I'm way over my head.
And I'm not even sure I did the right type of railing or on the correct side.
Still...it was a fun challenge.
View attachment 125602
Hey! Would it be possible to add the same rails to the other side? Thanks!!Usually I can find some 'premade' whatever(s) to warp and fit into the image and accomplish the desired task. Not this time. I like doing this type of project so I decided to do whatever it took.
The first thing was to trim that big bush and re-fabricate the steps under it. Easy
So I ended up completely drawing the railing from scratch. The verticals were fairly simple, the rest not so much. That problem of course it modeling the railing with photographic-like nuances. <SIGH> Best I can do. Usually a new day brings to light all the ills of the previous work but on this one I'm way over my head.
And I'm not even sure I did the right type of railing or on the correct side.
Still...it was a fun challenge.
View attachment 125602
ex_teacher
Guru
- Messages
- 568
- Likes
- 1,177
Wonderful!! Those look really amazing! Thanks again
Love your work, @ex_teacher. That almost looks real. You said:
If you can, I would love to know how you did it. Specifically, how did you achieve the 3D effect on the railing?I ended up completely drawing the railing from scratch.
ex_teacher
Guru
- Messages
- 568
- Likes
- 1,177
I'm not so sure that my explanation will help. I tried a few options but, basically these were fundamentally drawn by hand in a version of the image that had been greatly enlarged. That is crude but effective way to produce something like this.
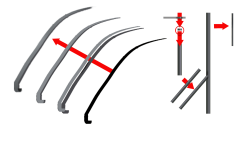
Basically this is a Lego set of custom made parts that I've massaged into the final product you see. I enlarged the image greatly and hand drew the top rail, trimmed it to shape and used some combination of warp and skew to achieve the desired shape. That top rail was transformed into a 3-D piece by recoloring it using 'lock transparent pixels; and offsetting the two tones to give thickness. I had to hand draw the J-hook at the end The last fuzzy one is the actual final railing top blurred to make it not stand out, The pseudo-tube stock was created by making a small modeled cross section and then dragging it out (transformed) into a longer piece as needed . Smaller sections were downsized and rotated as needed. Tubes that abutted tubes were appropriately rounded at the attachment point and a bit of shading added
Most of the subtle shading was lost in downsizing, feathering, and hand done highlight and shadows for final output and
Because of the curvature of the walkway, perspective is difficult, require a lot of fiddling and is overwhelmingly the weakest part of the process. Its all by eye.
I'm attaching a IKEA-like assemble sheet in PNG format. Hope this helps a bit but I know saying I hand drew it is little help
Bruce

Last edited:
@ex_teacher
Taking inspiration from your first post where you mentioned you hand-drew the railing, I thought of attempting to learn the hand drawing process.
Then, I had been meddling with layer styles to create a bevel effect that negotiates the curvature of the railing for 3D effect. But, I had been facing challenges. Your explanation above assists to some extent, but it made me appreciative of the amount of skill and hard work you put in to get that end product result. I discovered the purpose of "Lock Transparent Pixels" after reading your post.
Taking inspiration from your first post where you mentioned you hand-drew the railing, I thought of attempting to learn the hand drawing process.
After a lot of fiddling, I settled with the following perspective (far from satisfactory, but that had to do due to time constraints).Because of the curvature of the walkway, perspective is difficult, require a lot of fiddling and is overwhelmingly the weakest part of the process. Its all by eye.

Then, I had been meddling with layer styles to create a bevel effect that negotiates the curvature of the railing for 3D effect. But, I had been facing challenges. Your explanation above assists to some extent, but it made me appreciative of the amount of skill and hard work you put in to get that end product result. I discovered the purpose of "Lock Transparent Pixels" after reading your post.
Could I bother you for further explanation on this if you have time? I see the image explanation to the right where you showed the cross section - but how did you elongate that cross section into a flawless tube without blowing pixels or it looking fake?The pseudo-tube stock was created by making a small modeled cross section and then dragging it out (transformed) into a longer piece as needed
ex_teacher
Guru
- Messages
- 568
- Likes
- 1,177
That is accomplished in 4 steps@ex_teacher
Could I bother you for further explanation on this if you have time? I see the image explanation to the right where you showed the cross section - but how did you elongate that cross section into a flawless tube without blowing pixels or it looking fake?
1. I created an narrow middle gray rectangle and rasterized it
2. I did a combination of burn/dodge and paint vertical light and dark bands; fundamentally going from dark to light to dark where the light is off center (although it doesn't have to be)
3. select the appropriate rectangular section of the original 'gray' rectangle has that dark-light-dark transition.
4. And this last step is the easiest but... # 3 selection is copied to a new layer via CTRL+J . CTRL+T transform that by grabbing the central bottom handle and pulling down, You shouldn't restrain it in any manner, just pull down but unfortunately I believe different versions of PS have defaulted to varying keys. If you've done a sloppy job in step #2 you might have to grab a very small cross section of this result and re-create step 3. The trick is that this block should be a series of same or similar color stacked vertical pixels. Look at that area at 300% or 400%
Check out the PNG diagram I posted and look in the red circle. When that small block is center-handle pulled down when transforming it turns into a modeled cylinder/tube
Good Luck
Bruce
That is such a neat technique and you explained it very well. Thank you.That is accomplished in 4 steps

