Photoshop Gurus Forum
Welcome to Photoshop Gurus forum. Register a free account today to become a member! It's completely free. Once signed in, you'll enjoy an ad-free experience and be able to participate on this site by adding your own topics and posts, as well as connect with other members through your own private inbox!
You are using an out of date browser. It may not display this or other websites correctly.
You should upgrade or use an alternative browser.
You should upgrade or use an alternative browser.
Removing remnant border around selected objects
- Thread starter Grey24601
- Start date
- Messages
- 24,252
- Likes
- 13,737
Hello and welcome!
Original image
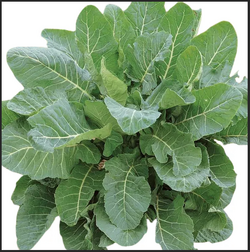
Selected and placed on black BG.
White remnant border is seen.
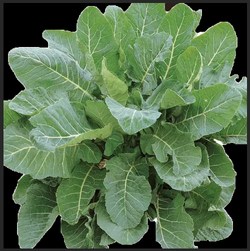
Used select and mask.
Still some white!
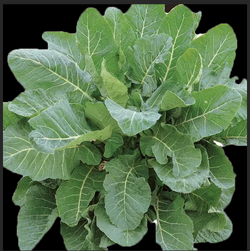
Used Brush Tool on layer mask to remove remaining white remnant.

Select and mask...........just like you have showing in your sample image. Shift your edge and decon colors on output. If you still have some white remnant left, use the Brush Tool on the layer mask to remove.I get a white halo around it. .................. Any ideas???
Original image

Selected and placed on black BG.
White remnant border is seen.

Used select and mask.
Still some white!

Used Brush Tool on layer mask to remove remaining white remnant.

- Messages
- 2,693
- Likes
- 3,129
In Select and Mask, you can try shifting the Radius under Edge Detection to bring in the selection and eliminate the white fringe.
I've also selected the mask and then used the smudge tool around the edge to bring the layer mask in towards the subject. Bit tedious on a somewhat complex image.
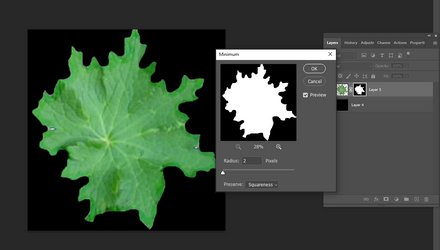
Another way is to select the mask, then go to Filter>Other>Minimum and try several pixel choices. Keep the setting for ssquaremess to preserve the tips of the image.
Here's my try with this:

Always many ways to get to a result. Here's another approach:
- Create a layer mask as best you can, but it will still have the problem of the white halo.
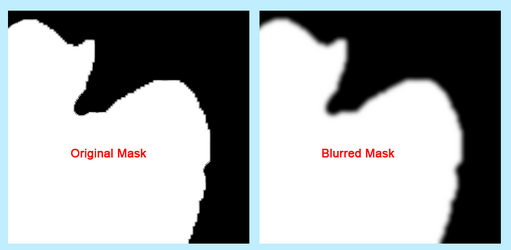
- Activate the layer mask itself and apply a Gaussian blur of one or two pixels. I used two pixels.
- Here's a side-by-side comparison of the upper-right corner of the original mask vs. the blurred mask.

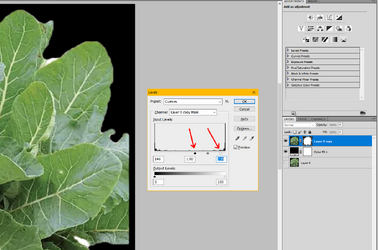
- With the layer mask active, open a Levels adjustment using Ctrl+L (or Cmd+L).
- Move the black slider pretty far to the right until the mask looks good. You can also experiment with moving the white slider slightly to the left. (See red arrows, below.)
- The Levels adjustment takes the blurry gray-tones of your mask and sharpens them by either darkening or lightening.
- Finally, use the brush tool to manually clean up the few large white halos that are too big for this technique.

Thank you very much for your help with this. I really appreciate it.Hello and welcome!
Select and mask...........just like you have showing in your sample image. Shift your edge and decon colors on output. If you still have some white remnant left, use the Brush Tool on the layer mask to remove.
Original image
View attachment 152487
Selected and placed on black BG.
White remnant border is seen.
View attachment 152488
Used select and mask.
Still some white!
View attachment 152489
Used Brush Tool on layer mask to remove remaining white remnant.
View attachment 152490
Thank you for your help. I tried contracting the selection but it still created a halo.In Select and Mask, you can try shifting the Radius under Edge Detection to bring in the selection and eliminate the white fringe.
I've also selected the mask and then used the smudge tool around the edge to bring the layer mask in towards the subject. Bit tedious on a somewhat complex image.
Another way is to select the mask, then go to Filter>Other>Minimum and try several pixel choices. Keep the setting for ssquaremess to preserve the tips of the image.
Here's my try with this:
View attachment 152491
HI Thank you for your help. I tried it and it made no difference.Always many ways to get to a result. Here's another approach:
- Create a layer mask as best you can, but it will still have the problem of the white halo.
- Activate the layer mask itself and apply a Gaussian blur of one or two pixels. I used two pixels.
- Here's a side-by-side comparison of the upper-right corner of the original mask vs. the blurred mask.
View attachment 152492
- With the layer mask active, open a Levels adjustment using Ctrl+L (or Cmd+L).
- Move the black slider pretty far to the right until the mask looks good. You can also experiment with moving the white slider slightly to the left. (See red arrows, below.)
- The Levels adjustment takes the blurry gray-tones of your mask and sharpens them by either darkening or lightening.
- Finally, use the brush tool to manually clean up the few large white halos that are too big for this technique.
View attachment 152493
Hi Thanks for your help. I have tried contracting the selection but that made no difference. I will try the the smudge tool but there are a lot of complicated edges.In Select and Mask, you can try shifting the Radius under Edge Detection to bring in the selection and eliminate the white fringe.
I've also selected the mask and then used the smudge tool around the edge to bring the layer mask in towards the subject. Bit tedious on a somewhat complex image.
Another way is to select the mask, then go to Filter>Other>Minimum and try several pixel choices. Keep the setting for ssquaremess to preserve the tips of the image.
Here's my try with this:
View attachment 152491
Thanks for this. How do I shift my decon edges?Hello and welcome!
Select and mask...........just like you have showing in your sample image. Shift your edge and decon colors on output. If you still have some white remnant left, use the Brush Tool on the layer mask to remove.
Original image
View attachment 152487
Selected and placed on black BG.
White remnant border is seen.
View attachment 152488
Used select and mask.
Still some white!
View attachment 152489
Used Brush Tool on layer mask to remove remaining white remnant.
View attachment 152490
Hi I got this farHello and welcome!
Select and mask...........just like you have showing in your sample image. Shift your edge and decon colors on output. If you still have some white remnant left, use the Brush Tool on the layer mask to remove.
Original image
View attachment 152487
Selected and placed on black BG.
White remnant border is seen.
View attachment 152488
Used select and mask.
Still some white!
View attachment 152489
Used Brush Tool on layer mask to remove remaining white remnant.
View attachment 152490
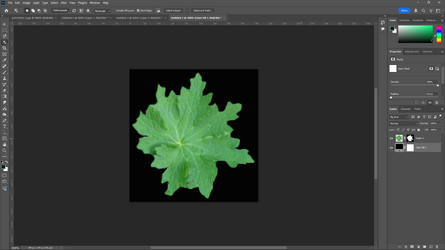
I can't select decontamination of colours. ?
- Messages
- 3,354
- Likes
- 3,092
A couple thingsI can't select decontamination of colours. ?
- you need to have the layer selected that has the mask you want to adjust
- a secondary factor that may not matter yet when you initially select the object, you don’t need to delete the background, just turn the selection into a mask. You effectively have both the mask and the layer transparency working at the same time. Sometimes that has some undesired side effects
Just some quick thoughts
John Wheeler
Thanks JohnA couple things
- you need to have the layer selected that has the mask you want to adjust
- a secondary factor that may not matter yet when you initially select the object, you don’t need to delete the background, just turn the selection into a mask. You effectively have both the mask and the layer transparency working at the same time. Sometimes that has some undesired side effects
Just some quick thoughts
John Wheeler
- Messages
- 3,354
- Likes
- 3,092

