What's new
Photoshop Gurus Forum

Welcome to Photoshop Gurus forum. Register a free account today to become a member! It's completely free. Once signed in, you'll enjoy an ad-free experience and be able to participate on this site by adding your own topics and posts, as well as connect with other members through your own private inbox!

Step-and-Repeat (Shft+Ctrl+Alt+T)


Rich54

Guru
Messages
1,974
Likes
3,830
I thought I'd start a new thread rather than add confusion to Alexandria's recent post. With the caveat that I am still using 15-year-old CS5, here are a few observations about rotating an object around a circular path.

Raster Layers
  • Raster layers are straightforward.
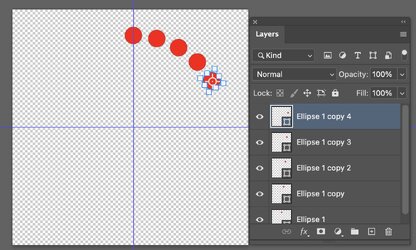
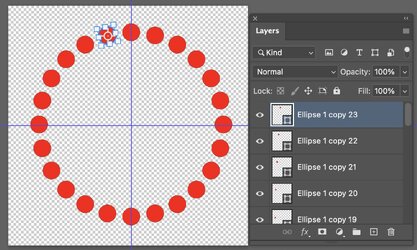
  • Select the object and go to Free Transform (Ctrl+T). Move the axis of rotation to the center of your circular path. Rotate the item by the desired amount.
  • By pressing Shft+Ctrl+Alt+T repeatedly, the rotation will repeat around the circular path and each subsequent copy will be on its own layer.
  • In CS5, this will work regardless of which tool happens to be active. Specifically, the Move tool being active—or not—makes no difference at all.

Vector Shape Layers
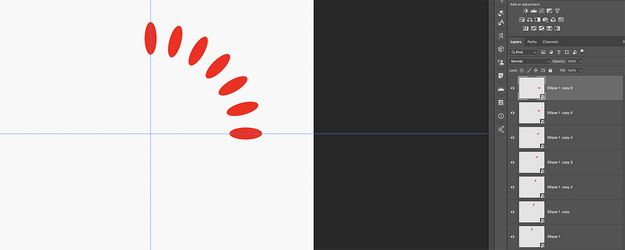
  • Following the steps above will accomplish the rotations, but they will all occur on one layer rather than numerous individual layers.
  • I discovered a slightly annoying, but very easy workaround, which successfully performs the rotations of vector shapes into separate, individual layers.
    • Create vector shape #1 on a new layer.
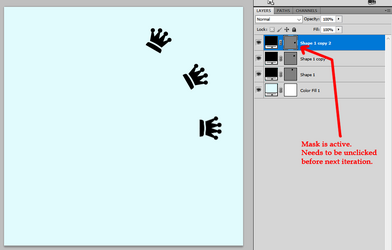
    • In CS5, when you create a vector shape, the vector layer mask is automatically selected and active. Before doing anything else, you must unclick the layer mask to de-select it.
    • Now go to Free Transform to perform your first rotation.
    • For rotation #2, press Shft+Ctrl+Alt+T only one time. It will duplicate and rotate the shape onto a new layer. But... that new layer, once again, will have its mask active. You must first unclick the mask before proceeding further.
    • Keep repeating Shft+Ctrl+Alt+T, but each time, you need to stop and unclick the layer mask before going further.

1761249704505.png
 
I addition to the great post above, if you are using Ps CS6 to Ps CC v20.0.8, the process is completely different for the vector shape layer, but is the same for the raster layers.


Raster Layers
  • Raster layers are straightforward.
  • Select the raster object and copy via Cmd/Cntrl + J. Select the copied objects layer, enter Free Transform via Cmd/Cntrl + T, move the axis of rotation to the center of your circular path by dragging (hold shift key to keep straight). Rotate the copied raster object by the desired amount by, click and dragging or entering the amount of degrees you desire in the "Rotate" window of the tools option bar.
  • By pressing Shift + Cmd/Ctrl + OptAlt + T repeatedly, the rotation will repeat around the circular path and each subsequent raster object copy will be on its own individual layer.
  • In CS6 and CC, this will work regardless of which tool happens to be active. Specifically, the Move tool being active—or not—makes no difference at all.

Vector Shape Layers
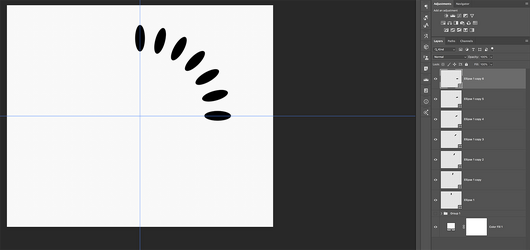
  • Select the vector shape and copy via Cmd/Cntrl + J. Make sure the Move Tool is selected, Select the copied vector shape layer, enter Free Transform via Cmd/Cntrl + T, move the axis of rotation to the center of your circular path by dragging (hold shift key to keep straight). Rotate the copied vector shape by the desired amount by, click and dragging or entering the amount of degrees you desire in the "Rotate" window of the tools option bar.
  • By pressing Shift + Cmd/Ctrl + OptAlt + T repeatedly, the rotation will repeat around the circular path and each subsequent vecter shape copy will be on its own individual layer.
  • In CS6 and CC v20.0.8, this will work as long as the Move Tool is active. If the Move Tool is NOT active, the vector shapes will be copied to one layer only.

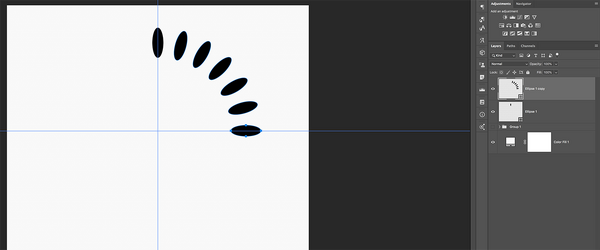
The following screen shots are of vector based shape layers.
With the Move Tool selected
Screen Shot 2025-10-23 at 4.41.59 PM.png

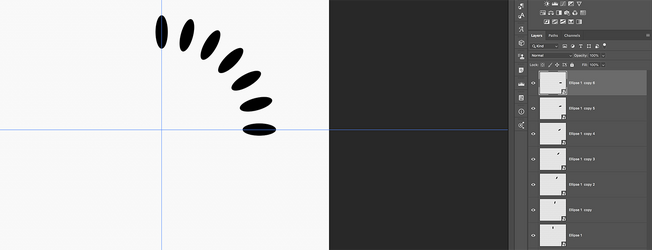
Without the Move Tool selected
Screen Shot 2025-10-23 at 4.42.35 PM.png
 
@IamSam, in the layers panel of your screenshot above, are these Smart Objects with a vector shape inside it? Or is this how newer versions of PS display vector shape layers?

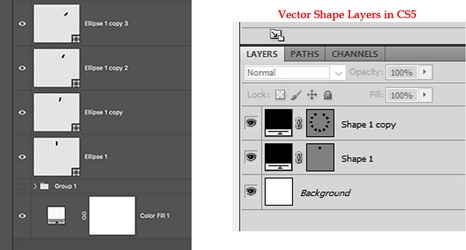
In CS5, a vector shape layer consists of a color picker linked to a vector mask. Inside the vector mask is the actual vector path (with its anchor points, etc.)


1761264229186.png
 
in the layers panel of your screenshot above, are these Smart Objects with a vector shape inside it? Or is this how newer versions of PS display vector shape layers?
These are not Smart Objects containing vector shapes. Yes, they are just standard shape layers and this is how the newer Ps versions display shapes.

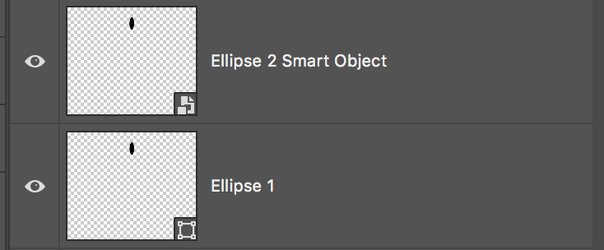
In the screenshot below, Ellipse 1 layer, is a shape layer with a shape layer icon on the lower right hand corner of the thumbnail.
Ellipse 2 Smart Object Layer, is a Smart Object layer (presently containing but not limited to a shape) with a Smart Object layer icon on the lower right hand corner of the thumbnail.

Screen Shot 2025-10-23 at 11.13.56 PM.png

I did try to Step and Repeat a Smart Object layer containing a shape!
It seems to work great and created new individual layers...............even without the Move Tool being selected! This may be another workaround! Interested to see if you can step and repeat Smart Objects in CS5!

These are Smart Object layers
Screen Shot 2025-10-23 at 11.23.11 PM.png

Here I have changed one of the SO layers (via double clicking and PSB) to the color red and updated. All the copied SO's updated as well.
Screen Shot 2025-10-23 at 11.26.53 PM.png
 
Interested to see if you can step and repeat Smart Objects in CS5

In CS5, once you convert to a Smart Object, then the step-and-repeat does not work at all. I tried with the Move tool active vs. inactive, and I tried both raster and vector shapes inside the smart object. No matter what, step-and-repeat does absolutely nothing on a smart object.
 
I have PS 26.5.0
The approach that @IamSam mentioned almost works but not quite yet does with one addition and that is right before using Shift+Cmd+T (Shift+CNTL+T on PCs) you duplicated the Layer with Cmd+J (Cntl+J on PCs)

It looks a bit different, so will show the visual steps as well for those with a newer version to know what to expect

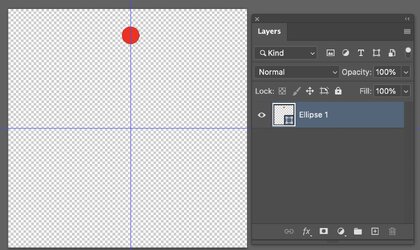
We start with a single Shape Object:

Screenshot 2025-10-24 at 3.18.56 PM.jpg

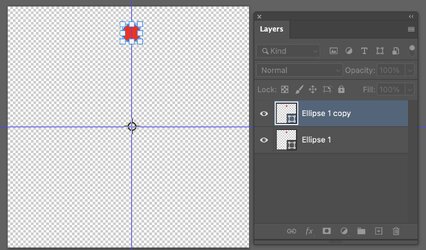
Duplicate to new Layer with CMD+J (Cntl+J on PCs). The duplicated shape shows up with all the control points. You start the Transform with Cmd+T (Cntl+T on PCs) and position the rotation point where desired (tidbit - If you hold the shift Key the rotation point can be made to lock the X or Y dimentions when you move it)

Screenshot 2025-10-24 at 3.19.32 PM.jpg

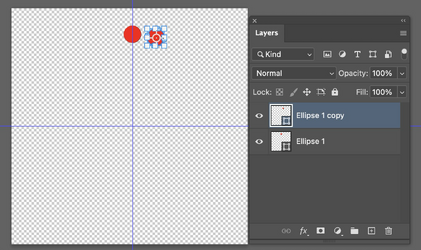
From there, I just changed the rotation parameter in the Options Bar to 15 degrees for accuracy and clicked the accept checkmark

1761342562004.png

From there it was a matter of using Cmd+J (Cntl+J on PCs), followed by Shift+Cmd+T (Shift+Cntl+T on PCs) which I did a few times to create new layers with the next step and repeat:

Screenshot 2025-10-24 at 3.20.53 PM.jpg

I continued that pair of keyboard shortcuts to complete the full circle:

Screenshot 2025-10-24 at 3.22.17 PM.jpg

To make this easier, one could create a keyboard shortcut that runs an action with those two shortcuts.
So I think we have all versions of Photoshop covered
John Wheeler
 

Back
Top