What's new
Photoshop Gurus Forum

Welcome to Photoshop Gurus forum. Register a free account today to become a member! It's completely free. Once signed in, you'll enjoy an ad-free experience and be able to participate on this site by adding your own topics and posts, as well as connect with other members through your own private inbox!

Does anyone know how to achieve this photo effect


arkadium

New Member
Messages
1
Likes
0
Hi!

Does anyone know how to achieve this photo effect and some online free tutorials to put this into practice? Or other similar photo style photographers?

What is the technique the photographer used to get this look and what steps do you think he followed?


1662420_10152322863587526_1320062801_n.png10426710_10152571906972526_2714313483430209016_n.png10253978_10152410511217526_1724807768361870254_n.png900x600xdonkeycolour900.png.pagespeed.ic.ni6PJApCQa.jpg

Thanks a lot!!!

Good luck!
 
This can be achieved without a filter.

Start with a photograph with plenty of space around the subject. Duplicate the image so you're not working on the original.

On the copy, play around with adjustment layers - curves, exposure, color balance, vibrance - to enhance the colors you want to bring out in the environment. Just look at the space around the subject and don't be afraid to experiment on this. With adjustment layers you can always change your mind! Use layer masks on the subject so you don't end up with oddly-colored people/animals/whatever your subject is.

Once you're happy with the way the colors look, create a Stamp Visible layer above it all and apply a fairly strong gaussian blur the copy so that you see mostly blobs of color. Apply a layer mask. Choose a black/white radial gradient and apply that to the layer mask, starting with black on the subject and working out. Experiment with this until you like what you see.

Make a new layer and fill with black. Apply a layer mask. Using that same black/white gradient, work from the center to mask the black everywhere except the corners.

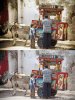
Using this method, I started out with a stock picture of a little girl in a meadow.

I included the finished picture along with my desktop so you can see what I did in just a few minutes. Your mileage may vary according to what you want to do with it. :)

Girl1.jpg

Girl2.jpg
 
They are all slightly different.There a vignette on each and color-contrast adjustment. It appears they used a hue-sat adjustment layer with a b/w gradient to get a sepia tone around the vignette. Probably a bit of blur too on a duplicate layer, again with a layer mask to restrict to the outer areas. Something like this:
 

Attachments

  • RosettaIceCream (26).jpg
    RosettaIceCream (26).jpg
    538 KB · Views: 0

Back
Top