What's new
Photoshop Gurus Forum

Welcome to Photoshop Gurus forum. Register a free account today to become a member! It's completely free. Once signed in, you'll enjoy an ad-free experience and be able to participate on this site by adding your own topics and posts, as well as connect with other members through your own private inbox!

Adding an image onto a block of flats.


Dayvid

Member
Messages
17
Likes
2
Hi,

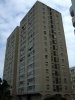
I have been searching around for a tut on how to add an image onto a tower block of flats. I tried to get the image on top of the block of flats and did good but then I had to select and cut all those windows in the block. The image looked immature. Is there a way to get the image on top of the block of flats to look more realistic withow having to cut windows one by one? Thus making it scruffy? (there are at least 50 windows to select and cut).

Thanks
 

tomross

Well-Known Member
Messages
85
Likes
49
Hey Dayvid,

Do you have the images you could post? That would be really helpful.

Typically, I say it's worth putting in the effort to cut out windows, put in the details etc... Perhaps it's the method of cutting out windows that is damaging the effect.

I've seen the effect done, but I'm not aware of a good tutorial on the subject.
 

Dayvid

Member
Messages
17
Likes
2
Hi tomross,

Say that I want to add a union flag to this image of a tower block. I can appreciate that the block image is not too good but my task is to add the union flag to it.
Thanks
 

Dayvid

Member
Messages
17
Likes
2
thankss
 

Attachments

  • 3919214372_9eb1ed70d1_z.jpg
    3919214372_9eb1ed70d1_z.jpg
    107.1 KB · Views: 41
  • download.jpg
    download.jpg
    11.7 KB · Views: 39
Last edited:

tomross

Well-Known Member
Messages
85
Likes
49
Ok, first of all, you'll definitely need a bigger size of photo. Preferably for both, as it's better to work at high-res, but at the very least the union jack needs to be as large as the side of the building.

Do you mind uploading your version so far, where you weren't happy with the result?
 

Dayvid

Member
Messages
17
Likes
2
Sorry but I discharged the image as I found it not to be of high standard. I can only find the image of this block on this resolution as it is a Google images search.
PS. I want to add the Union flag only to the right side of the block.
 
Last edited:

iDad

Guru
Messages
11,578
Likes
4,467
"Is there a way to get the image on top of the block of flats to look more realistic withow having to cut windows one by one?" The simle answer is no.
 

tomross

Well-Known Member
Messages
85
Likes
49
Is this the kind of effect you're trying to achieve?

Basic steps:

1. Use transform>distort to fit the union jack to the building
2. Change layer blend mode on union jack layer to 'multiply' reduce opacity to around 50%
3. Apply layer mask to union jack layer
4. Rather than selecting each window (which takes forever) just zoom in and use a black paintbrush to mask out the areas of flag overlapping windows (this is a rougher, but quicker method).

There's more that can be done to help the realism, but this should be a good start.

unionjack.jpg
 

tomross

Well-Known Member
Messages
85
Likes
49
Happy to help Dayvid :). PM me if you'd like the source file for reference purposes.
 

Tom Mann

Guru
Messages
7,223
Likes
4,343
Here's another way to select all the windows that takes even less time:

a) Make a series of nearly parallel selections of each column of windows. Include in each column the non-window space in each column. I would suggest doing this using the polygonal lasso tool. Save this selection. Call it, "columns" or something similar. This is a total of 5 selections.

b) Do the same for each row of windows. This is a total of 15 nearly horizontal rectangular selections. Call these selections, "rows" or something similar.

c) With the "rows" selection still loaded, go to select / "load selection", and change the mode to the last option which is the Boolean intersection of the two sets. Select the "columns" as the new selection to be intersected with the existing "rows" selection.

d) You now have a selection that consists only of the windows, ie, each place where a row selection intersects a column selection.

The total number of selections you have made is only 20, ie, 5 + 15. Compare this to making 75 (= 5 x 15) tiny selections or painting that number of little rectangles.


HTH,

Tom M
 
Last edited:

Trevor Dennis

Well-Known Member
Messages
153
Likes
99
Rather than cut out the windows, I'd be inclined to use an Image Map to apply the flag to the building. I'd have a go but it is coming up to 3:30am here.
 

IamSam

Administrator
Staff member
Administrator
Messages
22,752
Likes
13,268
Hi Dayvid,

I also had the idea of using a displacement map as mentioned by Trevor because I wanted to preserve the shading of the building as to add to realism. I did not have much success with the process.

I did use a variation of what has already been mentioned.

I first found a larger file version of the Union Jack, yours was way too small. I converted it to a Smart object and then used transform>distort (some warp) to fit it to the end of the building.
I lowered the opacity of the now transformed Union Jack (so I could see through it) and added a layer mask.
With the layer mask selected and I used Tom Mann's very useful tip in isolating the windows and, of course, filling the selection with black (option + delete).

I wanted the UJ to be at about 75% opacity. This is what it looked like.
UnionJackBuilding_01.png
Not very realistic.

So it would be visible on the UJ, I created a new layer(s) above the rest and used the Polygonal Lasso Tool to select areas of the buildings face that were darker. After I made the selection, I filled it with black and reduced it's opacity. I show these here on a white background so you can get the idea.
UnionJackBuilding_02.png

I also added a new layer with a gradient designed to mimic the gradient on the building. I outlined the end of the building with the Polygonal Lasso Tool and then used the Gradient Tool, set to foreground to transparent with black being the foreground color, to run a gradient within the selection. Command + D to deselect. Remember, these are going on top of the UJ layer. Again, this is on a white background layer that would not be there when you do it!
UnionJackBuilding_03.png

In the end (after removing the white demonstration layer) you get a fairly convincing composite.
UnionJackBuilding_04.png

It could use a lot more tweaking but you get the idea.
 
Last edited:

iDad

Guru
Messages
11,578
Likes
4,467
Each floor has a indented or raised area between,you seem to have overlooked it. The cement looks very smooth now, no texture?
 

ibclare

Queen Bee
Messages
11,034
Likes
4,638
The example from tomross has blend mode which shows the texture better. I can almost see it in Sam's and I think he wanted to keep the flag colors brighter. My suggestion might be to use each example, make it like tom's, then use the brightness of Sam's as a new layer on overlay or screen and lower the opacity. Without trying it - being lazy as you know I am :rolleyes: - I can't say how this might work but it is similar to other image solutions I have done.
 

IamSam

Administrator
Staff member
Administrator
Messages
22,752
Likes
13,268
iPop said:
Each floor has a indented or raised area between,you seem to have overlooked it. The cement looks very smooth now, no texture?

Yes Dad, I said it needed some more tweaking.

I wanted to keep the brightness of the flag as well. I'm certain there's a way to use a displacement map for this which would show more detail, I have not found it yet.
 

iDad

Guru
Messages
11,578
Likes
4,467
okay Son,:cheesygrin: you could use displacement you could use transparency levels also, which will be very tedious in some selections. The levels will need to be tweaked to satisfaction. There are so many ways, we could find ways until the cows come home and still not be finished:mrgreen:
 

Top