What's new
Photoshop Gurus Forum

Welcome to Photoshop Gurus forum. Register a free account today to become a member! It's completely free. Once signed in, you'll enjoy an ad-free experience and be able to participate on this site by adding your own topics and posts, as well as connect with other members through your own private inbox!

Adding Contrast, removing a shadow


jerseyboy

Well-Known Member
Messages
47
Likes
2
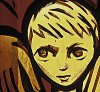
This is an old Kodak PCD image of a stained glass window converted to a TIF and a small portion made into a JPG for the purpose of this illustration. I would like to make 2 corrections:


1) I would like to accentuate the brush marks in the face. From my humble notions of PS I know that pulling the contrast slider across isn't really the answer but something like finding the fainter, darker pixels and accentuating them with some kind of mask is more the way to go.


2) There is an outdoor shadow that runs up the left hand side of the image which I would like to eliminate.


Any help or clues would be gratefully welcomed.
 

Attachments

  • IMG0014-cs.jpg
    IMG0014-cs.jpg
    67.2 KB · Views: 17
You could use a soft edge smudge brush in lighten mode, actually use the smudge tool at 100% percent strength work your way down but I think the hundred percent will be okay that will take care of it
 
Quick try,IMG0014-cs.png it will work
 
you could also play with layer modes, duplicate and put the top layer in screen mode, maybe that might lighten up a lot of it maybe too much I don't know
 
Ah! Maybe did not notice the rough pixels, so it's not one solid color Where I did it was. May need to repaint it at least over the dark area with the color you want on a separate layer
 
In the first part of your request, you are asking for what is called "local contrast" which, pun intended, is in contrast to "global contrast" (what you get when you simply use the contrast slider.

There are several ways to achieve this:

1. Perform unsharp masking on the image with a low percentage, but a radius in the range of 5 to 50 pixels, zero threshold.

2. Bring the image into ACR and bump up the "clarity" slider a bit PLUS add some sharpening radius = maximum, percentage = small. This is essentially identical to method #1, except done in ACR, not PS.2. Make a copy of the image on a new layer, run the copy through the high pass filter (radius 0.8 to 5 pixels) and then set the blend mode of the result to "overlay". Sometimes it's more convenient to do it in ACR because of your workflow, but the problem is that the radius can only go up to 3 pixels, and often that isn't enough.

3. My favorite method (gives me the most control) is to put a copy of the image on its own layer, run it through the high pass filter (radius from 0.5 pixels to 5 pixels), and then set the blending mode of that layer to "overlay".

I'll post an example of this method in a moment.


TomM

PS -The second part of your request requires a different technique and I'll let someone else address that as I have to run.
 
Last edited:
I don't think your gonna be able to change that with a simple slider there's too many colors it's not solid
 
Last edited:
You are asking for what is called "local contrast" which, pun intended, is in contrast to "global contrast" (what you get when you simply use the contrast slider.

There are several ways to achieve this:


3. My favorite method (gives me the most control) is to put a copy of the image on its own layer, run it through the high pass filter (radius from 0.5 pixels to 5 pixels), and then set the blending mode of that layer to "overlay".

I'll post an example of this method in a moment.

TomM

Many thanks. In waiting for your example I have been experimenting and yes your method 3 does a very good job of getting some detail back into the face.

Do you have an idea for treating that shadow on the left?
 
Here's an example of how one could accentuate the brush work and bring out the texture using the HPF (high pass filter) method. I used two passes, one with a radius around 5 or 6 px, the second pass with a radius of around 1.3 px.

If one wants more brush work and less texture, omit the 2nd, smaller radius pass, and crank up the larger radius work, eg, with a levels adjustment, doing it a 2nd time at the same radius, etc.. There will be a range of radii at which the halos will start to be obtrusive, but they can be dealt with, as well.

As I said, I'll leave it to someone else to show you how to brighten the LHS in a believable way.

HTH,

TomM
 

Attachments

  • IMG0014-cs-tjm01-acr0-ps01a_hpfx2-01.jpg
    IMG0014-cs-tjm01-acr0-ps01a_hpfx2-01.jpg
    243.7 KB · Views: 17
I tried Tom's idea I couldn't get it to do it but he knows more than I,
I tried it this:test.png
I am not going to finish it for you but this is probably the best route to take create a blank layer and paint over with the colors that should be in place by selecting the colors that are already in the image use a soft brush the area will determine the size of a brush to use
 
Here's an example of how one could accentuate the brush work and bring out the texture using the HPF (high pass filter) method. I used two passes, one with a radius around 5 or 6 px, the second pass with a radius of around 1.3 px.

...

As I said, I'll leave it to someone else to show you how to brighten the LHS in a believable way.

HTH,

TomM

Thanks for the great tutorial on HPF. I have learnt much in this past hour.
 
I tried Tom's idea I couldn't get it to do it but he knows more than I,
I tried it this:
I am not going to finish it for you but this is probably the best route to take create a blank layer and paint over with the colors that should be in place by selecting the colors that are already in the image use a soft brush the area will determine the size of a brush to use

Thanks for the idea, I will experiment a bit.
 
I tried to take the shadow out. I did not try to change the contrast.

I mainly painted it out with the Brush Tool.

IMG0015-cs.png
 

Back
Top