What's new
Photoshop Gurus Forum

Welcome to Photoshop Gurus forum. Register a free account today to become a member! It's completely free. Once signed in, you'll enjoy an ad-free experience and be able to participate on this site by adding your own topics and posts, as well as connect with other members through your own private inbox!

Applying brush/filters to selections for spot channels


marksaus

New Member
Messages
4
Likes
0
Hello all,

Quick summary: I am UV printing bottles, and the printer can selectively apply white ink as a base coat, then CMYK, then varnish, to achieve a 3D effect and selective varnish.

To tell the printer where to apply the white and varnish inks, I create whatever selection (usually shadows) and create a new spot channel on which the printer applies the special inks.

Trouble is that when you have a large region of selected area and spot channel, the end effect is pretty glossy, plastic, terrible.

Before I got my own printer, I ordered the bottles already printed, and comparing what my supplier used to send me and what I'm now achieving, it seems what they did to avoid this "large uniform shiny part" effect is to somehow modify the selection so that within the original "select range-shadows" selection, a random kind of splatter effect was applied. Then you had the 3D and gloss effect on seemingly random splotches of the dark areas instead of the whole dark areas, looking so much better...

So the question is: How on earth does one apply filters/brushes/whatever to transform any given selection into something random or artistic that looks like a paint splatter selection? I know how to apply brushes or filters to transform an illustration, but what I need to do is apply them to a selection and from that selection create a spot channel for the printer, without modifying the actual illustration.

Thanks in advance for any assistance!

Marcos
 
Hi @marksaus
It would help to have a picture of what you desire and also more detail on any requirements, such as the size of the spatter.
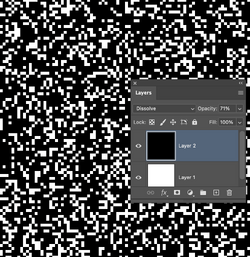
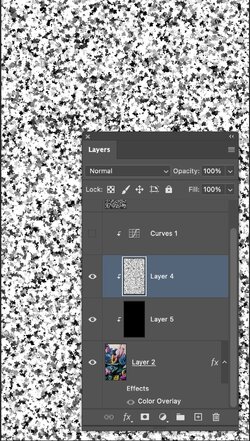
If all you need is a random pattern selection, you can create two Layers, one white and one black, set the upper Layer Blend mode to dissolve, and turn down the opacity to get the desired density.

From there, you can select the black or white pixels with a magic wand and a random pattern to match any desired density with the opacity slider.

The picture below shows how to do that with the pixel pattern with the Layer Panel overlay.

I hope this gives you an approach to consider, but I'm not sure it will meet your needs without more details from your end.
John Wheeler.

Screenshot 2024-11-05 at 5.04.31 PM.png
 
Thank you very much for the reply John. I have attached two photos.

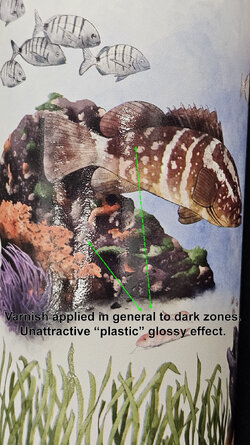
I printed the one with the big grouper fish myself, by selecting the shadows, then creating a spot colour channel from that selection and telling the printer to add the varnish there. It's hard to appreciate in the photo, but the overall result is a very large area of uniform glossy varnish and it looks pretty terrible!

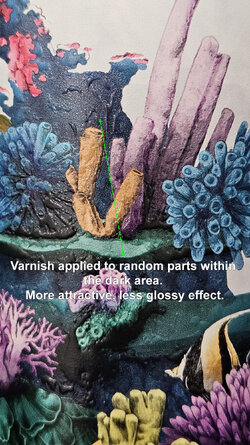
The other photo with the coral reef came from my supplier. It seems they selected the shadows too, but then inside that selection somehow applied this random splatter effect so that there are "droplets" of varnish within the dark area, not just a large expanse of varnish. The splatter seems random, is fairly rounded and kind of looks like the droplets of water that would stay on the bottle if you sprayed it with a hose. I am totally stuck in how to create this splatter effect. And to make it more challenging, I need to apply this splatter only to the darker parts of the image.

Any assistance or suggestions are greatly appreciated :)

Marcos

NicerVarnish01.jpg

GlossyVarnish01.jpg
 
Hi @marksaus
I had to think about a way to do this, and I can describe one way to approach the problem.
I will break it down into two parts
1) Creating a random pattern of splotches
2) How can this pattern be applied against your image to create a B&W pattern that varies by the image's luminosity and can be used for your spot channel?

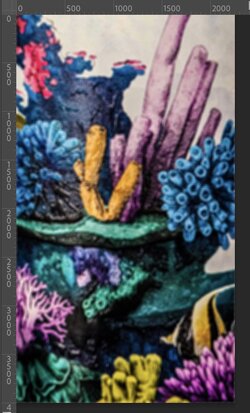
The image I am using in this description is just a variation of what you posted, and you can see the pixel size from the pixel ruler included:

Screenshot 2024-11-07 at 7.18.55 PM.jpg

1)
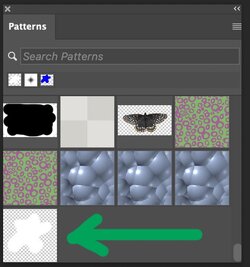
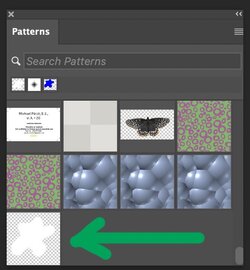
In this approach, you can create a pattern based on a splotch design that fits your needs, whether basic circles or a more complex shape. A single splotch element is created and saved as a PS Pattern. The pattern size should be created to be small compared to the elements in your image (of course)

Here is the splotch pattern I created (I just made a shape from the shape tool and then rasterized it. I made the foreground of the shape white, yet I believe any gray tone would also work. The background is transparent.

Screenshot 2024-11-07 at 7.37.10 PM.jpg

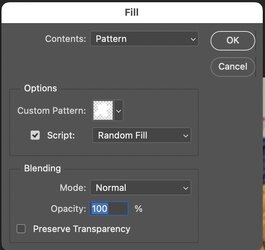
I then created a black Layer above the test image and used the Edit > Fill command to populate the Layer with this pattern randomly with a constant size yet with random rotation and high variation in the tone. Here are the settings that were used (note the setting for "script" set to Random Fill

Screenshot 2024-11-07 at 7.27.06 PM.jpg

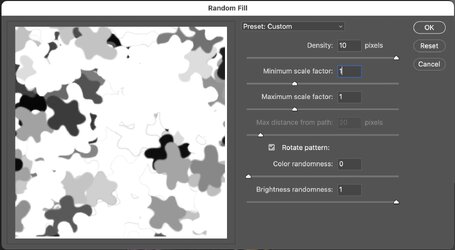
Here is the pop-up that comes next, and you can play with the sliders to get a pattern you want to use (it takes experimentation)

Screenshot 2024-11-07 at 7.28.48 PM.jpg

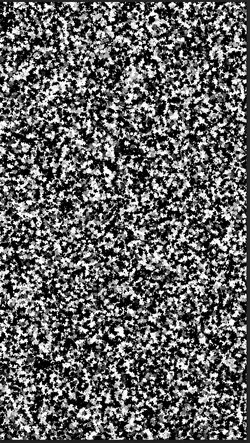
Here is the overall pattern when the fill is complete:

Screenshot 2024-11-07 at 7.34.20 PM.jpg

I merged the pattern with the black Layer, so there was no transparency.

Part 2)

Here is the needed Layer Stack. Note initially, the top two Layers are turned off.
The top Layer is the Pattern
The Layer Below is a Curve Adjustment Layer
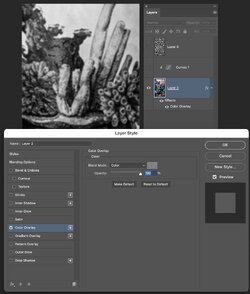
The bottom Layer is the test image that I am turning to B&W using a Layer Style with a Color Overlay blend set to color, and the color chip can be any gray tone from black to white:

Screenshot 2024-11-07 at 7.39.47 PM.jpg

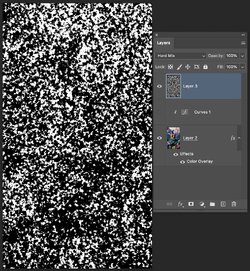
Now turn on the visibility of top Layer and set the Blend to Hard Mix. You can start to see the Luminosity-controlled pattern start to appear:

Screenshot 2024-11-07 at 7.43.54 PM.jpg

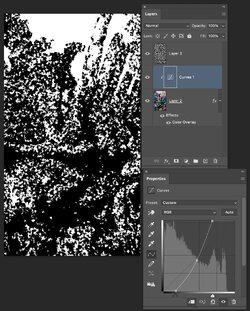
Now, all you need to do to adjust the desired spot density is adjust the curves adjustment layer. I show you one setting I used in the image below:

Screenshot 2024-11-07 at 7.45.57 PM.jpg

I used black to represent the areas where you did not want much varnish and white where you wanted the maximum varnish.

It requires some experimentation, yet I hope this approach gives you something to consider
John Wheeler

Screenshot 2024-11-07 at 7.17.17 PM.jpg

Screenshot 2024-11-07 at 7.32.15 PM.jpg
 
Thanks for the detailed explanation John. It will take me a while to digest and attempt this, but I now have a way forward! I'll let you know how I got on, cheers!
 
Hello again John. I was able to experiment and definitely get some nice results with your method, thanks so much! As they say there is more than one way to skin a cat, definitely in Photoshop, so I also came by another tutorial to create "water droplets" on an image that I was able to understand better since you onlocked for me the idea of creating another layer to play around with.

It uses a lot of the same methods you describe, by filling a new layer with a clouds pattern, then adding a sketch-plaster filter varying settings until it looks more or less acceptable. Then I can select the white or black pixels on that layer, save as a selection, get rid of the layer and load the selection on my image. Then I can subtract that selection from my selection of shadows, to only have the pattern on the dark areas.

Your method is way more refined, customisable and I can see I will get a better result, so I will play around more. But the urgency and anxiety of not knowing where to start has definitely subsided, I now have a result that can certainly be improved but is acceptable. I am extremely grateful for your assistance, it's so good to see that there are still people willing to share their knowledge and even put the time you did into experimenting to help strangers. :-)
You are more than welcome @marksaus
It's great that you moved ahead to the point where you can try some things out on your own and reduce the anxiety. There are a lot of great people on this forum with all sorts of skills, so feel free to come back for help when you need it.
John Wheeler
 

Back
Top