What's new
Photoshop Gurus Forum

Welcome to Photoshop Gurus forum. Register a free account today to become a member! It's completely free. Once signed in, you'll enjoy an ad-free experience and be able to participate on this site by adding your own topics and posts, as well as connect with other members through your own private inbox!

bending objects


JallaBalla [EO]

Well-Known Member
Messages
55
Likes
0
ok....

I have a stright gunbarrel I wanna bend like a "L" - how can PS 8 help me with this?

barel.jpg
(illustration)
 
I don't know how far you want to bend the barrel
I put the barrel on a separate layer
Rotated the image 90 CW
Applied Shear(repeat edge pixels)
Rotated back 90 CCW
then clean up with the Liquify tool
I hope this leads to the answer or give you an idea to experiment with ;)
 
great thx.
I still have a question. :)
Did you delete the barrel from the original layer?
 
No, I didn't delete it, I just painted over it with the BG color.
And I also used transform to help point the barrel downward and to line it up with the stock.
BTW I didn't put the entire barrel on a new layer just the part forward of the stock.
 
I also figured it was the shear - but couldn't quite figure out how to get the shearing perpendicular to the barrel (from the filter itself). But I never figured to just turn the image instead! ;\ If you can't take the filter to the image, take the image to the filter - or something like that. Thanks Nitrobutler.

I would further suggest to actually copy the front of the barrel to a new layer as well, just to merge it (with some rotation) to the bended barrel end - except if you want the "melted" look. You also might want to distort this tip to compensate for the change in perspective. My bit.
 
If a place a bunny under the canon (LOL!) and want to aim for his head.... is it easy to move just part of the barrel ? Bending the barrel is easy, but i I wanna locate the end of the barrel somewhere specific I can't do it :D
 
What I did here was placed the tip of the cannon on another layer.
Then I created an "L" shape using the Pen Tool, filled it with black.
then I used the Fade command with the Brush Tool to draw in the blue HiLite on the barrel.
Then I re-place the cannon tip.
Added the poor bunny and Viola!!
 
Better not let any pro-bunny activists see this (would Hugh Hefner count?).
 
thx again ! :perfect:
 
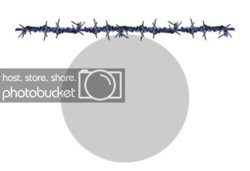
wire.jpg

:( :( :( :( :( :(

Here's my problem. I want to bend this wire around the circle without distorting it.

I have tried polar co-ordinates and shearing, but both distort the wire.

PLEASE HELP ME.
 
select half of the wire using rect marq. edit--transform--rotate then move rotation point to the end of the selection (about the middle of the wire) and then rotate a few degrees. keep repeating this proceedure moving the selection box along the wire.
 
Thanks man. I've done it now, a bit of extra work. I just thought there was a much easier way.

Here's where its at, at the moment.
I'll follow up with the complete poster sometime nextweek.
logo.jpg
 
Lee said:
That looks great, pablo. :perfect:

Thanks Lee. Well this design will not last long as my boss does not like the tiger text, and he feels the barbed wire is too negative for our market. So back to the drawing board. [confused]
 
There probably is a better way,there usually is in PS.glad to be of help.
I think it looks great.
 
hi, i have a problem pretty similar to pablos.

i want to bend a row of small lines to a circle, i need that for an volume controller i created.
with polar coords, spherize or even with fperry's method it wont look as it should, and rotating every single line in its right angle would be very time consuming.

isnt there another way to bend or wrap something to a circle ?

dont have a host so i uploaded the psd file. maybe someone could have a look at it, cause i cant explain it any better [honesty]

sorry for the bad english.
 
yes thats what i mean, how have you created that ? the lines are very accurate, when i use filters it looks somewhat distorted.
 
I'm not good at tutorials, but here goes nothing :\
1- Open new Doc. 500x500 px
2- We need to mark the center so, CTRL+R (ruler), then drag guide lines to mark the center(see sample).
3- Create new layer
4- Chose Rectangle shape Tool (U).
5- Press D to get default foreground color.
6- Create long rectangle at the top center of this Doc.
7- (Control + T) Transform Tool, then drag the "center mark"down to where the two guide lines meet in the center of the document.
8- Now get your calculator out! Decide how many lines you want to create, In my sample I decided on 12.
A circle has 360 degrees so I divided 360 by 12 and got 30 degrees, enter this number in the Rotate Box (see sample), then click the check mark.
9- Hold CTRL+SHIFT+ALT and press T 11 times.
10- In the layers palette link all 11 new layers together, then merge them (CTRL-E).
11- If needed, copy merged layer then transform (CTRL+T)hold Shift and spin layer to have 24 lines.
P.S. I had a devil of a time trying to move just the center marker on STEP 7, I had to start over and use a bigger document in order to move the center marker and not the whole object.
 

Back
Top