What's new
Photoshop Gurus Forum

Welcome to Photoshop Gurus forum. Register a free account today to become a member! It's completely free. Once signed in, you'll enjoy an ad-free experience and be able to participate on this site by adding your own topics and posts, as well as connect with other members through your own private inbox!

Centering 2 circles on a rectangle


Mike

Member
Messages
15
Likes
4
Hi
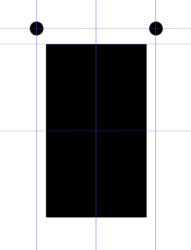
Just started using Photoshop to do some new project work but don't know how to get these two circles positioned on the rectangle.

The rectangle is 101.6mm long and 58.8mm wide. Both circles are 8mm in diameter and are 9.11mm from the top of the rectangle and 5.47mm from both the right and left edges.

I expect there's a really simple method of doing this but for me its a bit of a blur.

I'd be grateful for any help hear.
 
Learn how to use guides.

Set your guides to mm.

Set up center guides.

Set your ruler point of origin.

You know that the height of your rectangle is 101.6mm. Divided by 2 = 50.8mm
50.8 mm + 9.11 = 59.91. Set your next horizontal guide a7 -59.91.

Now do the same for the side guides.
The width of the rectangle is 58.8mm divided by 2 = 29.4
29.4 + 5.47 = 34.87
You now have two vertical guides to create, one at -34.87 and the other at 34.87

With the Move Tool, drag your ellipses to snap to the center of the guides intersections.

Screen Shot 2018-03-17 at 10.53.43 PM.png
 
This is in addition to IamSam's explanation and an alternative, it's just a different way of using the measurements.

If your rectangle is a layer that's smaller then the document background, firstly align the rectangle to the top left of the document.
Do this by selecting the MOVE tool, select both rectangle layer and background layer, then on the top menu, click the left align symbol then the top align symbol.
Alignment.jpg
1. On the top menu click VIEW > NEW GUIDE... and enter (Vertical: 9.47mm) and click OK. (This is the distance from the left for the circle placement plus half the diameter of the circle).
2. Repeat the VIEW > NEW GUIDE... and enter (Vertical: 49.33mm) and click OK. (this is the total width of the rectangle less 9.47mm as used in the first guide).
3. To set the horizontal guide, click VIEW > NEW GUIDE... and enter (Horizontal: 13.11mm) and click OK. (This is the distance from the top for the circle placement (9.11mm) plus half the diameter of the circle (4mm).

Once the guides are set, check that the VIEW > SNAP TO is set to GUIDES then create the circles and drag them to "Snap" to the central positions of the guides. You can then LINK the rectangle and circles and move them to anywhere in your document.

Just a final thing to do: Zoom your image to 100% and you may need to nudge the circles so they're right on the centre guides.

I have written an action for you "Guides for Mike" which will set the guides for the dimensions you supplied.
 

Attachments

  • Guides for Mike.atn
    458 bytes · Views: 0

Back
Top