Photoshop Gurus Forum
Welcome to Photoshop Gurus forum. Register a free account today to become a member! It's completely free. Once signed in, you'll enjoy an ad-free experience and be able to participate on this site by adding your own topics and posts, as well as connect with other members through your own private inbox!
You are using an out of date browser. It may not display this or other websites correctly.
You should upgrade or use an alternative browser.
You should upgrade or use an alternative browser.
Change colours of floral
- Thread starter oodya
- Start date
- Messages
- 22,898
- Likes
- 13,303
Hey!
Make a selection of all the flowers either in groups or one by one.
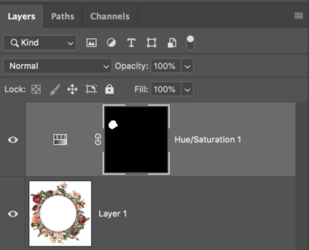
Use either a solid color adjustment layers or a Colorize Hue & Sat adjustment layers with an added layer mask.
It will take as many of these adjustment layers as is required to colorize all of the flowers.
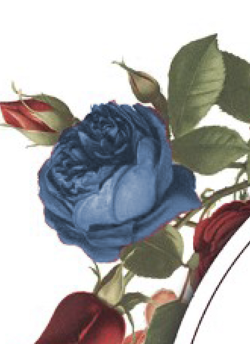
Selection (In this case of a single rose)
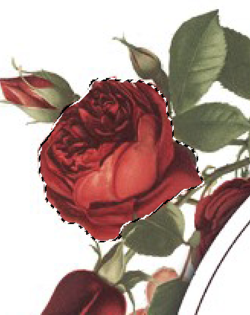
Colorized with Hue & Sat adjustment layer
Make a selection of all the flowers either in groups or one by one.
Use either a solid color adjustment layers or a Colorize Hue & Sat adjustment layers with an added layer mask.
It will take as many of these adjustment layers as is required to colorize all of the flowers.
Selection (In this case of a single rose)

Colorized with Hue & Sat adjustment layer


thebestcpu
Guru
- Messages
- 2,997
- Likes
- 2,766
Hi @oodya
As always there are many approaches possible in Photoshop. Here is another.
The example below does not use Layer Mask yet certainly could for fine tuning.
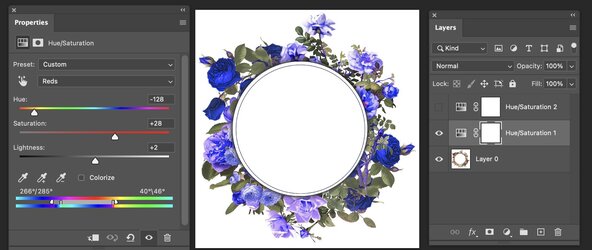
I just added a couple Hue Sat Layers to shift specific bands of color.
First was to shift the main reds and yellow closer to blue:
The second Hue/Sat Layer was to adust the remaining pink areas:
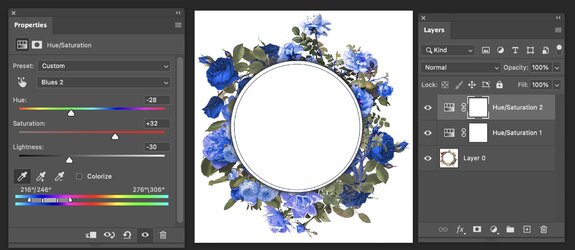
These are just example results as you may want different colors/saturation/luminosity than above.
Just an idea on approach to consider
Hope this helps
John Wheeler
As always there are many approaches possible in Photoshop. Here is another.
The example below does not use Layer Mask yet certainly could for fine tuning.
I just added a couple Hue Sat Layers to shift specific bands of color.
First was to shift the main reds and yellow closer to blue:

The second Hue/Sat Layer was to adust the remaining pink areas:

These are just example results as you may want different colors/saturation/luminosity than above.
Just an idea on approach to consider
Hope this helps
John Wheeler
- Messages
- 22,898
- Likes
- 13,303
I'm actually more of a fan of the technique that John has done above in using the H&S custom color targeting.
I thought of suggesting it myself but I wasn't sure of the accuracy level you wanted. Individual masking ensures specific colorization................but it can be a bit more time consuming.
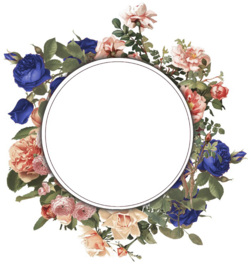
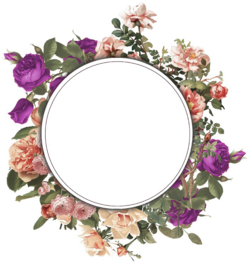
I thought of suggesting it myself but I wasn't sure of the accuracy level you wanted. Individual masking ensures specific colorization................but it can be a bit more time consuming.


Thank you all. So the first part (changing the 'Reds' to Blue seems to work fine. However, when I attempt to do the same for the remaining Pink areas, it looks to get a bit funny. I do the Hue Saturation1 without any issues. Click on Hue Saturation again, which becomes 2. Then I go to the hand with the two arrows and select the 'Pink' area. When I then amend the Hue / Saturation, I get the weird attached result. What am I doing wrong?
Thank you!
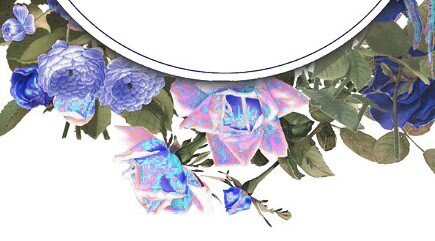
Thank you!

thebestcpu
Guru
- Messages
- 2,997
- Likes
- 2,766
Hi @ooday
It would help if you provided screen shots of your Layer stack and all settings of the Hue Saturation Adjustment Layers (I used two separate Layers).
Better yet, if you saved the PSD file and shared it through a file sharing service it would be pretty easily determined what is going on.
I cannot tell from your description if you used two Layers or implemented two separate settings in a single Hue/Sat Layer.
just a suggestion as a PSD or screen shots of all settings tell a better story than just word descriptions.
John Wheeler
Thank you for your message. The PSD file can be found here:
 www.transfernow.net
floral 4.psd is available for download
Click to access the floral 4.psd (1.38 MB) download with TransferNow
thebestcpu
Guru
- Messages
- 2,997
- Likes
- 2,766
Hi @oodya
I think you are very close in your solution.
Here is the settings of the magenta adjustments in the Hue/Sat Layer that you set up next to the image that is still not changed to blue:
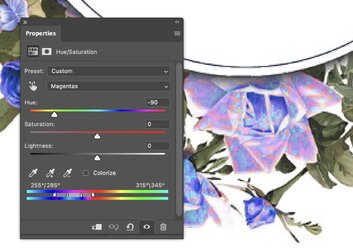
Here is a slight adjustment moving the sliders by hand to capture more of the reds to shift towards the blue:
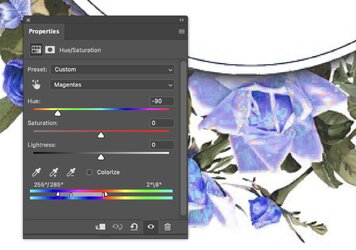
So I think all you need to do is experiment with both the slider positions of what colors to capture and also tic he slider of who much Hue shift you want.
On a slightly different topic. I wanted to point out that shifting colors in JPEG files is problematic due to the lossy compression of that format. The compression occurs mostly in the color components (not the luminosity component) so when you shit the colors around the JPEG compression artifacts start to raise their ugly head. You can see a bit of the in your images which is the "blocking" you see. Best to start with an original image that has not gone through lossy compression. An alternative if you have a more recent copy of PS is to use the Neural Filter and use the JPEG Artifacts Removal option. That is not as good as a better original image yet it does help some. The image below shows a fully saturated Hue map of your JPEG image on the right side and on the left side is the original image. As you can see there is a good amount of blocking due to the compression when I zoom in on the area you are trying to address with the second Hus Hue/Sat Layer. The lossy compression does limit how well the final image will be.
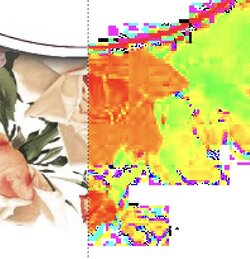
Hope this is helpful
John Wheeler
I think you are very close in your solution.
Here is the settings of the magenta adjustments in the Hue/Sat Layer that you set up next to the image that is still not changed to blue:

Here is a slight adjustment moving the sliders by hand to capture more of the reds to shift towards the blue:

So I think all you need to do is experiment with both the slider positions of what colors to capture and also tic he slider of who much Hue shift you want.
On a slightly different topic. I wanted to point out that shifting colors in JPEG files is problematic due to the lossy compression of that format. The compression occurs mostly in the color components (not the luminosity component) so when you shit the colors around the JPEG compression artifacts start to raise their ugly head. You can see a bit of the in your images which is the "blocking" you see. Best to start with an original image that has not gone through lossy compression. An alternative if you have a more recent copy of PS is to use the Neural Filter and use the JPEG Artifacts Removal option. That is not as good as a better original image yet it does help some. The image below shows a fully saturated Hue map of your JPEG image on the right side and on the left side is the original image. As you can see there is a good amount of blocking due to the compression when I zoom in on the area you are trying to address with the second Hus Hue/Sat Layer. The lossy compression does limit how well the final image will be.

Hope this is helpful
John Wheeler
Sorry to be a pain, but I have gone back to the original PNG file and still am struggling with some of the floral, particularly with the bottom one - I just can't seem to get the colors right, without it still having that weird effect (as per my above screenshot).
thebestcpu
Guru
- Messages
- 2,997
- Likes
- 2,766
Hard to know exactly the problem since your starting image is now a PNG. I suggest you post the PSD file where you started with the PNG file so it can be examined by forum members.Sorry to be a pain, but I have gone back to the original PNG file and still am struggling with some of the floral, particularly with the bottom one - I just can't seem to get the colors right, without it still having that weird effect (as per my above screenshot).
Note that the exact setting for the Hue/Sat Layers also depends on the color space you are using.
I did notice that your original PSD file did not have an embedded color space in the image. In that case, which color space is used depends on your settings in Edit > Color Settings
That may not be your problem at all yet thought it was worth mentioning. When you save your PSD make sure you include the color space you are using in the Save As process:

Including the new PSD in another post will make it much easier for forum members to give you help.
John Wheeler
Thank you for your message. The PSD file can be found here:
 www.transfernow.net
floral border.psd is available for download
Click to access the floral border.psd (2.55 MB) download with TransferNow
thebestcpu
Guru
- Messages
- 2,997
- Likes
- 2,766
Hi @oodya
Here are my observations. There are three issues with the last one being the one that most likely the most important.
1) I compared the first images you sent with the last images you sent. The base image in all are all the same so I see it appears that they are the same JPEG image and not an origianl PNG image with no lossy compression. I don't think this is the primary issue by any means yet it will limit the quality of the final image
2) The flowers have partial transparency in them. To demonstrate this the image below has a dark blue background under the primary image in the lower left corner of the image. The dark blue comes through in many flower areas that I would not normally expect. The colors for those areas of transparency will depend on the background color that is being used and may impact the overall result. There are ways to remove the transparency if that is desired yet not a must
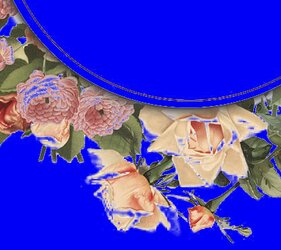
3) I think the root cause issue is a need for more experience with selecting the color ranges to use when creating a color shift. When creating and deciding on the range of colors to change, there are four markers that can be adjusted all lined up in a row. The inner two define the range of colors that will be shifted 100% of the setting in the three overall settings in the H S L settings. The outer two markers define a tail off area of colors where the amount of shift is linearly reduced down to 0. The colors ouside the limts of these two outside markers will remain the same as the starting image. I suggest you look up tutorials that make these custom adjustments to get more familiar with them.
Here is a crop of the origimal image without any adjustments:
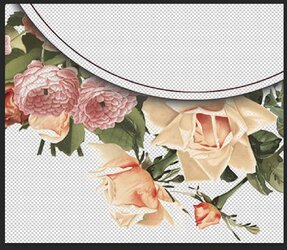
As an exmple, the yellow flower on the bottom as a color range from 0 degrees in Hue to 40 degress in Hue. to XXX degrees in color with this resulting image:
Following is how the image looks just with your first Hue Adjustment Layer including the Hue/Sat settings:
If you just move the right middle slider to the right to incoporate up to 40 degrees, the colors in question now shift closer to what you want. So it appears to me the major root cause is including a wide enough color selection when adjusting the Hue of the image. When that change is made, Here is the resulting image:
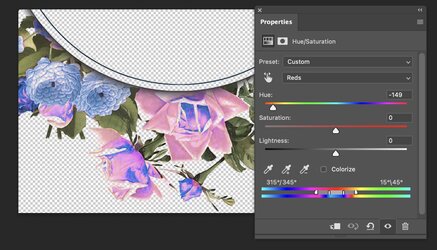
Note that the range of colors to be included in the shift of the 4 markers are 315 / 345 15/45. The range with full shift of color is from 345 to 15. yet the yellow of the flower when sampled were up in the 40 range.
If all I do is shift the right middle marker over to 40 here is the resulting result:
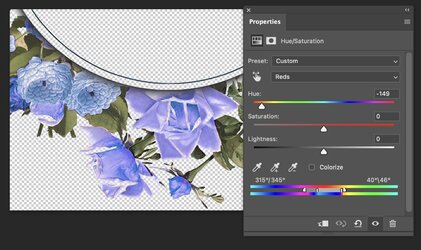
This is even without adding a second Hue/Adjustment Layer..
Is this enough detail to show you how to proceed and do you see how you were not capturing a wide enough color range to shift.
Hope this helps
John Wheeler
Here are my observations. There are three issues with the last one being the one that most likely the most important.
1) I compared the first images you sent with the last images you sent. The base image in all are all the same so I see it appears that they are the same JPEG image and not an origianl PNG image with no lossy compression. I don't think this is the primary issue by any means yet it will limit the quality of the final image
2) The flowers have partial transparency in them. To demonstrate this the image below has a dark blue background under the primary image in the lower left corner of the image. The dark blue comes through in many flower areas that I would not normally expect. The colors for those areas of transparency will depend on the background color that is being used and may impact the overall result. There are ways to remove the transparency if that is desired yet not a must

3) I think the root cause issue is a need for more experience with selecting the color ranges to use when creating a color shift. When creating and deciding on the range of colors to change, there are four markers that can be adjusted all lined up in a row. The inner two define the range of colors that will be shifted 100% of the setting in the three overall settings in the H S L settings. The outer two markers define a tail off area of colors where the amount of shift is linearly reduced down to 0. The colors ouside the limts of these two outside markers will remain the same as the starting image. I suggest you look up tutorials that make these custom adjustments to get more familiar with them.
Here is a crop of the origimal image without any adjustments:

As an exmple, the yellow flower on the bottom as a color range from 0 degrees in Hue to 40 degress in Hue. to XXX degrees in color with this resulting image:
Following is how the image looks just with your first Hue Adjustment Layer including the Hue/Sat settings:
If you just move the right middle slider to the right to incoporate up to 40 degrees, the colors in question now shift closer to what you want. So it appears to me the major root cause is including a wide enough color selection when adjusting the Hue of the image. When that change is made, Here is the resulting image:

Note that the range of colors to be included in the shift of the 4 markers are 315 / 345 15/45. The range with full shift of color is from 345 to 15. yet the yellow of the flower when sampled were up in the 40 range.
If all I do is shift the right middle marker over to 40 here is the resulting result:

This is even without adding a second Hue/Adjustment Layer..
Is this enough detail to show you how to proceed and do you see how you were not capturing a wide enough color range to shift.
Hope this helps
John Wheeler

