- Messages
- 3,344
- Likes
- 3,081
@Cox posted a free request on this topic and requested a tutorial as well. I documented the steps I took to create the raster to vector conversion.
The first step was get have a starting image that is 1500 pixel long edge minimum. Cox's image was quite small so I used a 4x enlargement through Topaz Gigapixel yet just using the standard command File > Image Size should work just fine (e.g. a 400% increase with the resampling checked and auto select on rendering algorithm. So here was the starting image after enlargement:

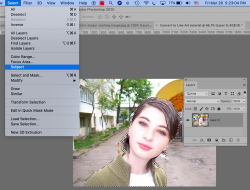
As the background was of no interest for the final product, I created a selection with Select > Subject One can optionally tune this in with other selection tools:
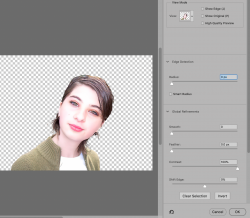
At the bottom of the Layer Panel I used the Add Layer Mask icon to move the selection over to the Layer Mask and making the surrounding area transparent. I then right clicked on the Layer Mask Thumbnail in the Layer Panel and used the Select and Mask tool/panel to tune in the selection as desired.
NOTE: Since when finally converting to vectors we want to visuallize the "edges" it is important (ok helpful) if you turn on the Contrast Slider to the far right. Also note that this is where you can bring out more detail in the hair yet in this particular application, having a lot of fine detail is difficult to cut in vinyl yet make work well for other types of vector line art
Now right click on the Layer in the Layer Panel and Convert to a Smart Object (this allows going back later to fine tune adjustments without redoing everything). Then add the Smart Filters
- Adobe Camera Raw (default settings)
- Noise > Dust and Scratches (minimum setting)
- Blur > Gaussian Blur (minimum setting)
Key Note: Before adding the next filter, make sure the Foreground and Background color chips are set to default by pressing the keyboard shortcut "D". Many of the sketch filters are very sensitive to the foreground and background values when initiated.
- Filter Gallery > Sketch > Photocopy
Now after all that - turn off the eye icon in the Layer Panel for the lower three filters only leaving the Photocopy Filter on
We will go back to the other filters later for tuning.
We now have the starting of a pretty good line drawing (one type of line drawing or sketch)
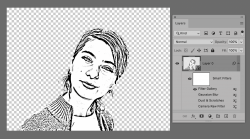
Just as we wanted the Layer Mask to be high contrast (e.g. only black and white), so is the same for the pixel information. Se we add a Threshold Adjustment Layer. Adjust as you desire for the line drawing you want.

Forum member Cox wanted the sweater detail minimized as cutting vinyl and picking out all the little pieces is probably no fun at all and no necessary for the subject. So I added a blank Layer right below the Threshold adjustment Layer, masked the sweater area and then filled with solid black. Now there is a lot less detail to print/cut/pick out the pieces. This is not an issue for other types of media.
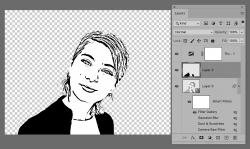
OK, now we are ready for fine tuning.
The main adjustments is by going by to the Sketch > Photoshop Filter and adjust the detail and darkness sliders to get the desired result (individual choice)
Then one by one, you can go back to the three filters in the Smart Object Layer.
- If you find you have lines in areas that are undesired, using the Camera Raw filter can be of help. Using the basic tone panel, converting the B&W and using the B&W mixer panel can help take details out of the face or other areas. One can also add detail in other areas.
- Both the Dust and Scratches and the Gaussian Blur can be used to remove more detail.
I ended up using the Dust and Scratch Filter set to 1 for this image for the image size I started with. This removed a bit of detail
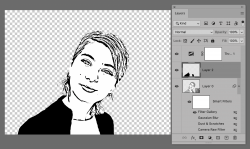
Before converting to vector format, there is one optional step that can be used.
Stamp all the Layers to a new Layer Shift +Opt + CMD + E (Shift +Alt + Ctrl + E for PCs) and then erase out of paint in any specific details desired.
Now, to convert this to all Vectors!!!!
Using the magic wand tool to point sample and tolerance set to zero, anti alias turned off (important!) and contiguous turned off. Select all of the black pixels in the image
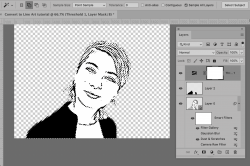
!!!!! With the top Layer selected, go the Paths Panel, and in the upper right dropdown, chose Make Work Path. It will ask what value in pixels to use for smoothing the vectors. In this image I used 2 yet good results occured with 4. This is trial and error so you may need to back up with UNDO and try another value if you do not like the end result.

I turned off visibility of all Layers in the Layers Panel so all you see are the drawn paths. With all the other Layers turned off we are prepared to create the Vectors in the next steps
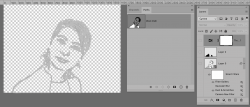
Here is the last generation step for this tutorial.
Just use the command Layer > New Fill Layer > Solid Color click OK and it will go to the Color Picker and choose solid black. A new visible Shape Layer (all vectors) is now created and we already turned off the visibility of all the other Layers
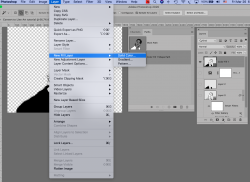
Now just save the file in Photoshop PDF format (again only with the Shape Layer Visible and you have your vector file ready to go.
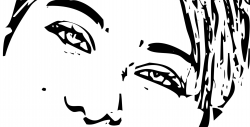
I loaded that PDF file into my browser and enlarge so you see just part of the face.
Nice sharp vectors and no pixelization.
Enjoy
John Wheeler
The first step was get have a starting image that is 1500 pixel long edge minimum. Cox's image was quite small so I used a 4x enlargement through Topaz Gigapixel yet just using the standard command File > Image Size should work just fine (e.g. a 400% increase with the resampling checked and auto select on rendering algorithm. So here was the starting image after enlargement:

As the background was of no interest for the final product, I created a selection with Select > Subject One can optionally tune this in with other selection tools:

At the bottom of the Layer Panel I used the Add Layer Mask icon to move the selection over to the Layer Mask and making the surrounding area transparent. I then right clicked on the Layer Mask Thumbnail in the Layer Panel and used the Select and Mask tool/panel to tune in the selection as desired.
NOTE: Since when finally converting to vectors we want to visuallize the "edges" it is important (ok helpful) if you turn on the Contrast Slider to the far right. Also note that this is where you can bring out more detail in the hair yet in this particular application, having a lot of fine detail is difficult to cut in vinyl yet make work well for other types of vector line art

Now right click on the Layer in the Layer Panel and Convert to a Smart Object (this allows going back later to fine tune adjustments without redoing everything). Then add the Smart Filters
- Adobe Camera Raw (default settings)
- Noise > Dust and Scratches (minimum setting)
- Blur > Gaussian Blur (minimum setting)
Key Note: Before adding the next filter, make sure the Foreground and Background color chips are set to default by pressing the keyboard shortcut "D". Many of the sketch filters are very sensitive to the foreground and background values when initiated.
- Filter Gallery > Sketch > Photocopy
Now after all that - turn off the eye icon in the Layer Panel for the lower three filters only leaving the Photocopy Filter on
We will go back to the other filters later for tuning.
We now have the starting of a pretty good line drawing (one type of line drawing or sketch)

Just as we wanted the Layer Mask to be high contrast (e.g. only black and white), so is the same for the pixel information. Se we add a Threshold Adjustment Layer. Adjust as you desire for the line drawing you want.

Forum member Cox wanted the sweater detail minimized as cutting vinyl and picking out all the little pieces is probably no fun at all and no necessary for the subject. So I added a blank Layer right below the Threshold adjustment Layer, masked the sweater area and then filled with solid black. Now there is a lot less detail to print/cut/pick out the pieces. This is not an issue for other types of media.

OK, now we are ready for fine tuning.
The main adjustments is by going by to the Sketch > Photoshop Filter and adjust the detail and darkness sliders to get the desired result (individual choice)
Then one by one, you can go back to the three filters in the Smart Object Layer.
- If you find you have lines in areas that are undesired, using the Camera Raw filter can be of help. Using the basic tone panel, converting the B&W and using the B&W mixer panel can help take details out of the face or other areas. One can also add detail in other areas.
- Both the Dust and Scratches and the Gaussian Blur can be used to remove more detail.
I ended up using the Dust and Scratch Filter set to 1 for this image for the image size I started with. This removed a bit of detail

Before converting to vector format, there is one optional step that can be used.
Stamp all the Layers to a new Layer Shift +Opt + CMD + E (Shift +Alt + Ctrl + E for PCs) and then erase out of paint in any specific details desired.
Now, to convert this to all Vectors!!!!
Using the magic wand tool to point sample and tolerance set to zero, anti alias turned off (important!) and contiguous turned off. Select all of the black pixels in the image

!!!!! With the top Layer selected, go the Paths Panel, and in the upper right dropdown, chose Make Work Path. It will ask what value in pixels to use for smoothing the vectors. In this image I used 2 yet good results occured with 4. This is trial and error so you may need to back up with UNDO and try another value if you do not like the end result.

I turned off visibility of all Layers in the Layers Panel so all you see are the drawn paths. With all the other Layers turned off we are prepared to create the Vectors in the next steps

Here is the last generation step for this tutorial.
Just use the command Layer > New Fill Layer > Solid Color click OK and it will go to the Color Picker and choose solid black. A new visible Shape Layer (all vectors) is now created and we already turned off the visibility of all the other Layers

Now just save the file in Photoshop PDF format (again only with the Shape Layer Visible and you have your vector file ready to go.
I loaded that PDF file into my browser and enlarge so you see just part of the face.
Nice sharp vectors and no pixelization.
Enjoy
John Wheeler

