What's new
Photoshop Gurus Forum

Welcome to Photoshop Gurus forum. Register a free account today to become a member! It's completely free. Once signed in, you'll enjoy an ad-free experience and be able to participate on this site by adding your own topics and posts, as well as connect with other members through your own private inbox!

Converting anti-alias image to raster (pixel art) form.


NoName

Active Member
Messages
30
Likes
3
Hi all,

I'm wondering if there's a method to convert an anti-alias image into a raster image (or get as close to possible to it) so that it looks like pixel art.

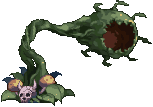
Here is an example of an anti-alias image:
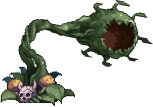
Untitled-2.png

You may not be able to tell, but the above has anti-alias applied (i.e. it is a bit blurred). I want to make it look something like the below sample, i.e. anti-alias removed, ensuring hard pixels are only preserved.
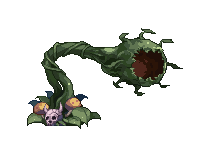
1607101448332.png

Is there a process in PS (or any other software you know) that can be applied to achieve this (even if it gets close to getting the colors right)?

Thanks!
 
Hi @NoName
If your images are all PNG images with the non-object area being full transparency (such as what you provided), there is an approach that works quite well:

- Open the image into PS
- Convert the transparency to a Layer Mask via the command Layer > Layer Mask > From Transparency
- With the Layer Mask selected apply Threshold adjustment (Image > Adjustments >Threshold
- Adjust the Threshold slider until you position the sharp ediges for the image where desired (colors should be great)
- They right click on the Layer Mask and choose Apply Layer Mask. This step will convert the Layer Mask back into the transparency (and deletes the Layer Maks) in the image yet not with sharp
edges
- You can now save as a new PNG and you are good to go

Hope that does it for you
John Wheeler
 
Thanks for your input thebestcpu!

This is a good start, but I'm wondering if this can be done for the entire sprite/image instead of only the edges (apologies if I wasn't clear in the OP). I'm basically trying to see if the colors of a sprite that is anti-aliased can be aliased.

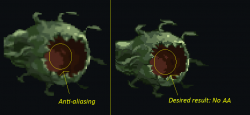
The below comparison should clarify this a bit more. In the example, the left image has anti-aliasing, whereas the right has no anti-aliasing. I've highlighted the mouth area to illustrate the comparison more specifically (the entire image illustrates the effect though).

1607122674631.png

In this example, the original was already aliased. But surely there must be a way to convert anti-aliased images into aliased form?

Thanks.
 
Hi @NoName
I tried a couple approaches and they both help a bit yet I don't know how perfect it needs to be.

So after fixing the transparency edge issues (which could be done as the first step or the last step),
Add a Posterize Adjustment to ~4. This will reduce the number of total colors and it will look less anit-aliased. There is some color shift as well.
To reduce the color shift, you can add a copy of the original image above the Posterize Adjustment Layer and set the Blend mode to Color
That gave some decent results

The second approach after you have taken care of the edge transparency is the use Save for Web and set the output format to PNG 8 (instead of 24). It brings up a table where you can select the number of colors and set the number to powers of 2 up to 256. It looked pretty good when I set it to 16
You save the PNG 8 file and read it back in and resave as PNG24 if you prefer that format.

Let me know if that is good enough
John Wheeler
 
Thanks thebestcpu.

I tried your second approach. It looks better for sure, but in particular, the colors table you mentioned is something that caught my eye. It looks like there is an option in PS for indexing colors (Image > Mode > Indexed Color).

After picking Local (Selective) and 39 colors with transparency enabled, I got this:

Untitled-3disp.png

It "looks" blurred but when you zoom in, its actually aliased and when I count the colors in PaintShop, I get 39 colors (against the 1866 colors of the anti-aliased image).

I'm just curious if you had some thoughts on this; lets say I have an original aliased imaged and its color palette, and I distort it a bit via transforming. Would it be possible to achieve this result but while simultaneously ensuring that PS doesn't remove colors from a given palette, and avoids adding additional colors, essentially restricting it to the original color palette I supply to it (the palette would be of the original aliased image)?

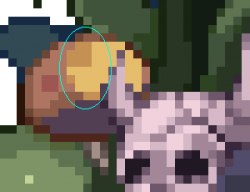
For example, in the original image, there is a shade of orange in the left mushroom highlighted in the image below:

1607131835335.png

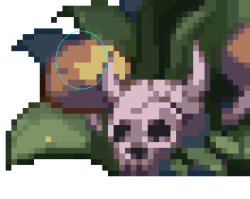
In the Indexed Color result, this shade of orange is missing (along with a few other colors), while PS appears to add a few colors, noticeably to the leaf on the bottom left which gives it the blurry feel:

1607131908740.png

Basically, is there a way for PS to "force" the results into a color palette belonging to an original aliased image? I know we have the option of transforming using the nearest neighbor setting, but that distorts things quite a bit. Transforming an image with the other options then applying such a technique would I think give the best results.

In any case, thanks for all your input thus far! Results are definitely close to perfection.
 
Last edited:
I am not an expert on using files in Indexed Color and the Color Tables though I have dabbled with them. The answer is yes they can be customized and here is the link to the Adobe Help file:
Customizing Color Index Tables

Also, here is a link to a way that describes how to extract color tables which can be saved and used as the tables for Indexed files (see answer 1 in the link):
Extracting Colors out of Color Table

Now that's a lot of push ups yet it can be pretty accurate.

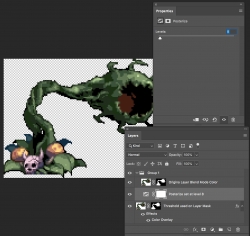
Here is an alternate approach using the techniques mentioned and combined with the attached image.

First Layer was the extracted Layer Mask with the Threshold Layer Applied - I also added a Layer style of Color Overlay with the Color set to White and the blend on the Layer Style set to Color. This is a quick and dirty way to extract the luminosity out of the color image.

Second Layer is a Posterize Adjustment Layer set to a value of 9 (adjust to get the right level of gray levels desired

Third Layer was the original Layer with no Layer Style and Blend set to Color to add the original color back in.
This may come close to what you want yet you have a variety of options now from which to choose.
Hope this helps
John Wheeler

Screen Shot 2020-12-04 at 10.17.18 PM.png
 
Thanks thebestcpu. I will go through those options and see what results I can get by mixing them.

Appreciate your input in this!
 

Back
Top