Photoshop Gurus Forum
Welcome to Photoshop Gurus forum. Register a free account today to become a member! It's completely free. Once signed in, you'll enjoy an ad-free experience and be able to participate on this site by adding your own topics and posts, as well as connect with other members through your own private inbox!
You are using an out of date browser. It may not display this or other websites correctly.
You should upgrade or use an alternative browser.
You should upgrade or use an alternative browser.
Create 3d layers
- Thread starter Pzh20
- Start date
- Messages
- 24,206
- Likes
- 13,734
Hello and welcome to PSG.
There are usually multiple ways to accomplish effects in Ps. Photoshop is not always the best choice when it comes to 3D. If I had the time I feel I could easily re-create the images you've posted above but explaining how I did it would be next to impossible.
Here is one method of a simple and quick test using Ps 3D engine. Of course I would have to spend a lot more time on refining the textures and improving the lighting..............but something similar to your examples can be accomplished.
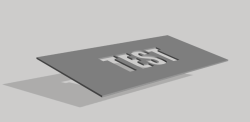
If I have time, I will play with some other ideas I have used in the past, such as with smart objects and layer styles................maybe if I offer up the PSD you may be able to understand what I've done.
There are usually multiple ways to accomplish effects in Ps. Photoshop is not always the best choice when it comes to 3D. If I had the time I feel I could easily re-create the images you've posted above but explaining how I did it would be next to impossible.
Here is one method of a simple and quick test using Ps 3D engine. Of course I would have to spend a lot more time on refining the textures and improving the lighting..............but something similar to your examples can be accomplished.

If I have time, I will play with some other ideas I have used in the past, such as with smart objects and layer styles................maybe if I offer up the PSD you may be able to understand what I've done.
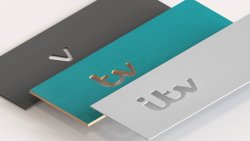
Thanks for this, interesting that 3d is more difficult, as a static render ends up 2d but looks 3d. Maybe that's why I'm struggling with it. I'm trying to create. Logo that has this 3d look to it, as if the text is cut out of a solid block, where some of the letters show through the top layer, some show through the middle layer and some through all three layers. I will look more into the 3d engine and try messing around with that.Hello and welcome to PSG.
There are usually multiple ways to accomplish effects in Ps. Photoshop is not always the best choice when it comes to 3D. If I had the time I feel I could easily re-create the images you've posted above but explaining how I did it would be next to impossible.
Here is one method of a simple and quick test using Ps 3D engine. Of course I would have to spend a lot more time on refining the textures and improving the lighting..............but something similar to your examples can be accomplished.
View attachment 124760
If I have time, I will play with some other ideas I have used in the past, such as with smart objects and layer styles................maybe if I offer up the PSD you may be able to understand what I've done.
Regards Pete
- Messages
- 2,687
- Likes
- 3,121
It's always worth trying to just see what's possible.You've got a lot further than I have, but thanks for trying.
Regards Pete
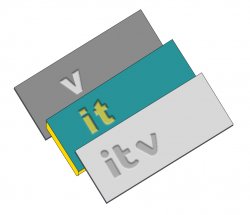
If you'd like it, here's my photoshop file to play with - jsut a warning...I don't often work neatly
 :
:
debossed panels 3 levels.psd
1 file sent via WeTransfer, the simplest way to send your files around the world
Here's the typeface I used:

itv_logo_by_lyricofficial_dbpbdd8.ttf
1 file sent via WeTransfer, the simplest way to send your files around the world
Overall could use a bit more tweaking and some shadow work...
- Jeff
- Messages
- 24,206
- Likes
- 13,734
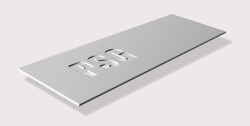
Here is another quick example of a similar 3D effect done with only 2D Ps techniques.
This is a multi layer technique used to provide depth. The initial rectangle with the PSG "cutout" (layer mask applied) was created and duplicated 7 times, moving each layer down and right. These were then placed in a group. The group was then transformed (distort)into it's flat 3D position. The corners were squared using a layer mask on the group.
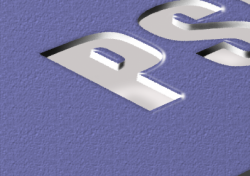
Shading on the letters was next and was done by hand with the Brush Tool using the top and bottom layers as selections. The gradient was also done by hand using the top rectangle layer as a selection. Lastly layer styles were added to the group for the drop shadow and to the top rectangle layer for some added Bevel and embossing.
As usual there is always some additional tweaking that could be done, but this may give you some idea and direction of where to go. I see some areas that I needed to adjust, like the harsh shadow on the left edge.............but I just ran out of time to work on this..........maybe later!

Attachments
[ iLLuSioN ]
Power User
- Messages
- 428
- Likes
- 457
Just check out a few mockups...

 www.photoshopvideotutorial.com

Free 3D Logo Mockup Download
Elevate your branding with our free wood cutout 3D logo mockup. This high-quality mockup allows you to showcase your logo in a realistic wooden texture, perfect for presentations or portfolios. Simply insert your design into the smart object layer, and watch your logo come to life with a...
 www.photoshopvideotutorial.com
- Messages
- 24,206
- Likes
- 13,734
What I cannot see is where or how the text was cut through.
Sorry.........I wasn't sure how versed you were with basic Ps techniques so I was very vague about that step thinking you would understand. I didn't know how much needed to be explained. Also, I'm getting to the point to where I'm no longer going to do anymore explanations of any kind on this forum.The initial rectangle with the PSG "cutout" (layer mask applied) was created and duplicated 7 times.
Create the initial (original) rectangle. (Note: Do not transform until all layers are finished and placed within a group)
On a new layer, use the Type Tool to create the text. Turn off the Type layer when done.
Cmd/Cntrl + click the Type layers thumbnail to make a selection.
With the selection active, add a layer mask to the initial rectangle layer.

Then click on the layer mask to select, then right click the layer mask and choose "apply layer mask".
This will be your first or top layer..............also note because I failed to mention, that I changed the top layers color after I was done duplicating it 7 times. Also note that 7 was arbitrary, you can duplicate it as many times as needed to make it the thickness you desire.

One way you can make the top layer any color you wish is by adding and clipping a solid color adjustment layer to the top initial rectangle layer at any time.

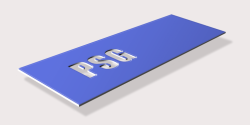
Another way to add color and texture is by using the layer style on the top initial rectangle layer.
Use "Pattern Overlay" to add texture, and "Color Overlay" to add color.

I usually keep the Type layers, but I deleted it in my sample PSD to keep the file size down.
ex_teacher
Guru
- Messages
- 568
- Likes
- 1,177
My very old Nvidia Quadro graphic card might do 30 bit display to my pair of Benq monitors but PS laughs at it when I tried to do a 3D extrusion <SIGH>
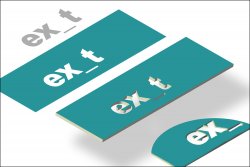
I experimented in conventional 2D and did something vaguely similar to IAMSAM, but the lettering cutout is dumbed down a bit. I started this the other day and worked on it some more today just because its fun Whatever…In the real world I would use a drawing package where the extrusion is trivial.
Basically I used the magic wand on a hunk of type and used that selection to cut out the type shape out of a rasterized rectangle. ( Shift+Ctrl+J then delete that cutout layer) That was distorted into a , more or less, orthogonal projection. (Ctrl+T then rotate and/or hold down the Ctrl Key and move handles
That layer was duplicated and the bottom layer was edited by locking the transparent pixels and painting shadow and side view colors on the appropriate edges for the ‘drop layers’. Locking the transparent pixels is a neat trick accomplished by clicking on a layer and hitting that little checkerboard symbol in the Lock bar on the top of the layers palette. ‘drop layers’ was accomplished in this case by selecting the move tool and using the arrow keys and moving that layer down 5 nudges and over to the. left one nudge. I duplicated that layer and repeated until I had the desired thickness, That left some hand-cleanup where the top pristine layer covered a multitude of sins..
A drop shadow was added to that resultant group.
There is a section of that doctored-up second layer in the lower right corner. You can see the sloppy hand painted edges that reveal themselves when the layers are dropped down. I didn’t bother with the bevel and emboss but its a really nice touch.

Last edited:

