What's new
Photoshop Gurus Forum

Welcome to Photoshop Gurus forum. Register a free account today to become a member! It's completely free. Once signed in, you'll enjoy an ad-free experience and be able to participate on this site by adding your own topics and posts, as well as connect with other members through your own private inbox!

Crop and bleed for print, please help!


TineX

New Member
Messages
3
Likes
0
Hello, please I am sorry I am not finding this info anywhere,
I understand you add 3 mm on every side to do the bleed, but
1) say that A4 is 2480x 3508, does it mean that I have to set the canvas to 2483 and 3508, or do the 3 mm go INSIDE that canvas size?

and
2) if the 3 mm go INSIDE, does it mean that when I print the document the images in the center of the canvas become a bit smaller? I have to print some images that need to be precisely a certain size, how do I make sure that they stay that size? please help

and 3) what about crops? are they just placed there in the corners, or do they affect the size of the final printed image?

please help, I am so frustrated I watched like 20 videos and NO ONE mentions any of this.
thank you
 
Hi TineX
It might help to know about your project in a little more detail so Forum members can better target their information and/or recommendations to you e.g.

Are you sending this off to a commercial printer or are you doing this on your own printer?
If you need the final product to be a specific size are you referring to the final size is A4 or is cut down from A4?
Is it that the final paper boundaries have to be a specific size and/or the scale of the image has to be exact (e.g. 1 inch on as measured in Photoshop comes out as 1 inch on the print)?

If you are going to a commercial printer, you can contact them for specifically what they want you to provide to them. That is the fastest and safest way to make sure thing come out how you want.

- I will assume that you are creating a product where your cut size is well within the paper/card stock on which it is printed in preparation for cutting down to the exact size you want. The stock size on which you are printing is large enough to accommodate the bleed area (the sacrificial area of your image that is allowed to be cut so that no plain card stock color is showing on any edge. The bleed area allows for either the printer or the cutter to be slightly off exact positioning due to mechanical limitations.
- I will also assume that the final product that you want needs to be where 1 inch as measured on the image on Photoshop will also exactly be the same 1 inch of the image when printing (not everyone needs this.

So here is my approach to consider.

1) Ignore exact number of pixels of the stock onto which you are printing. Focus on the inch (or cm, mm etc) size of the image you want in Photoshop as well as the resolution you need for quality (e.g. 300 ppi). I will assume you are measuring in mm since that is what you mentioned for the bleed

2) Create you the image you desire in mm for the final size and also add the extra 3mm added in for each edge of the image (so the image is 6mm taller and 6mm wider in Photoshop than the final cut image). You create that 3mm boundary of your image as a sacrificial area. You don't know which portion of that area will be sacrificed due to misalignment of the printing/cutting machinery yet the final cut size should be quite accurate

3) In Photoshop in the print module, to make sure that what you print is exactly the same dimensions as what you see in Photoshop, is just not scale the image size. That is all there is to that. Note, that is Photoshop tells you something is going to print outside the printing boundaries then you are trying to print on too small a paper/card stock

4) Further down in the Print module there is a place where you can set the bleed dimensions. Set that to 3mm or to whatever is needed.

5) Then you set the option to show the crop marks. Note that with a 3mm bleed the crop marks will go a little ways into you image yet not all the way to the cutting corner.

Since you did not use the "scale" feature in the printer module, all the crop marks or anything else will not disturb the size of your image and you will get the exact size your created with the resolution you original set up in Photoshop. Using this approach you did not have to worry about the canvas size or pixel size of the stock upon which it was being printed. The paper/stock just had to be a bit bigger than your final cropped image.

Of course, I may have totally misunderstood your problem yet hope that some of this information will be helpful
John Wheeler
 
Hello, please I am sorry I am not finding this info anywhere,
I understand you add 3 mm on every side to do the bleed, but
1) say that A4 is 2480x 3508, does it mean that I have to set the canvas to 2483 and 3508, or do the 3 mm go INSIDE that canvas size?

and
2) if the 3 mm go INSIDE, does it mean that when I print the document the images in the center of the canvas become a bit smaller? I have to print some images that need to be precisely a certain size, how do I make sure that they stay that size? please help

and 3) what about crops? are they just placed there in the corners, or do they affect the size of the final printed image?

please help, I am so frustrated I watched like 20 videos and NO ONE mentions any of this.
thank you
Hello -
The above explanation was quite complete. But just for clarification, I'd like to add my own answers to your questions.

First, in print, we spec print items in either mm or inches (US). Pixels are important for your images - but the printer wants to know exactly the size and trim of the document he is printing so he knows what size sheet he is printing on.

For an A4 size 210 X 297 mm (8.3 X 11.7 inches US), you must add 3mm to all four sides (or .125 inches US).
So the untrimmed image area of your document, if it bleeds, would be 216 X 303 mm (8.425 X 11.825 inches US)

The crop marks would go outside the trim area and can enter the bleed area - my own instinct is to place the crops outside the bleed area.

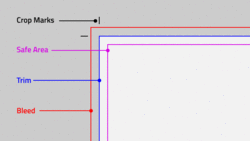
Here is an example of a layout template showing safe area, crops, and bleeds

crops and bleeds.gif

Note - the "safe area" indicates where all non-bleeding items should be kept, ie type. You want to keep type at least 3 mm (.125 inches US) from the trim. So should the image shift slightly in print, or the cutting be slightly off, the type won't be affected.

Note that the bleed extends outside of the trim area.

The crops do not affect the image - those are just the trim guides for the vendor when the document is cut and are trimmed off.

When you spec the job to the printer, just indicate trim size and note that the piece bleeds.

For instance:

Trim: 210 X 297 mm plus bleeds

This is also a flag for the printer to check the document to see if the bleeds have been indicated and there is enough image to bleed past the trim.

Bottom line -the document you present to the printer/vendor will actually be slightly larger than the final trimmed piece.

If you have any additional questions, please don't hesitate to post. Printers most likely will give you a call if there's a problem with the document layout and provide an opportunity to correct.

- Jeff
 
I will add in a question to you @JeffK to tap into your knowledge and may go along with the OP as well.
It makes sense to me the crop marks (which identifies the trimmed area within the accuracy of the printing and cutting registration) are printed outside the bleed area. However, when you enable making crop marks visible in the Photoshop Print Panel, the crop marks do go inside the bleed area (not all the way to the trim area). Do you know how to have the crop marks moved outside the bleed area from the Print Module or does one just have to increase the canvas size and create them yourself?
John Wheeler
 
Using PS as a page layout program is not familiar to me. Usually this is done in a program such as InDesign where you can easily set the parameters and the document is marked up accordingly.
But you can easily set your trim marks manually by dragging guides from the rulers on the side and top.
Then using the pencil tool, draw the crops where you want them by drawing along the guide and keeping your hand on the shift key to keep the crop line straight.
You would have to enlarge the canvas size to get that done.

There's a quick-and-easy tutorial on that with images on creativePRO
Photoshop How-To: Adding Bleeds and Crop Marks

Thanks for asking!

- Jeff
 

Back
Top