What's new
Photoshop Gurus Forum

Welcome to Photoshop Gurus forum. Register a free account today to become a member! It's completely free. Once signed in, you'll enjoy an ad-free experience and be able to participate on this site by adding your own topics and posts, as well as connect with other members through your own private inbox!

Custom Text Box Graphic


Cozz92

New Member
Messages
1
Likes
0
Hi Everyone,

First off, I'm a complete beginner with Photoshop and use very little of its capabilities for my line of work (real estate photography), so please forgive me if there is a simple answer to this that could have been answered with a search of the forum, I did try before posting but not a lot makes sense to me at this point.

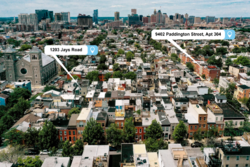
With nearly every shoot, I supply drone shots with location tags around the property I'm shooting. At the moment I use a tag that consists of several layers and takes a considerable amount of time if I need to resize this for a longer string of text. What I am looking to do is to create something that allows me to place the complete graphic onto the canvas, and resize and edit the text as necessary, however I only want to make the white section wider or narrower (depending on the length of text needed), but without changing the size of the blue section or location tag.
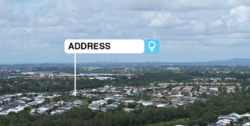
1651027096296.png

Thank you in advance to anyone that may be able to help me!

Regards,
Corey
 

IamSam

Administrator
Staff member
Administrator
Messages
22,752
Likes
13,268
Hey Corey! Welcome to PSG.

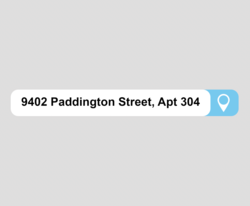
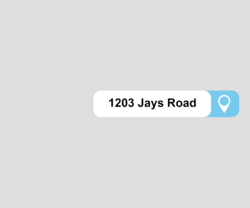
Are you wanting something like this??? Whereby everything remains consistent, but the white box is sized to fit smaller or larger addresses?

Screen Shot 2022-04-26 at 10.30.36 PM.png
Screen Shot 2022-04-26 at 10.30.49 PM.png

If so. This is just 3 layers combined.
A Blue rounded rectangle layer.....
Screen Shot 2022-04-26 at 10.35.17 PM.png

The location tag icon layer. on top of the blue rounded rectangle layer.
Screen Shot 2022-04-26 at 10.35.28 PM.png

And finally, a white rounded rectangle layer on top of the other two.
Screen Shot 2022-04-26 at 10.35.46 PM.png

Since the white rounded rectangle layer is a shape layer, I can use the Pen Tool or the Direct Selection Tool to select (Cmd/cntrl + Drag a selection) the left side path nodes of the white rounded rectangle layer (they turn black when selected), hold the shift + Cmd/Cntrl keys for the Pen Tool or the Shift key only for the Direct Selection Tool, and move the end of the white rounded rectangle to a smaller size.
Screen Shot 2022-04-26 at 10.36.55 PM.png
Screen Shot 2022-04-26 at 10.43.17 PM.png

You only move the left side so the rest of the graphic stays the same.

This of course will require that you learn a little about shape layers and the Pen Tool/Direct Selection Tools. There's a plethora of YouTube vids on these tools.
 

IamSam

Administrator
Staff member
Administrator
Messages
22,752
Likes
13,268
Not sure as to whether or not I should continue having not heard back from you. But for the sake of future inquiries, I will go on.

I would create and edit the location tag(s) in its own separate document at a fairly large size. They can be made smaller.
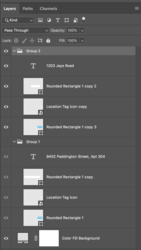
I would place the individual tags in groups.
Screen Shot 2022-04-27 at 11.25.30 AM.png

I would copy and paste tag groups of similar size for editing by selecting the group, and hitting Cmd/Cntrl + J.
This makes editing the white rounded rectangle and text (address) layer easy.
You would simply select the white rounded rectangle layer and edit as described above (post #2) with the Pen Tool.
Then select the type/text/address layer, choose the Type Tool, double click the type layer and edit the address.
Center the type/text with the Move Tool.

When you're ready to use the tag in a photo....
Copy that group from the location tag document by selecting/highlighting the group, hit Cmd/Cntrl + C to copy.
Go to the photo and past the group by hitting Cmd/Cntrl + V
Right click on the group, select ungroup (the grouped layers should be highlighted), then hit Cmd/Cntrl + E to merge/rastorize the group layers.

You can then resize the tag if needed by hitting Cmd/Cntrl + T to enter free transform.
Make a note of the Height (93.00px) while resizing in case you use multiple tags in one photo.......we want them to be the same.
Note: You need to click/select the "link" icon between the Width and Height windows!

Screen Shot 2022-04-27 at 11.43.05 AM.png

Position the tags using the Move Tool.
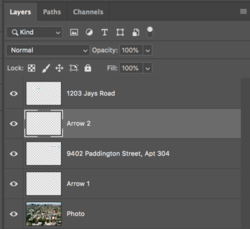
On new layers below the merged tag/address layer, use the Pen Tool to make directional indicators (arrows) or lines if you wish.
Note: This is a reduced screenshot so the quality is poor!
Screen Shot 2022-04-27 at 11.45.51 AM.png

Photo documents layers panel.
Screen Shot 2022-04-27 at 11.46.02 AM.png

By using this type of method you will always have access to the same exact location tag that is readily editable for all future drone photos! Once made, you don't have to remake it every time.
But this will involve learning some features in Ps!
 

Top