What's new
Photoshop Gurus Forum

Welcome to Photoshop Gurus forum. Register a free account today to become a member! It's completely free. Once signed in, you'll enjoy an ad-free experience and be able to participate on this site by adding your own topics and posts, as well as connect with other members through your own private inbox!

Deleted background reappears?


jlovelo

Member
Messages
8
Likes
0
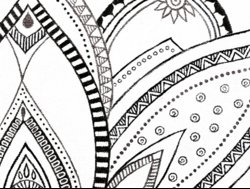
PS CC 2017. Not sure what I am missing here. I photograph my partner's artwork and render it as monochrome line art for screenprinting onto fabric. Mostly her images are graphics painted on white paper and I can separate the images without much difficulty. However this is proving a challenge. Acrylic on canvass, the design is higlighted against a deep blue background. My goal is to get from this:

1.jpg
to this (approximately):
1a.jpg

I create a selection using the Colour Range > Highlights to exclude the dark background. The resulting selection is pretty clean as can be seen by the marching ant borders here after inverting the selection and deleting:
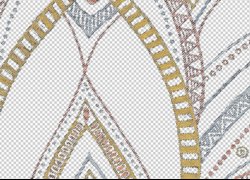
2.jpg

I then used Threshold command to render the image as monochrome and to pump up the contrast:
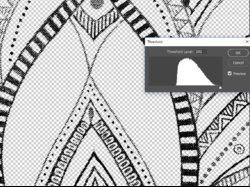
3.jpg

I finally add a Threshold layer to force the remaining greys to black. However my deleted background rises from the dead - here we can see the canvas fabric pattern from the original photo return to wreck my result. Why is not deleted?
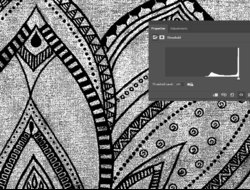
4.jpg

There are many ways to skin a cat and no doubt probably several better ways to approach this task. But firstly I'd love to understand why my deleted background has reappeared. Any suggestions welcomed..
 
Last edited:

colleague

Guru
Messages
824
Likes
1,254
those pixels were not 100 % transparant (but maybe 95% transparant)
and you forced those pixels to become vissible with the treshold
 

jlovelo

Member
Messages
8
Likes
0
those pixels were not 100 % transparant (but maybe 95% transparant)
and you forced those pixels to become vissible with the treshold
Yes I can see them faintly in the transparent background, but I still do not understand why there are pixels remaining after I deleted the selection
 

colleague

Guru
Messages
824
Likes
1,254
that is because the selection with color range could not select all the wanted parts for 100 %
 

jlovelo

Member
Messages
8
Likes
0
that is because the selection with color range could not select all the wanted parts for 100 %
Thanks for your feedback colleague - but the resulting selection border (marching ants can be seen in the 3rd snapshot) was sharply defined along the edges of the design content in this image. All the background pixels should have been cleanly deleted (yes? no?). I also checked the masking options to ensure they were all set to zero such as feathering etc. There must be something in the config I have missed - this version CC2017 has a lot of new features I still grapple with. Certainly something to do with transparency would seem to be the culprit.
 

colleague

Guru
Messages
824
Likes
1,254
I think that the marching ants just gives you an indication of the borders of the selection
and cannot exactly what is 100 % selected

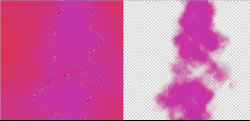
here is an example
I made a layer with filter rendering clouds to mix 2 colours
then I used selection color range that gives defined sharp selection
but when I use mask , I see a gradation of transparancy

render clouds.jpg
 

colleague

Guru
Messages
824
Likes
1,254
there is a solution if you do not delete the selection you made with color range
but in stead you use a mask
then you click on the mask icon and use a treshold on the mask
 

thebestcpu

Guru
Messages
2,988
Likes
2,747
Hi jlovelo

To the first order, it is much easier if the painting were not a a rough surface which presents an underlying pattern from which to extract the boundary lines. As is, it is much more difficult.

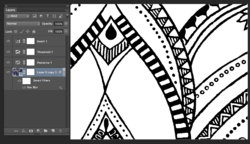
However, given the starting point, here is another approach that may or may not meet your specific needs shown in the image below with the Layer stack at the left:

Line-Sketch.jpg

To help get rid of the background pattern (which is similar to rasterization), increase the size of the overall image by 10X or 1000% using the nearest neighbor rendering option.

Then, apply the box blur filter to taste and I set mine at 22 for the image above (I do this with a Smart Ojbect so I can go back and fine tune which setting for the box blur to use.

Then posterize adjustment layer set to 2, followed by Threshold adjustment layer with slider near the left side and then an invert adjustment Layer.

To fine tune the image you can also insert a curves adjustment layer right above the Smart Ojbect with or without the posterize adjustment layer and then individually tune the R, G and B curves to taste.

Just another approach to consider and hope this is of some value.

John Wheeler (aka thebestcpu)
 

jlovelo

Member
Messages
8
Likes
0
Hi jlovelo

To the first order, it is much easier if the painting were not a a rough surface which presents an underlying pattern from which to extract the boundary lines. As is, it is much more difficult.

However, given the starting point, here is another approach that may or may not meet your specific needs shown in the image below with the Layer stack at the left:

View attachment 80696

To help get rid of the background pattern (which is similar to rasterization), increase the size of the overall image by 10X or 1000% using the nearest neighbor rendering option.

Then, apply the box blur filter to taste and I set mine at 22 for the image above (I do this with a Smart Ojbect so I can go back and fine tune which setting for the box blur to use.

Then posterize adjustment layer set to 2, followed by Threshold adjustment layer with slider near the left side and then an invert adjustment Layer.

To fine tune the image you can also insert a curves adjustment layer right above the Smart Ojbect with or without the posterize adjustment layer and then individually tune the R, G and B curves to taste.

Just another approach to consider and hope this is of some value.

John Wheeler (aka thebestcpu)

Thanks for your suggestion John which looks very promising - I guessed there might be a better approach. I will give this a try and report back in a day or two.
cheers
Jeremy
 

jlovelo

Member
Messages
8
Likes
0
there is a solution if you do not delete the selection you made with color range
but in stead you use a mask
then you click on the mask icon and use a treshold on the mask
Thanks colleague - I will try out some of these good suggestions.
 

jlovelo

Member
Messages
8
Likes
0
Success - I am now getting a great result using the Blur and Posterize filters - thanks John for your guidance. I also worked out my initial problem as I still needed to delete the background and key the design cleanly for screenprinting. When I used the Select Colour > Highlight option, I did not understand the Fuzziness slider which affect transparency of the selected area. By pushing this to 0% I have been able to achieve a fully transparent background.
 

Top