What's new
Photoshop Gurus Forum

Welcome to Photoshop Gurus forum. Register a free account today to become a member! It's completely free. Once signed in, you'll enjoy an ad-free experience and be able to participate on this site by adding your own topics and posts, as well as connect with other members through your own private inbox!

Export as PNG


ScottHen

Member
Messages
7
Likes
1
Hello all, I'm Stuck on the proper way to export as PNG post Object Select/Background Removal.
I am starting a new workflow and using the Object Select Tool in PS 2023 in hopes of removing backgrounds. The main issue is that although my image previews with a transparent background, the background layer is somehow remaining as a fantom layer as it is showing up (In this case) when I load to Etsy.

The process that I used was: Object Select -> Select and Mask -> Output to New Document -> Export as PNG

I have attached a sample file called, "BoB" which is the image that was created post production from the steps above. Just not sure what I am missing in my steps to have the image really gone and not just in preview mode.

Bob.png
 
According to the Etsy best practices:
'Animated .gif files & transparent .png files are not supported. If a file contains transparency, the transparent parts of the image will appear black on Etsy. '

Never used it so couldn't speak from experience.

Regards.
MrToM.
 
Thanks, @MrToM... Indeed, I will change image preview on Etsy to a .jpg. Still off though that the background from the image pre-Photoshop is showing at all. I understand Etsy adding something but in this case it is showing a layer that PS should have removed from my understanding.
 
...the background layer is somehow remaining as a fantom layer as it is showing up (In this case) when I load to Etsy.
This is because Etsy does not support Transparent background PNG files, as mentioned in this link : here.

Also, I confirm that the file you uploaded here is indeed a proper PNG file with transparency. I would also like to point to you that your selection techniques have scope for improvement. For example, there is a big chunk of background left between her Left hand and her body. Also, the Left hand selection is not really smooth.
 
@polarwoc - I understand that and agree and I will change my workflow so that the image is a .jpg file for Etsy.

That still leaves me though with a question regarding how the alpha layer or or original background is there. I understand if Etsy fill with black, a solid color, or random pattern but it is showing with the actually background that was in the image prior to using the PS workflow and exporting.
 
I understand if Etsy fill with black, a solid color, or random pattern but it is showing with the actually background that was in the image prior to using the PS workflow and exporting.
So sorry, I have not worked on Etsy before. But, I can suggest you conduct an experiment and let us know the result: Upload the following image with Orange BG and let us know if it still shows up a) original background or b) Orange background?
1941-Before-Bob.jpg
I expect it should be showing Orange BG. If it is showing original BG when you uploaded the transparent BG PNG file, I guess it is because your cache is not cleared? Just one of the possibilities.
 
Png transparency works by adding an 'alpha' channel to the file.
If the site supports png transparency then the alpha channel has an effect, and hides the background.
If a site doesn't support transparency then the alpha channel is ignored, thus has no effect, and whatever background was there when the alpha channel was created will be visible.

If you want to have a 'plain' background then place one behind the png image you have at present.
Go through the motions as you described in your first post to create another png image.

This time when you upload to Etsy it should display a plain background, or whatever you placed behind it.

Transparency removes nothing from the image, it just 'hides' it.

Regards.
MrToM.
 
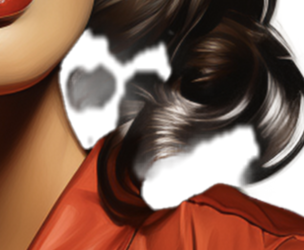
What's going on here? Seems to be some issues with the selection.

Screen Shot 2023-07-17 at 4.23.03 PM.png
 
So sorry, I have not worked on Etsy before. But, I can suggest you conduct an experiment and let us know the result: Upload the following image with Orange BG and let us know if it still shows up a) original background or b) Orange background?
View attachment 138643
I expect it should be showing Orange BG. If it is showing original BG when you uploaded the transparent BG PNG file, I guess it is because your cache is not cleared? Just one of the possibilities.
@polarwoc - The image with the orange background is a .jpg. I did preform a test though with a blue solid background as a png it it shows blue, (Did not show the original background).
 
Png transparency works by adding an 'alpha' channel to the file.
If the site supports png transparency then the alpha channel has an effect, and hides the background.
If a site doesn't support transparency then the alpha channel is ignored, thus has no effect, and whatever background was there when the alpha channel was created will be visible.

If you want to have a 'plain' background then place one behind the png image you have at present.
Go through the motions as you described in your first post to create another png image.

This time when you upload to Etsy it should display a plain background, or whatever you placed behind it.

Transparency removes nothing from the image, it just 'hides' it.

Regards.
MrToM.
@MrToM - Thanks. That is super informative. In the end, I am not that worried about Etsy as creating a flattened jpg file for the preview image is no big deal at all. My real concern though is that the part of the actually product or digital file that is being sent to the custom is the same .png file. It would be embarrassing if for some reason they were to see an original layer or any or all of my edits. So I guess my question then turns into: How do a properly export to PNG and not have the invisible layer ever becoming visible?
I did do an experiment and rather than Export as PNG I exported as legacy Web PNG-24 and this did seem to work. Hate to use legacy tools as a work around though.
 
Thank you, @MrToM I did not know that before.
No worries.
If you think about it, you cannot physically have 'transparency' when it comes to digital images...there has to always be 'something', every pixel HAS to have a colour.

Its all done with just 'hiding' whatever you don't need to see.

Those members here of the 'older' generation may remember 'super-pink' which was deemed to be the 'least likely' colour used in an image. This was 'foolishly' was used by MS (at least) to convey 'transparency', anything of that colour was replaced by whatever was meant to be behind it (so to speak). Unfortunately the memo didn't get all the way to the tea boy and some of the check-boxes in the OS settings dialogs became 'transparent'...creating holes wherever there should have been a check-box. Genius!

If you check out the 'Save for web' dialog and select 'jpg' as the output format you'll still see the 'Matte' option swatch colour, which you could use to make the background of your image 'super-pink' which would then create transparency in jpg images on a Windows platform.

Png's came with their own 'alpha channel' (read mask) so jpg's with a Matte became second choice. Its a similar story with 'gif' files, although with those the 'transparency' is either on or off, anything that should have partial transparency is replaced with the 'Matte' colour so you can choose a colour that best matches the background the gif will be diplayed against.

Regards.
MrToM.
@MrToM - Much appreciated.
So, hypothetically, let's say that one was selling a .png image of a tomato with a transparent background and this special tomato was in a photo that was originally on the vine in a orchard. (Not sure if tomato's really grow in orchards or not). Is there a tool in PS to remove the field portion or layer so that the end user would never be able to see it at all? Would one have to for example flatten it and then re-do the image selection tool so that the white becomes the hidden layer vs the field?
 
Is there a tool in PS to remove the field portion or layer so that the end user would never be able to see it at all?
@MrToM can correct me if I am incorrect, but from the provided information, I would take the Tomato in Orchard picture, replace all background with some colour, then save it as a JPG, then make this background transparent and then saving it as a PNG. On platforms that do not support PNG, it would only safely show the colour of the underlying JPG rather than the original orchard BG.
 
...Is there a tool in PS to remove...
Well not really no, but you can hide them in different ways.
As I understood it any 'transparency' is just an 'alpha' channel that if recognised by the software will hide those pixels.
What it is hiding is the issue and I understood it to be whatever was there when the alpha channel was created.

Once you have your 'selection' try some different methods...completely delete the pixels, then use 'Save for web (legacy)' instead of 'export png'...or whatever way you exported. (I know you've done this and it works...so don't let the word 'legacy' fool you, there is nothing wrong with using Save for Web, it's just Adobe trying to make it sound worse to promote the other pointless features they keep adding.)
Try adding a layer mask and the 'Applying' the mask. This also removes (hides) pixels but maybe it does it differently? I dunno for sure.

As I said I don't use Etsy so cannot try this for real, sorry.


...but from the provided information, I would take the Tomato...replace...background transparent and then saving it as a PNG.
Yeah, sort of. There is nothing wrong in that at all, it's more about how PS handles 'hiding' pixels when it outputs the image to a file.
'...make this background transparent...' Many ways to do that and I can only guess that the method used by the OP kept all the pixel info and Etsy gladly displayed it.

Even deleting pixels is really just hiding them, in PS they call it a mask, when it's saved to an image that supports transparency it's an alpha channel. Same thing.

How both PS and Etsy process 'masks' and/or alpha channels is anybody's guess but at least the OP now knows that Etsy doesn't support transparency, and also knows what they replace it with.
The OP has also used 'Save for Web' which also worked so at least there is a working solution.

Tricky stuff, transparency. (Which is what made Win7 so good, and was completely removed in Win10. I feel real sorry for the person who coded the 'transparency' effect in Win7, couldn't have been easy.)

Regards.
MrToM.
 
Hi @ScottHen
There is a pretty simple way to see what is hiding when the transparency is removed. Just take these steps.
With the PNG Layer (make sure it is not a background Layer)
1) Use the Layer > Layer Mask > From Transparency to turn the transparency to a Layer Mask
2) Right Click and the Layer Mask Thumbnail in the Layer panel and chose either Disable or Delete Layer Mack

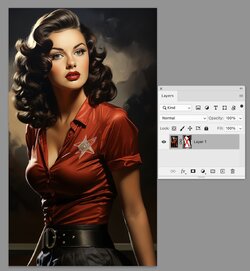
In the image below I used Disable Layer Mask and took a screen shot of the final result. That shows what the transparency was hiding and what will show when the transparency is removed.
Hope this incremental information is helpful
John Wheeler

Screen Shot 2023-07-17 at 10.05.48 PM.jpg
 

Back
Top