What's new
Photoshop Gurus Forum

Welcome to Photoshop Gurus forum. Register a free account today to become a member! It's completely free. Once signed in, you'll enjoy an ad-free experience and be able to participate on this site by adding your own topics and posts, as well as connect with other members through your own private inbox!

Filter to sharpen pixelated images.


Messages
8
Likes
0
I am looking for a filter that will smooth out pixelated images, but not blur them like Gaussian Blur.
Something like those filters called "Super Eagle / 2xSal / Hq3x / xBRz" that take pixel art and scale it up but sharpen it taking the square edges away and making sharp lines instead.

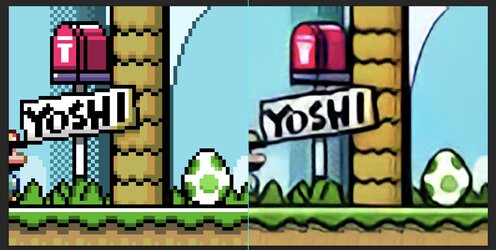
I have included an example.
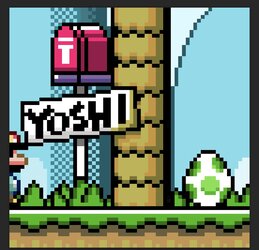
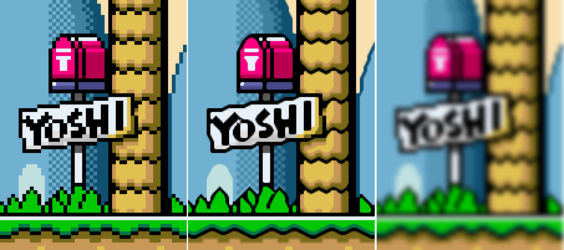
The image on the left being an example "source image"
The middle image being an example "wanted outcome" which is xBRz filtered.
The right image "Gaussian Blur" (which everyone seems to recommend to use do this effect of depixelating) But as you can see it just blurs the squares... what I'm looking for is turning pixel edges into sharp lines like in the middle example.
Filter.png
 
Hi @Love_N_Thunder
The filters you mention are pretty specific to increasing the size of very small pixel art to larger (usually integral amounts) sizes. They are often done with limited colors such as the mode of "Incexed Colors." It is a pretty specific look and feel beyond just using nearest neighbor interpolation often for game graphics.

I could not find any of those filters for use in Photoshop, though I believe the algorithms and code are in Python code. Translating those to a Photoshop script (Javascript) would provide the exact reproduction you are looking for.

However, if you are looking for a generic way in Photoshop (or with available plugins) to increase pixel art in general with pretty sharp edges, I will show you an approach that gives decent results yet is not exact, such as with xRBz.

First, I found a 64x64 pixel representation close to the image you gave as a sample shared here (pretty small)

Yohsi-64x64.png

increasing the size by 16x to the size of your sample with nearest neighbor shows it at a larger size


Screenshot 2024-01-27 at 8.21.59 PM.jpg

What I did, is starting with the 64x64 pixel art, I used the Topaz AI filter from Photoshop (File > Automate > TopazAI) and increased the size by 6x using the model of graphics and then placed it size by size with the enlarged nearest neighbor interpolation method below:

Screenshot 2024-01-27 at 8.26.29 PM.jpg

I think that is the best I could do on short-order with available tools and filters that I had.
Hope that helps
John Wheeler
 
Hi @Love_N_Thunder
The filters you mention are pretty specific to increasing the size of very small pixel art to larger (usually integral amounts) sizes. They are often done with limited colors such as the mode of "Incexed Colors." It is a pretty specific look and feel beyond just using nearest neighbor interpolation often for game graphics.

I could not find any of those filters for use in Photoshop, though I believe the algorithms and code are in Python code. Translating those to a Photoshop script (Javascript) would provide the exact reproduction you are looking for.

However, if you are looking for a generic way in Photoshop (or with available plugins) to increase pixel art in general with pretty sharp edges, I will show you an approach that gives decent results yet is not exact, such as with xRBz.

First, I found a 64x64 pixel representation close to the image you gave as a sample shared here (pretty small)

View attachment 142462

increasing the size by 16x to the size of your sample with nearest neighbor shows it at a larger size


View attachment 142463

What I did, is starting with the 64x64 pixel art, I used the Topaz AI filter from Photoshop (File > Automate > TopazAI) and increased the size by 6x using the model of graphics and then placed it size by size with the enlarged nearest neighbor interpolation method below:

View attachment 142464

I think that is the best I could do on short-order with available tools and filters that I had.
Hope that helps
John Wheeler
Oh wow thanks for going through so much trouble!

As an update I actually contacted the author of xBRZ to see if he might implement a PS or GIMP plugin filter. He does have the source code availible for download on his sourceforge page, as well as a beta tool that will filter images you input. However I was not able to get it to work as it returns a few errors related to not knowing the palette format sRGB etc and or almost always gives me a "bad allocation table" on all the images I tried.


Also & to be more specific in this particular instance (as to why I've reached out), I've got some images that were originally done in 1024x1024, I wanted to scale them up to a print like quality, for say a posters or T-Shirts. But the quality is just too low.
So I scaled them up in PS which has the typical Bilinear / Bicubic scaling algorythms, but these just make the image even more blurry once scaled up 3-4 times (Image in the middle in provided example). However when I scale these images using Nearest Neighbour they remain nearly identical to their originals, but you can see the blocks/pixels (Example on the LEFT in attached image). So I wanted to scale these smaller images up "preserved" like the original with Nearest Neighbour, then sharpen the blocks to become smooth lines (without blur) like xBRZ....

I might add that I've also played around with various filters applied then scaling the image up and or down... scaling the image up with nearest neighbour to huge size then scaling it down using "bicubic smooth" etc etc....
So far the closest thing I could find to xBRZ type filters is "underpainting" which is the image on the right in the example....

123.png
 
HI @Love_N_Thunder

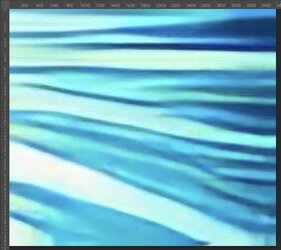
As another example, I took your left image (starring image above) and showed it below the result, getting it up to 3600 pixels on a side in Photoshop. (screenshot)

Screenshot 2024-01-27 at 10.44.38 PM.jpg

It may seem counter-intuitive yet here are the steps I took:

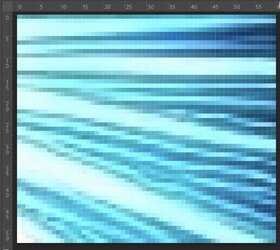
- Started with your starting image (note the pixel ruler is included):

Screenshot 2024-01-27 at 10.50.47 PM.jpg

I then reduced the image down to 12.5% of the original using the nearest neighbor interpolation model. This created an image with the smallest element in the 1-pixel range. TopazAI enlargement for the graphics model works better than starting with an enlarged image (again, note the pixel ruler is included)

Screenshot 2024-01-27 at 10.51.08 PM.jpg
- I then used Topaz AI to enlarge by 6x
- then, from Photoshop, I increased the size with Image resize by 10x (or 1000%) using Presever details 2 interpolation.

It yielded smoother lines. Of course, more work could be done to tune it in to ones needs yet wanted to show you a path that may be worth considering
If you have any questions, just ask
John Wheeler
 
HI @Love_N_Thunder

As another example, I took your left image (starring image above) and showed it below the result, getting it up to 3600 pixels on a side in Photoshop. (screenshot)

View attachment 142467

It may seem counter-intuitive yet here are the steps I took:

- Started with your starting image (note the pixel ruler is included):

View attachment 142468

I then reduced the image down to 12.5% of the original using the nearest neighbor interpolation model. This created an image with the smallest element in the 1-pixel range. TopazAI enlargement for the graphics model works better than starting with an enlarged image (again, note the pixel ruler is included)

View attachment 142469
- I then used Topaz AI to enlarge by 6x
- then, from Photoshop, I increased the size with Image resize by 10x (or 1000%) using Presever details 2 interpolation.

It yielded smoother lines. Of course, more work could be done to tune it in to ones needs yet wanted to show you a path that may be worth considering
If you have any questions, just ask
John Wheeler
You scaled it down? Hmmm.... I guess I should have mentioned this was only a small section of a much larger image that also contains text (I did not want to share the full image.) . Scaling it down might corrupt the text among other small details. (Perhaps I should have included a snippet of the original)
Technically speaking I suppose if I got passionate enough I could go manually through the image and pixel by pixel fix it... but wow that would take so long especially with multiple images to edit.

Anyways I've included 3 files 2 are snippets from the original unedited image (note there is JPG compression artifacts which I filtered out before the nearest neighbour upscale - aka the images I provided in previous message) I have also included a .zip of these 2 images in case this forum scales them.

Original crop.png

Example 2.png
 

Attachments

  • unedited png.zip
    37.7 KB · Views: 2
Hi @Love_N_Thunder
Thank you for the extra details of what you are trying to achieve. Giving full recommendations without seeing the whole project/picture is hard.

So first, let me clarify. Whether it is any of the pieces of software you mentioned in your first post or using TopazAI, having the original pixel art without enlargement is essential for the process to be successful.

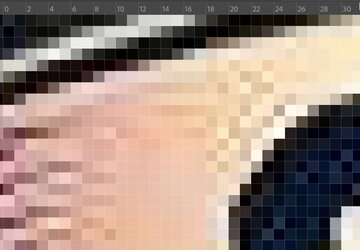
Your example with the letter C is an excellent example of pixel art when the features are created at the pixel level. I have taken a screenshot of the image (enlarged) along with the Photoshop ruler so it is clear that the features are only one or two pixels wide. That makes it a good subject for the software mentioned above to be successful. This is an enlargement of the image with the "C" enlarged and showing the area of just the upper left of the character "C" and up to the top edge:

Screenshot 2024-01-28 at 6.59.00 AM.jpg

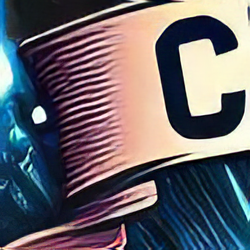
I took the PNG image you supplied and ran it through TopazAI with a 6X enlargement using the graphics model choice. It's not perfect yet. It did a reasonable job of removing the pixelation issue and preserving the text.

Example-2-with-TopazAI.png

From this 6X size, one could use the standard Image > Image Resize command to create higher-resolution images.
I hope that helps a bit more.
John Wheeler
 
Hi @Love_N_Thunder
Thank you for the extra details of what you are trying to achieve. Giving full recommendations without seeing the whole project/picture is hard.

So first, let me clarify. Whether it is any of the pieces of software you mentioned in your first post or using TopazAI, having the original pixel art without enlargement is essential for the process to be successful.

Your example with the letter C is an excellent example of pixel art when the features are created at the pixel level. I have taken a screenshot of the image (enlarged) along with the Photoshop ruler so it is clear that the features are only one or two pixels wide. That makes it a good subject for the software mentioned above to be successful. This is an enlargement of the image with the "C" enlarged and showing the area of just the upper left of the character "C" and up to the top edge:

View attachment 142476

I took the PNG image you supplied and ran it through TopazAI with a 6X enlargement using the graphics model choice. It's not perfect yet. It did a reasonable job of removing the pixelation issue and preserving the text.

View attachment 142477

From this 6X size, one could use the standard Image > Image Resize command to create higher-resolution images.
I hope that helps a bit more.
John Wheeler
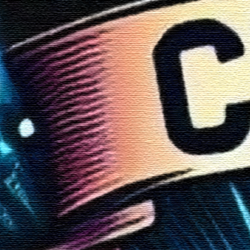
Here is an example of what I achieved with scaling up from the original 1024x1024 to 4096x4096 with "Nearest Neighbour" then applying "Underpainting" then I applied "Textureize - Canvas"

Which Topaz AI did you use in this example? There looks to be version 1 and 2 and also Topaz Gigapixel?

Example 3.png
 
Last edited:
Here is an example of what I achieved with scaling up from the original 1024x1024 to 4096x4096 with "Nearest Neighbour" then applying "Underpainting" then I applied "Textureize - Canvas"

Which Topaz AI did you use in this example? There looks to be version 1 and 2 and also Topaz Gigapixel?

View attachment 142496
Nice results.
I am using TopazAi 2024 version 2.2.2
John Wheeler
 

Back
Top