What's new
Photoshop Gurus Forum

Welcome to Photoshop Gurus forum. Register a free account today to become a member! It's completely free. Once signed in, you'll enjoy an ad-free experience and be able to participate on this site by adding your own topics and posts, as well as connect with other members through your own private inbox!

Fitting an image into a room layout


max.vesuvius

New Member
Messages
3
Likes
0
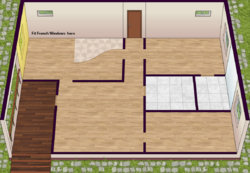
So I got this room layout, I need to know how I can fit or warp an image into the walls that are oddly shaped.
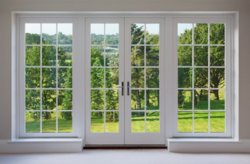
As an example, I highlighted the wall section in yellow where I want to fit french windows, any clues on how to do this?
 

Attachments

  • frenchdoors-1024x671-696x456.jpg
    frenchdoors-1024x671-696x456.jpg
    57.8 KB · Views: 9
  • Room-Layout.jpg
    Room-Layout.jpg
    187.8 KB · Views: 10
It would take a considerable amount of patience and trials to make it look convincing, but you can use Transform tool to achieve it. Once you click CTRL+T and in transform mode, you can press in CTRL and click on any corner to distort the image to suit your angle. Otherwise, the options inside Edit>Transform> Scale/Rotate/Skew/Distort/Perspective/Warp should help you achieve it.
I got something like this, which is unconvincing, but the perspective is the best I could get, given it was a straight angle pic being applied from a perpendicular view. It can serve indicational purposes.
1445-After-Room-Layout.jpg
 
Here is other quick way.
Put bottom left corner of window at bottom left corner of wall.
Pick MOVE tool and SELECT window. Hold CTRL and grab RIGHT bottom corner of window and drag to RIGHT bottom of wall.
Hold CTRL and grab LEFT top corner of window and drag to LEFT top corner of wall.
Hold CTRL and grab RIGHT top corner of window and drag to RIGHT top corner of wall.
Good to zoom in to better do adjustment.
If need to drag up or down in 90 degree can hold CTRL + SHIFT.
If explaining not good ask me to show with pictures.
 
It would take a considerable amount of patience and trials to make it look convincing, but you can use Transform tool to achieve it. Once you click CTRL+T and in transform mode, you can press in CTRL and click on any corner to distort the image to suit your angle. Otherwise, the options inside Edit>Transform> Scale/Rotate/Skew/Distort/Perspective/Warp should help you achieve it.
I got something like this, which is unconvincing, but the perspective is the best I could get, given it was a straight angle pic being applied from a perpendicular view. It can serve indicational purposes.
View attachment 88187
pretty decent polarwoc, but I can never really use the warp tools properly... tried and failed again!
 
I love to help out anyone who makes an attempt like yourself. I will surely help you out if you still do not understand after Ingrid explains.

Meanwhile, consider participating in our monthly contest. Please, comment as well. It encourages the participants. Thanks.
 
Here is explain for easy perspective:
1/ select object and move to where bottom left corner is in correct position.
Perspective.jpg
2/ Hold CTRL + SHIFT and drag LEFT TOP corner to correct position. This one 18 degrees.
Perspective-1.jpg
3/ Hold CTRL + SHIFT and drag RIGHT TOP corner to correct position. This one -42 degrees.
Perspective-2.jpg
4/ Hold CTRL + SHIFT and drag RIGHT BOTTOM corner to correct position. This one -50 degrees.
Perspective-3.jpg
This only one way to do perspective quickly. many more ways like others show.
 
That was a nice pictorial explanation @IngridO. One thing to note is that those angles specified are specific to the image used in the tutorial. Important thing to note is to hold CTRL + Shift and aligning the four corners suitably.
 
Thank you @polarwoc. I say in instructions that the degrees are for this one only so yes to use different degrees with different image. Also hold just only CTRL and it can move any way for different shape. I use this for doing Photoshop mockups. When zoom in can get very exact fitting for shape you want.
 

Back
Top