Photoshop Gurus Forum
Welcome to Photoshop Gurus forum. Register a free account today to become a member! It's completely free. Once signed in, you'll enjoy an ad-free experience and be able to participate on this site by adding your own topics and posts, as well as connect with other members through your own private inbox!
You are using an out of date browser. It may not display this or other websites correctly.
You should upgrade or use an alternative browser.
You should upgrade or use an alternative browser.
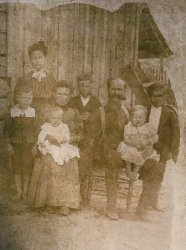
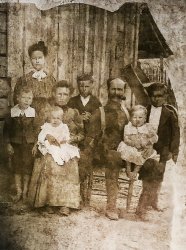
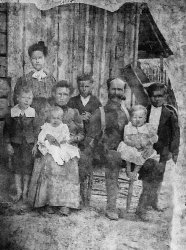
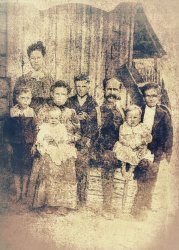
Restoration Gone As Far As I Can
- Thread starter WarrenG
- Start date
Being honest I don't see a good solution for this case... adding sharpness only will make the bad quality of the image more evidence and smoothen the faces will remove volume on the faces and make look really weird.
The only thing I could see that maybe could work is someone with really good drawing skills that can recreate the details lost in the process...But I don't know how to draw so I'm not sure either...
Cheers!
The only thing I could see that maybe could work is someone with really good drawing skills that can recreate the details lost in the process...But I don't know how to draw so I'm not sure either...
Cheers!
[ iLLuSioN ]
Power User
- Messages
- 428
- Likes
- 457
Thanks for your input, Argos. I tried a few things but none seemed to work. Was hoping someone would know of other Ps tools to use. Like you, I'm not an artist.Being honest I don't see a good solution for this case... adding sharpness only will make the bad quality of the image more evidence and smoothen the faces will remove volume on the faces and make look really weird.
The only thing I could see that maybe could work is someone with really good drawing skills that can recreate the details lost in the process...But I don't know how to draw so I'm not sure either...
Cheers!
Thanks, iLLuSioN. Adding contrast does add detail to the faces. Maybe I can add contrast and use a mask to apply it only to the faces. Wish there was a way to get all the faces more balance in tone - remove dark gray on some of them.I agree with Argos.
You can only "improve" the image by adding more contrast...
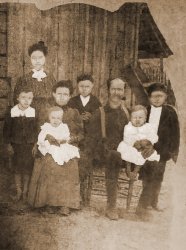
View attachment 116002View attachment 116003
Thanks, Babine. I'm not familiar with LUT overlays but assume they add vintage to the photo. The several curve adjustments brought out face detail but also added a lot of noise. That's my quandry - everything that increases face detail adds too much noise. It seems this photo is not easily restored because of lack of detail.
Thanks, Babine. I'm not familiar with LUT overlays but assume they add vintage to the photo. The several curve adjustments brought out face detail but also added a lot of noise. That's my quandry - everything that increases face detail adds too much noise. It seems this photo is not easily restored because of lack of detail.
Agreed. Much more time to be spent on this one. Cheers.
thebestcpu
Guru
- Messages
- 3,318
- Likes
- 3,066
Hi WarrenG
Pretty tough problem to create something out of nothing.
Just wanted to point out that especially with old pictures of generations past, expectations are not too high because so many that people see are not in great shape.
I personally think that trying to make radical changes will make it look worse or fake just because it does not fit with the rest of the image.
I think such is the case with you last fixes. The changes don't seem to fit in and pretty obvious that there was an attempt to add eyes.
I am no expert on the best techniques yet two that have work for me are
1) If here are other images of the same era of the same person, use that as an overlay to improve the image (this can be tricky as it too can appear as it does not fit with the image)
2) Use the clone stamp tool to use parts of the same face to replace the bad parts of the face. Note that the clone tool has options where you can use a horizontal mirror mode so copying one eye to match the other can be done pretty easily.
In the animated GIF image below I did some quick clone and stamp on the faces of 6 of he 8 folks to show what may be possible. Image will alternate between you last posted image before your gace changes and the quick clone work that I tried. The eye-brain combination looks for symmetry as pleasing so my goal was to make each face just slightly more symmetrical with this process.
Just wanted to provide you an idea a direction to consider. Hope this helps
John Wheeler
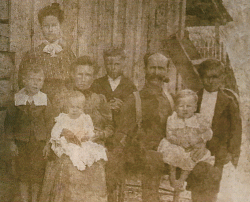

Wow - thanks so very much, John. Like you, I like to try to maintain the era look when restoring old photos. This one had me stumped on how to get the faces to where you could see them better. I like how you used the clone tool to copy the eyes. It improves the facial detail so you can see who the people are while keeping the natural look. Amazing how much eyes bring out facial detail. I'll go back to the beginning and try using the clone tool to copy over the better parts ofthe face to the other side. I guess you could also select a part of the face, copy it and paste to a new layer and then position it into place. Is it permissible on this forum for me to ask you to post your PSD file with the layers so I can see what steps you used?Hi WarrenG
Pretty tough problem to create something out of nothing.
Just wanted to point out that especially with old pictures of generations past, expectations are not too high because so many that people see are not in great shape.
I personally think that trying to make radical changes will make it look worse or fake just because it does not fit with the rest of the image.
I think such is the case with you last fixes. The changes don't seem to fit in and pretty obvious that there was an attempt to add eyes.
I am no expert on the best techniques yet two that have work for me are
1) If here are other images of the same era of the same person, use that as an overlay to improve the image (this can be tricky as it too can appear as it does not fit with the image)
2) Use the clone stamp tool to use parts of the same face to replace the bad parts of the face. Note that the clone tool has options where you can use a horizontal mirror mode so copying one eye to match the other can be done pretty easily.
In the animated GIF image below I did some quick clone and stamp on the faces of 6 of he 8 folks to show what may be possible. Image will alternate between you last posted image before your gace changes and the quick clone work that I tried. The eye-brain combination looks for symmetry as pleasing so my goal was to make each face just slightly more symmetrical with this process.
Just wanted to provide you an idea a direction to consider. Hope this helps
John Wheeler
View attachment 116065
Last edited:
thebestcpu
Guru
- Messages
- 3,318
- Likes
- 3,066
No problem.
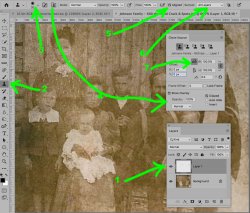
The PSD is attached as a dropbox link at the very end of this post yet it is pretty simple just a single added pixel Layer. So I am attached this picture with number pointers for what I did.
#1) So as not to destroy the original image, I created a blank Layer above the image and that is the Layer in which I did used the Clone Stamp. So all overplayed changes are contained in that one Layer. Note that you can use multiple Layers if you need to dived the work up more so lots of flexibility.
#2 Just shows the selection of the clone stamp tool
#3 I normally used a hard brush when cloning yet in the case of images with lots of noise, you can get a better natural blend if you use a soft brush. Mine was set ~30 yet you use what gives you the best result depending on many factors including the resolution of your image
#4 This shows the icon to bring up the Clone Source Panel explained in #7 below
#5 I often Clone Stamp with the Aligned option checked so if I use multiple stokes, the source point of the clone picks up where one left off.
#6 You will need the All Layers or Layers and below checked so the sampling for the Clone Stamp will reach down into the original image while it paints the result on the blank Layer.
#7 This is the specific setting in the Clone Stamp panel to reverse the horizontal direction for cloning. Pretty handy for copying in horizontal inverse. As you indicated, you could also duplicate the entire image and mask and move it around yet you would need to create a new Layer for each facial edit you were doing. Also, not all my Clone Stamp copies were all done with the horizontal direction reversed. For foreheads, I was cloning without the horizontal reverse turned on.
Hope this gives you a good starting point to explore this technique
John Wheeler
Here is the PSD file:
Link to Johnson Family sample PSD file
The PSD is attached as a dropbox link at the very end of this post yet it is pretty simple just a single added pixel Layer. So I am attached this picture with number pointers for what I did.
#1) So as not to destroy the original image, I created a blank Layer above the image and that is the Layer in which I did used the Clone Stamp. So all overplayed changes are contained in that one Layer. Note that you can use multiple Layers if you need to dived the work up more so lots of flexibility.
#2 Just shows the selection of the clone stamp tool
#3 I normally used a hard brush when cloning yet in the case of images with lots of noise, you can get a better natural blend if you use a soft brush. Mine was set ~30 yet you use what gives you the best result depending on many factors including the resolution of your image
#4 This shows the icon to bring up the Clone Source Panel explained in #7 below
#5 I often Clone Stamp with the Aligned option checked so if I use multiple stokes, the source point of the clone picks up where one left off.
#6 You will need the All Layers or Layers and below checked so the sampling for the Clone Stamp will reach down into the original image while it paints the result on the blank Layer.
#7 This is the specific setting in the Clone Stamp panel to reverse the horizontal direction for cloning. Pretty handy for copying in horizontal inverse. As you indicated, you could also duplicate the entire image and mask and move it around yet you would need to create a new Layer for each facial edit you were doing. Also, not all my Clone Stamp copies were all done with the horizontal direction reversed. For foreheads, I was cloning without the horizontal reverse turned on.
Hope this gives you a good starting point to explore this technique
John Wheeler

Here is the PSD file:
Link to Johnson Family sample PSD file
thebestcpu
Guru
- Messages
- 3,318
- Likes
- 3,066

