Hi. In PS CS5 I create a selection and desaturate the selection using Hue/Saturation. I then apply a color I want using the hexidecimal number. I have been adjusting the lightness level through hue/saturation by sight and it usually looks pretty good. However I need the color to look as accurate as possible. I remember reading something about the Info panel and adjusting the RGB to reflect a certain percentage of gray. Is there a way to adjust my gray to the right lightness to get a more accurate color? This part is confusing to me.
Photoshop Gurus Forum
Welcome to Photoshop Gurus forum. Register a free account today to become a member! It's completely free. Once signed in, you'll enjoy an ad-free experience and be able to participate on this site by adding your own topics and posts, as well as connect with other members through your own private inbox!
You are using an out of date browser. It may not display this or other websites correctly.
You should upgrade or use an alternative browser.
You should upgrade or use an alternative browser.
Grayscale and color brightness
- Thread starter puppychew
- Start date
o.robles
Well-Known Member
- Messages
- 151
- Likes
- 167
Also your monitor will display a different color according to the settings, also if you have a graphics card it will display a different color variation according to the settings, all this needs to be calibrated for a accurate color representation.
- Messages
- 3,357
- Likes
- 3,093
Hi Puppychew
One approach to maintain the original luminosity yet apply a different color is to:
1) Add an empty layer above your image and set the blend to "Color"
2) Paint on this Layer the desired color you want
Note that in Photoshop's Color Blend mode, color is the combination of Hue and Saturation settings.
What the Color Blend does is use the Luminosity of the Lower Level exactly, the Hue of the upper level exactly, and to extent possible, uses the Saturation of the upper Level as long as it is compatible with the Luminosity from the Lower Level.
Using an intermediate step going to B&W I suspect is also changing the Luminosity from the original image making it that much harder to get a match.
Give the above approach a try and see if gives you what you deisre. Just a suggestion
John Wheeler
- Messages
- 3,357
- Likes
- 3,093
HI Puppychew, it would be a lot easier if you took screen shots or cut and pastes or part of your screen and share them with the posts. Otherwise, it is like flying blind for other forum members as we cannot see your screen e.g. it sounds like you are using color styles and those include blend modes as well yet I was referring to the blend mode fo the whole Layer.
If you want to do this with a Hue/Sat adjustment Layer, turn off all color styles for now, set the Blend Mode for the Layer to Color and just adjust the Hue slider first and then the sat slider secondarily and see if that does the trick. Not sure what you are talking about turning the Layer on and off so getting totally confused on my end --- sorry. Pictures are worth a thousand words and I (or other forum members) can provide screen shots to guide you once I can see what your are trying to do.
If you want to do this with a Hue/Sat adjustment Layer, turn off all color styles for now, set the Blend Mode for the Layer to Color and just adjust the Hue slider first and then the sat slider secondarily and see if that does the trick. Not sure what you are talking about turning the Layer on and off so getting totally confused on my end --- sorry. Pictures are worth a thousand words and I (or other forum members) can provide screen shots to guide you once I can see what your are trying to do.
- Messages
- 24,263
- Likes
- 13,738
I agree.it would be a lot easier if you took screen shots or cut and pastes or part of your screen and share them with the posts.
You may also like to read this THREAD to see if it may help.
- Messages
- 3,357
- Likes
- 3,093
Hi Puppychew
Here are two screen shots to show what I was talking about as an example.
In the first image, I have a layer that shows the spectrum of colors on the bottom layer.
The second Layer is a Hue/Sat Layer masked to just change the upper half of the color Spectrum. This Layer is set to a blend of Color and the Hue set to +104 to force a significant color shift.
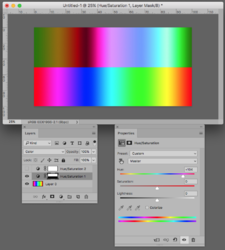
Now I add a second Hue/Sat adjustment Layer with Normal Blend and set the Saturation to zero. Not that the B&W results for the bottom half and upper half are identical even thought the color spectrum is widely shifted.
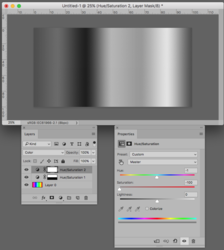
Now as it turns out, this is not perfect in matching Luminosity yet it is a good attempt because this is in RGB mode.
If you do the same experiement in the Color Mode of "LAB" you will get a closer visual match in Luminosity. I won't go into the details here yet thought this would get you going in how to shift colors and get a much closer Luminosity match as well.
Hope this helps
John Wheeler
Here are two screen shots to show what I was talking about as an example.
In the first image, I have a layer that shows the spectrum of colors on the bottom layer.
The second Layer is a Hue/Sat Layer masked to just change the upper half of the color Spectrum. This Layer is set to a blend of Color and the Hue set to +104 to force a significant color shift.

Now I add a second Hue/Sat adjustment Layer with Normal Blend and set the Saturation to zero. Not that the B&W results for the bottom half and upper half are identical even thought the color spectrum is widely shifted.

Now as it turns out, this is not perfect in matching Luminosity yet it is a good attempt because this is in RGB mode.
If you do the same experiement in the Color Mode of "LAB" you will get a closer visual match in Luminosity. I won't go into the details here yet thought this would get you going in how to shift colors and get a much closer Luminosity match as well.
Hope this helps
John Wheeler
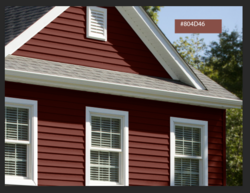
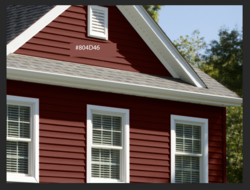
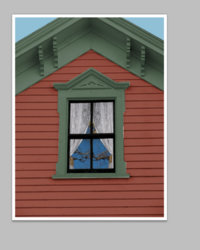
This is the image I am working on. I am coloring the body of the house Benjamin Moore Brick Red. The hexi decimal code for the color is #804D46 .I use that code in a color overlay.
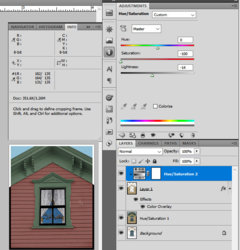
Here are my layers. The one discussed is the body color. I first desaturated the selection then I added the color overlay. I adjusted the lightness by comparing a paper swatch to the lightness on the monitor. I never mess with the hue because I have the color code.
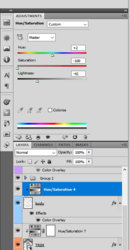
Why I am confused is that I remember reading that to get the correct lightness, you first make the selection gray then the RGB has to be a certain number to get the right lightness. Is that right?

Here are my layers. The one discussed is the body color. I first desaturated the selection then I added the color overlay. I adjusted the lightness by comparing a paper swatch to the lightness on the monitor. I never mess with the hue because I have the color code.

Why I am confused is that I remember reading that to get the correct lightness, you first make the selection gray then the RGB has to be a certain number to get the right lightness. Is that right?

- Messages
- 24,263
- Likes
- 13,738
Thanks John but I think I need to do this in baby steps. I'm not able to see your layers in the original post.
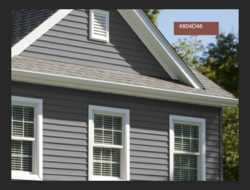
This is what I am starting with. I want to make the yellow clapboard brick red.
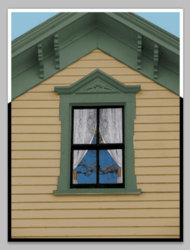
So first I make the selection into a layer.
Then I desaturate it.
Then I change the blend mode to "color"
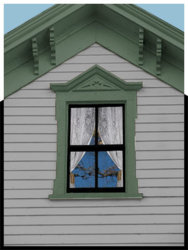
I think the part with the rectangle is just to compare the colors so i assume I skip that step and go to curves adjustment layer. This is where I am confused. In the example you matched the RGB to the RGB you want to match to but I do not have anything to match to except a color code.
This is what I am starting with. I want to make the yellow clapboard brick red.

So first I make the selection into a layer.
Then I desaturate it.
Then I change the blend mode to "color"

I think the part with the rectangle is just to compare the colors so i assume I skip that step and go to curves adjustment layer. This is where I am confused. In the example you matched the RGB to the RGB you want to match to but I do not have anything to match to except a color code.
- Messages
- 24,263
- Likes
- 13,738
My name is Sam. Please take a look at the original thread.............the layers are on the bottom of my post.Thanks John but I think I need to do this in baby steps. I'm not able to see your layers in the original post.
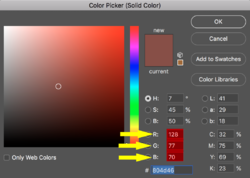
When you enter the color code at the bottom of your Color Picker, you also get the RGB values.In the example you matched the RGB to the RGB you want to match to but I do not have anything to match to except a color code.
- Messages
- 3,357
- Likes
- 3,093
Hi Puppychew
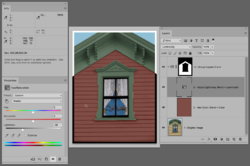
Here is my step by step with Layers shown in the image below.
Please note that your image needs to be in sRGB to get the color you want as the Hex color numbers used in Web design are only associated with sRGB to create the color with the associated name of that Hex number. I believe you already know this yet the images you posted came with no ICC profile tagged with them and that may or may not work depending of the Color Settings of your PS preferences
Layer 1 original image
Layers 2 thru 3 are grouped with Layer 4 which has a Layer mask for the house siding (Layer 4 left with default blending of Pass Through
Layer 2 is a solid color of #804d46 in sRGB which is the same as R=128 G=77 B= 70 in sRGB as Sam indicated above
Layer 3 is a Hue Sat Adjustment Layer with blend set to Luminosity
I have a color sampler point set on the siding as shown in the image to monitor the color (I had it set to RGB yet you could leave it in Web Color to see the Hex number as well
With that above setup, all you have to do is slide the Lightness slider in the Layer 3 until the info panel shows the desired RGB color. Layer 2 will make sure that the Hue and Sat values will be correct.
It was pretty easy to do so hope this is of some help.
John Wheeler

Hi - I think most of my problem is with my inability to use PS. I see the layers you have but don't know how to create those layers. While it is probably simple I never added a blank layer and painted it in. I always used a color overlay. Is the way I've been doing this wrong or just a different way of getting to the same place?
In the above image for the Hue/Sat adjustment. The lightness is set for -38. What determines that setting?
In the above image for the Hue/Sat adjustment. The lightness is set for -38. What determines that setting?
- Messages
- 3,357
- Likes
- 3,093
Hi Puppychew
Many ways to create a Layer the most basic is the command Layer > New > Layer
Many ways to fill a Layer the most basic is using the Paint Bucket Tool
Yes there are many ways to do this and probably including a Color Overlay in the Layer Style panel. However, there are many options in the Color Overlay so I was trying to provide a more foolproof way to provide one way to do the job
The Lightness Value was adjusted until the color values from the Color Sampler point (values in the Info Panel) achieved the exact color that was desired. The -38 was the result of moving the slider until the right color / right color numbers were achieved
Yes most of the problem is probably a need for more PS training and suggest you start wtih:
https://helpx.adobe.com/photoshop/user-guide.html
Hope that helps.
Thanks! My main confusion was the setting of the lightness value. You do not adjust the lightness value to the color by eye - right?
So you're saying that you desaturate the old color. Then you add the new color code as a color overlay. The RGB value should be written down. Then you adjust the lightness value to match the RGB value of the color?
I tried doing a color reading but it keeps changing when I move the eyedrop around. Is there a way to lock it in?
- Messages
- 3,357
- Likes
- 3,093
Hi Puppychew
First, my approach as you may have noticed has nothing to do with desaturation. I was giving you an alternate approach to simply give you the color desired wihtout involving going to grayscale at all.
I am not adjusting by eye, I am adjusting by matching the exact numbers while the image is in sRGB color space (which is required if you want to match Hex number colors)
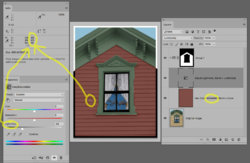
I changed the prior image to show the numbers in Hex (Web Colors) instead of RGB to make this even easier (you don't need to know the RGB number equivalent)
- I added the Hex number in the Layer label that you were trying to match.
- I used the Color Sampler tool with a sampling radius of 1 (point sample) and placed that on the siding of the image as circled in yellow. If you don't know the Color Sampler Tool then you can look that up in the tutorials as its a basic PS tool
- The info panel will show the color of that color sample and it is stable since the sample point does not change. You can change how the color numbers are viewed to be Web Colors (see Info Panel tutorial or Google it) so the sampled color is displayed in Hex directly if desired as shown in image.
- With the Hue/Sat adustment Layer selected, I moved the Lightness slider until the Hex numbers in the info panel match the hex number from your post and the same number I put in the Layer Label
- Not that since the original image is not a constant solid color (could be because it is JPEG) that any given sampling point will be a slightly different color. So in this version of the image I had selected a different point so the slider had to be moved to -44 to get the color number in the Info Panel to exactly match the desired Hex number.
So this is just coloring by the numbers giving you the exact desired color with non grayscale or desaturation involved.
Hope that helps
John Wheeler

- Messages
- 3,357
- Likes
- 3,093
Hi Puppychew
As you know, PS has many ways to get the same job done.
Unfortunately, within each Layer there are many options that can be chosen that will not show in a screen shot so I cannot give you an answer if you can do what you want from just the screenshot.
What would be needed is a detailed description of what each Layer is doing with what options/settings are used or uploading a copy of the PSD file for a forum member to examine the details of what you are doing and if you can easily achieve your desired result with that Layer structure.
So if your PS skills are not at a level to try a different basic approach as I have provided, I suggest you either upload the PSD to the forum or through a file sharing site and seek advise from a forum member. Someone could likely reverse engineer what your are trying to do with your approach and advise. I am on the forum sporadically and may not have time to jump in and start over from scratch with your approach.
Wishing you well on your project.
John Wheeler
Hi - I attached a psd file. I really prefer to do this by the method I am currently using and prefer to have the selection desaturated before adding the color. The main reason is once I have the correct desaturated lightness I can quickly do numerous color matches. Additionally I do not know PS enough to change my method.
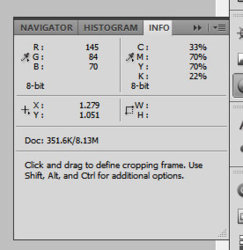
The problem I am having is with using the Info Panel to adjust the lightness setting. Maybe it's because I am using CS5. I never used the Info Panel before and am just learning to use it.
A mouse over shows the color code but when doing a reading it converts it to numbers.
Until now I have been adjusting the lightness by eye. What prompted me to post here is that I read somewhere that the grayscale lightness should be ### for RGB. Don't remember where I read this though - may have been Linda.com.

