What's new
Photoshop Gurus Forum

Welcome to Photoshop Gurus forum. Register a free account today to become a member! It's completely free. Once signed in, you'll enjoy an ad-free experience and be able to participate on this site by adding your own topics and posts, as well as connect with other members through your own private inbox!

Help I cannot figure out which filter is used for this photo


kristinleigh

New Member
Messages
2
Likes
0
Hello everyone,

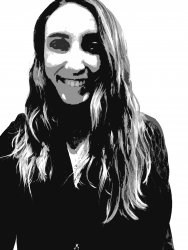
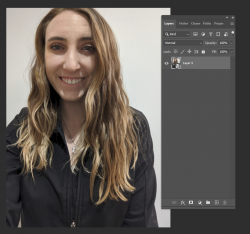
I need to edit my company's employee headshots for our wall and for months I have been playing around in photoshop with filters trying to match it up but I cannot figure it out for the life of me. Headshot one is what it is supposed to be. ANY help would save me so much time and frustration.

Thanks y'all


Headshot_One.png Headshot_Two.jpg
 

JeffK

Guru
Messages
2,497
Likes
2,898
As an example - playing with posterization:

Headshot_Two edited.jpg

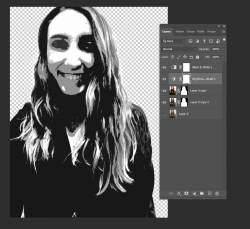
My workflow:

1637371068421.png

Method below - skip the Illustrator instructions. Cut out your subject from the background before you start and convert to b/w at the end;

 
Last edited:

Rich54

Guru
Messages
1,739
Likes
3,425
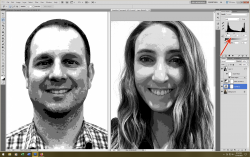
The main effect comes from the Poster Edges filter.
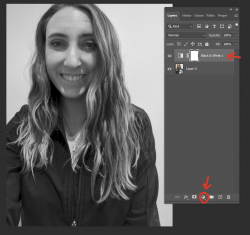
  • If you look at my layers palette below, I first used a Levels adjustment on your photo to boost the contrast. You can see the settings where the red arrow is pointing.
  • Then applied a Black & White adjustment layer above that.
  • As the top layer, I used Stamp Visible (Shft+Ctrl+Alt+E) to create a new image of you. Then I applied the Poster Edges filter to it (Edge Thickness = 0, Edge Intensity = 0, Posterization = 2).
  • Before applying the posterize filter, convert the top layer to a smart object. That allows you to go back and play with the filter settings later.


1637371041279.png
 

JeffK

Guru
Messages
2,497
Likes
2,898
One more as easy as can be made:

Open your image, right click, and convert to a smart object:

1637379042405.png

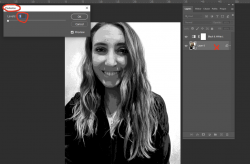
Now go to bottom of layers panel, click on that half moon round icon and choose Black and White:

1637379286823.png

Now, with the image layer active, go to top menu bar and click on *Image - Adjustments - Posterize.
That will open a Posterize dialog box with a slider. Make sure Preview box is checked. Here I set it to 5:
(*corrected from previous post)

1637379646058.png

The higher the number, the more grays are added. You can play with the number or slider and with Preview box checked, you can see what the image looks like
before you click ok.

After you click OK, and you don't like it, you can click on the Posterize smart filter icon in the layers panel that will reopen the Posterize dialog box so you can adjust if you want.

This is think better than first offer I made. Never rush to judgement I always say...and generally ignore... :cheesygrin:
 
Last edited:

Top