What's new
Photoshop Gurus Forum

Welcome to Photoshop Gurus forum. Register a free account today to become a member! It's completely free. Once signed in, you'll enjoy an ad-free experience and be able to participate on this site by adding your own topics and posts, as well as connect with other members through your own private inbox!

help with brushes


nonso

New Member
Messages
4
Likes
0
Hello,
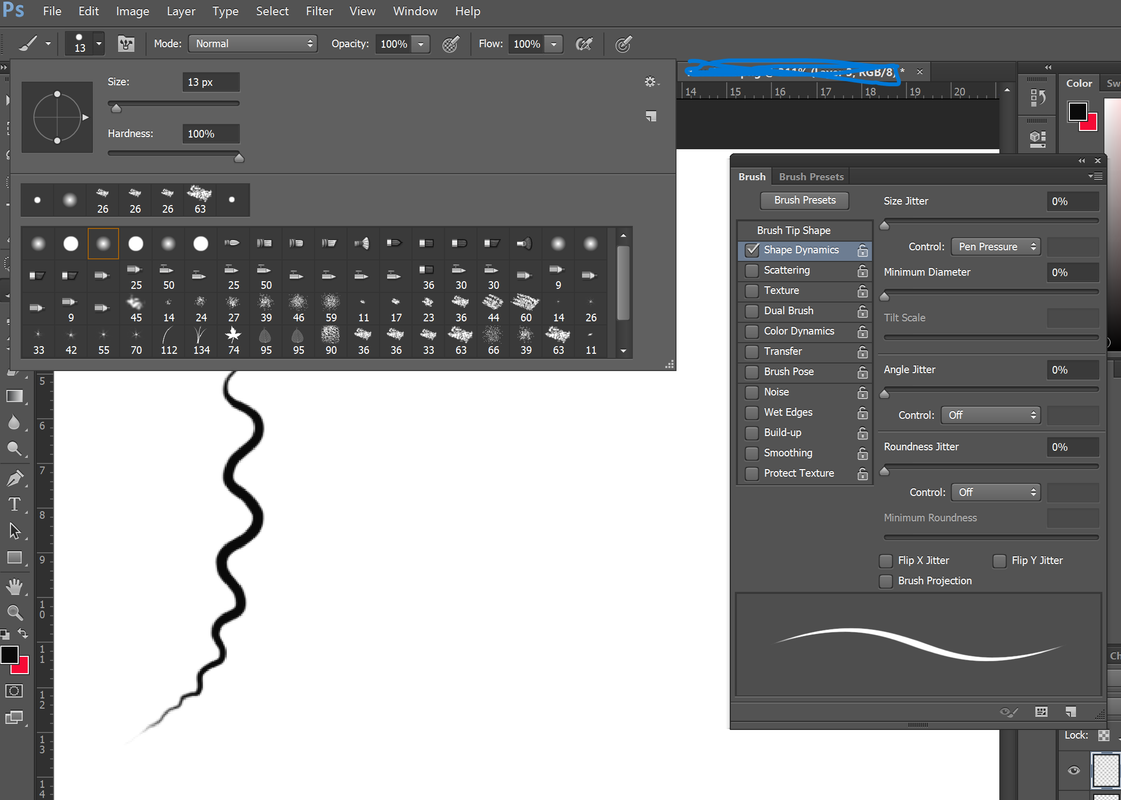
I'm facing a problem with the brushes.
I want to be able to regulate the thickness of the line based on the pressure I aply on the pen. But I don't want, at the same time, less opacity

to be more clear, I want this effect (you have to click the link to see well):


1.png


and not this effect:


2.png


what can I do to don't associate the pressure of the pen with the opacity, but just with the thickness of the line?

also what can I do to regulate the maximum and minimum thickness of the line?

thank you
 

MrToM

Guru
Messages
3,595
Likes
3,321
Hello nonso,
There is a preset brush that is size only by pen pressure, have you tried that?

Brush-Menu.png

Brushes-Panel.png


The Brush settings, Window > Brush Settings, allows you to set parameters for the current brush, including 'Minimum Diameter'.

Brush-Settings-Panel.png

You can set the maximum brush size as per normal with the '[' + ']' keys or scrubby size or however you please, that with the 'Minimum Diameter' setting should be what you want....or at least closer.

You can also save your brush settings to use again later.

Regards.
MrToM.
 

nonso

New Member
Messages
4
Likes
0
Thank you MrTom for the answer!

By using the brush you suggested (with 100% hardness option) I'm still not obtaining the result I want. for sure I need more confidence with the pen, but I'm quite sure I'm using the wrong brush with the wrong options

in this image you see on the left the kind of result I want to obtain and on the right the test (red arrows indicate where still opacity is present )

h


test1.png
 

MrToM

Guru
Messages
3,595
Likes
3,321
Darn.

I cannot replicate the problem.
Can you save the brush and post it here so I can try it?

Regards.
MrToM.
 

nonso

New Member
Messages
4
Likes
0
test0.png


here
 

MrToM

Guru
Messages
3,595
Likes
3,321
LOL...I actually meant the .abr file but never mind.

Maybe the 'pencil' is what you need? It has similar settings and you could always blur the result if you need that 'soft' edge.

Settings.png

Other than that I don't know, a 'soft' brush is created by having opacity so it may be unavoidable.

Regards.
MrToM.
 

thebestcpu

Guru
Messages
2,994
Likes
2,760
Hi @nonso . Mr Tom is correct in needing to use the Pencil too with anti alias set to zero.

The reason for this is that even with a brush set to 100% hardness and all options to not create opacity, the Brush tool still puts in antialiasing which is effectively reduced opacity at the edges.
This shows up the most when your lines approach one or a few pixels in size. I don't know how to turn off that anti-aliasing in the Brush tool (though someone else may).

It is not very obvious yet even though the Brush tool is set to 1 pixel, it is really not 1 pixel wide. It is actually about four pixels wide with the edges hidden by reduced transparency.
In the images below I will demonstrate what I mean.

This first picture shows two lines. The top line is a 13 pixel brush with 100% hardness and settings that allow no opacity. It is set to fade in the Brush dynamics to simulate lighter pen pressure out to the end. The lower line is just a 1 pixel line drawn horizontally. Both images end on the right vertical guide. Note that I drew the lines on a transparent layer over a white background Layer:

Screen Shot 2023-03-18 at 11.04.39 AM.jpg


This next image has no changes other than zooming in to the end of both lines so you can see the anti-aliasing for each. Note that on the 1 pixel line there is no black just shades of gray (very soft):


Screen Shot 2023-03-18 at 11.05.20 AM.jpg

Now what I do is extract the transparency to a Layer Mask by using the command Layer > Layer Mask > From Transparency.
After that I turn off the Layer Mask so you can now see what was really drawn on the Layer:

Screen Shot 2023-03-18 at 11.06.22 AM.jpg


I have the pixel grid turned on so you can see the minimum size of what Photoshop actually drew was 4 pixels at the minimum and it was the anti-aliasing from the included edge transparency that made it look smaller and also softer.

One way to get around your problem is to draw at on a Layer that has many more pixels so that the minimum width your draw does not approach a small number of pixels. Other then that, you would need to use the Pencil tool.

There is more finessing that could be done yet at that point your are trying to work around that basic operation of the brush.

Hope this helps explain what is going on
John Wheeler
 

MrToM

Guru
Messages
3,595
Likes
3,321
Hope this helps explain what is going on
It does!
It tried your example with a large soft round brush and ended up with a large hard square...
20230318-181607.png20230318-181617.png

I don't know how to turn off that anti-aliasing in the Brush tool (though someone else may).
From what I can gather I don't think it's possible, most seem to say that the brush tool without anti-aliasing IS the pencil tool, so yeah, I think you nailed it.

Regards.
MrToM.
 

thebestcpu

Guru
Messages
2,994
Likes
2,760
Hi @MrToM

It appears all of the brushes are made the same way. I did the same process on a leaf brush.

Brush outline:

Screen Shot 2023-03-18 at 8.28.33 PM.JPG


Here is the actual stamp of the brush in black:

Screen Shot 2023-03-18 at 8.31.26 PM.JPG


and then when extracting the transparency to a maxk layer and disabling it:

Screen Shot 2023-03-18 at 8.35.18 PM.JPG

Yet the real issue for the OP was that even with a totally solid brush, the anti-aliasing (edge transparency)is still there and makes small structures considerably transparent.

One more interesting thing under the Photoshop hood :)

John Wheeler
 

Top