What's new
Photoshop Gurus Forum

Welcome to Photoshop Gurus forum. Register a free account today to become a member! It's completely free. Once signed in, you'll enjoy an ad-free experience and be able to participate on this site by adding your own topics and posts, as well as connect with other members through your own private inbox!

Help with white spot color


humblehyper

Member
Messages
8
Likes
0
I created an action but when I apply it to an image with black color it doesn't lay white ink under it, I want to keep it as it is that lays gradient white in some colors, I dont want to big solid block of white under any color. What am I missing? thank you very much!

atn file
 

thebestcpu

Guru
Messages
2,989
Likes
2,748
Could you provide an example image with which you have a problem.
Are you working in Multi-channel mode with only spot colors?
An example and more details would be helpful
John Wheeler
 

thebestcpu

Guru
Messages
2,989
Likes
2,748
Hi @humblehyper
Here is my shot at answering your question with not other information right now.
First there are two issues in general.
You Action for the spot color is set to black and not white
At the end of your action, the Spot Layer remains in place. This is OK as long as you are doing nothing else with the image. If you run the Action a second time it will add a second "White" labeled channel.

The action is doing exactly what you are telling it to do

In the second Layer, the black remains black when desaturated.
You invert the Layer so the black remains white
You make a selection based on the channel so the white areas are fully 100% selected
Then the selection is inverted which turns the selection for the white ares (the original black area) totally off
So when you create a white channel, no white is placed in the black areas for that spot channel because the selection is totally turned off.

Hope this helps get you going in the right direction
John Wheeler

Of course I may be totally missing what you are trying to do :)
 

humblehyper

Member
Messages
8
Likes
0
Thank you John, how do I fix it? I just follow a guide online and created this myself LOL thank you very much again!
 

thebestcpu

Guru
Messages
2,989
Likes
2,748
Hi @humblehyper
It may be a language barrier and it could be me yet there is definitively clarity of communication.
I suggest you look at the Levels Adjustment Layer and how to use its capability and also read the PS language it uses for adjusting tone in the various ways it offers such as
Shadows, Midtones, Highlights, and Output Levels (both for Black Level and White Level).

In your request use that type of language and we can probably make better progress.
All a selection of the RGB channel does help specify which level of luminosity levels you want adjusted in the image (as in Luminosity Masks)

I am sure it is clear in your mind what you want except I am not a long distance mind reader so we have to go for better communication.
Once we know what you want stated in PS terminology it should not be hard to specify the steps needed and from there making an Action is pretty straightforward.

Alternately another forum member may jump in with better insight than I :)
John Wheeler

Help file link the Levels Adjustment Layer
 

humblehyper

Member
Messages
8
Likes
0
No language barrier sir, I understand what you're saying, it's just that I honestly have no clue how to edit this action file, the action file itself is good for my application but I just need to add a white underbase on any black pixels on every image that I import with black colors either by editing or updating what is missing in this action file :).

Example image below, I want the white under on any of the black pixel, the current action file doesn't do it. Thank you again sir!

16x20-1-scaled.jpg
 

[ iLLuSioN ]

Power User
Messages
386
Likes
399
A little tip: If you want to offer your action commercially later, you should make sure that it is language-independent.
 

thebestcpu

Guru
Messages
2,989
Likes
2,748
Hi @humblehyper

Thanks for the sample image.
I took your image and ran your provided Action.
The result is the same identical image that I began with and also a single spot channel.
I have provided two screenshots below.

My expertise is not in printing with spot channels

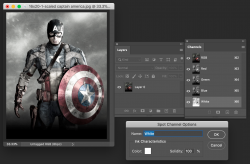
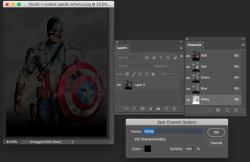
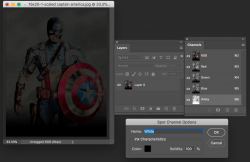
First Screenshot is with all channels turned on (note that the ink color is set to Black for your Spot channel as set in your Action)
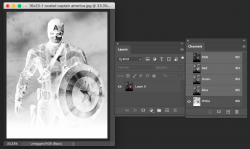
Second Screenshot is with the spot channel ink changed to white (I changed in mannually)
Third image is just the spot channel by itself as a grayscale image. The light areas is where the spot channel color will be applied the most (you can choose any color)
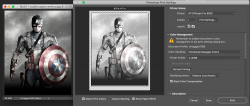
Fourth image is the print preview going to an HP printer - So getting the right color on print take more work than a standard color managed workflow

Also note that if you save as a JPEG to share online, the white channel will not appear.

If all the above makes sense to you and is what you want, they we can proceed.

Let me know based on the images which one is most correct and how it needs to change.
Also, it would be helpful if you are actually using a printer with more "plates" that can accomodate extra colors in printing or what is your target end result (or are you just experimenting with Photoshop)?

Hope this helps get us on a direction to help more
John Wheeler

Image screen shot after running sample image with your Action "As Is"
Screen Shot 2021-06-13 at 8.53.22 AM.png


Image after running your action and changing spot channel color to white:

Screen Shot 2021-06-13 at 8.54.31 AM.png

Spot Channel by itself:

Screen Shot 2021-06-13 at 8.48.33 AM.png


Preview image on Printer Panel when spot channel is using white ink:

Screen Shot 2021-06-13 at 9.03.16 AM.png
 

humblehyper

Member
Messages
8
Likes
0
Hi John, when you look at the "spot channel by itself" screenshot, anything that is shaded black will have white underbase, by looking at the source image, you'll notice that all the black ink of the artwork does not have any white underbase when running the action file. Thank you again for your assistance!
 

thebestcpu

Guru
Messages
2,989
Likes
2,748
Hi John, when you look at the "spot channel by itself" screenshot, anything that is shaded black will have white underbase, by looking at the source image, you'll notice that all the black ink of the artwork does not have any white underbase when running the action file. Thank you again for your assistance!

HI @humblehyper
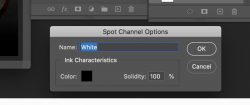
To be clear, when I run the action on your image "As Is" with no other adjustments the results I get are below (that seems pretty broken to me unless I just don't get it). Not white underbase is added at all anywhere. It is just a black paintover because the ink for the spot channel is set to Black:

Screen Shot 2021-06-13 at 8.53.22 AM.png
 

thebestcpu

Guru
Messages
2,989
Likes
2,748
BTW @humblehyper
Though not an expert on terminology when it comes to spot channels, I normally think of spot channels as adding ink on top of an image.
When I think of a white underbase, I usually think in terms of a full white background and having in the next higher Layer either image transparency or a Layer Mask to show through to the background Layer (or underbase).

FYI
John Wheeler
 

humblehyper

Member
Messages
8
Likes
0
HI @humblehyper
To be clear, when I run the action on your image "As Is" with no other adjustments the results I get are below (that seems pretty broken to me unless I just don't get it). Not white underbase is added at all anywhere. It is just a black paintover because the ink for the spot channel is set to Black:

View attachment 121803
1623631965380.png
Although it shows color black, when i print it, it prints a white underbase then colors on top, I mainly use this on my direct to garment machine (tshirt printer), I can change that color to any color and it will still print white ink, my program read that channel as white ink regardless of the color and solidity. Thank you!
 

thebestcpu

Guru
Messages
2,989
Likes
2,748
Thanks @humblehyper
That gives me a good perspective of what you are doing and how your printing.
With that new information let me echo back what I heard to make sure I have it right.
With your garment machine, it will create an underlying white amount of ink. The amount of white ink is inversely proportional to the amount of white showing in the Spot Channel that was created.
So if the Spot channel is white, then no white ink is deposited. The darker areas on the Spot Channel is where more white ink is deposited. I assume if a portion of the Spot Channel is pure black, then your printer would deposit the maximum amount of white ink.

Therefore, the way you set up the Spot channel the black areas of the original image created a Spot Channel area that was pure white and therefore would not place any white underlay.

I will assume my understanding above is correct with the solution I provide below.

In the steps you take to create the channel, you create a second duplicate Layer of the original image.
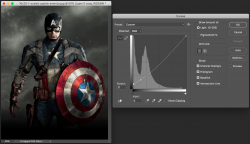
Before you create the selection for that second Layer, you need to change its tonality to raise the black levels up a bit. You may also need to change the gamma (contrast) to compensate to keep the rest of the image similar.

You can do that by using the command Image > Adjustments > Curves
You move up the black point a little bit so the blacks are no solid black and create another point on the curve to more quickly bring in line for the rest of the image. (image below)
The exact curve to you would have to be determined by experimentation as I don't know how to implement color and tonality management with spot colors (another forum member might)
Then when you create the selection and create the Spot Channel, it should work.

Let me know if this gets you on a path to achieve your desired result
John Wheeler

Screen Shot 2021-06-13 at 7.44.22 PM.png

After
 

humblehyper

Member
Messages
8
Likes
0
Yes you nailed it! I'll try the curves, im assuming i'd have to do this on all my artwork with black? Thank you again! I really appreciate it!
 

thebestcpu

Guru
Messages
2,989
Likes
2,748
You’re welcome @humblehyper and hope that addressed your project issues. I think you will learn by experience when you need to make the adjustment discussed.
 

Top