What's new
Photoshop Gurus Forum

Welcome to Photoshop Gurus forum. Register a free account today to become a member! It's completely free. Once signed in, you'll enjoy an ad-free experience and be able to participate on this site by adding your own topics and posts, as well as connect with other members through your own private inbox!

Help with work in progress


Vafann

Guru
Messages
1,362
Likes
378
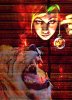
I have been trying to work on the thing that isn´t finished at all, but I must have gone overboard as usual with the curves and exposure and I don´t know what else. I can´t fix it even if I go through the layers and the history. I don´t know what I´ve done.

For one thing I´m wondering if there is any way to lighten this thing up, it´s way too dark I think. And I have been trying to learn to use layer masks, and it is going kind of ok, but how do I for example make this lion look more blended into the picture, and not so "cutout" looking? :)

bakom-persiennen-2.jpg
 

Vafann

Guru
Messages
1,362
Likes
378
Thank you Senior S! well, I was actually able to make it look something like that but then it all looked too red. Maybe I should desaturate it or something? With the lion I would like to know how to maybe make the edges a litte less sharp and flat looking. Thank you for taking the time to do that, I will try to at least make the lion a bit more the same color as the rest. I have eye problems so it could be that I don´t see things right. :) / vafann
 

SeniorS

Guru
Messages
1,747
Likes
520
I don't know what you really want to achieve, but one way is just copy lion to new layer, blur it and play with blending options and opacity. Maybe make one more copy and give some other blending.
That one is with planks copied over and overlay. If repaet it then it looks like fire which can make some sence in that image. If give it to normal with 40% opacity then planks hides lian a little.

To lighten it easiest way is make dublicate and change belnding to screen. Then with mask reduce lightness on too light areas or with curves take white point to about middle. And add some Shadows/Highlight (about +10).

It's looks red, if you want to reduce, then my way would make new adjusment layer Selective Color and reduce red (that would work on whole image) then with brush in mask give back red where it is needed.

P.S. It's friday i just don't want to work :)
 

Vafann

Guru
Messages
1,362
Likes
378
OK! Thank you! I will try everything, and if I can´t fix it I will just have to throw it away and start over again. This should teach me to be more careful, and not so sloppy and experimental when I don´t even know what I´m doing. lol

Thank you again Senior S :)
 

Paul

Former Member
Messages
12,879
Likes
7,023
I changed it to a male lion, is this what you are after?
 

Attachments

  • bakom-persiennen-2.jpg
    bakom-persiennen-2.jpg
    120.6 KB · Views: 10

Monkey Shepherd

Active Member
Messages
37
Likes
10
Hi Vafann.
Don't be so hard on yourself, it's process we go through to learn. What i find helps is save your work in stages as different psd files (say 1-8). This way you can always go back. It gives you more room to play, experiment and learn. I sometimes have up to 9 psd files before I'm happy with the work.
Have fun.
 

Vafann

Guru
Messages
1,362
Likes
378
Oh, thank you both Belial and Monkey. I have decided to start all over again, it´s so messed up that I can´t fix it. Well, you learn from your mistakes, and with the amount of mistakes I keep making, I am certainly going to learn a lot! lol!
 

Hoogle

Guru
Messages
8,334
Likes
2,587
you just needed to add a feather to the lion layer and then put an adjustment exposure layer on top to increase the brightness
 

Top