What's new
Photoshop Gurus Forum

Welcome to Photoshop Gurus forum. Register a free account today to become a member! It's completely free. Once signed in, you'll enjoy an ad-free experience and be able to participate on this site by adding your own topics and posts, as well as connect with other members through your own private inbox!

How can I “paint” from one layer to another?


ncop

Member
Messages
6
Likes
1
There is probably a simple way to do this but I have been going round in circles to try find it.

My aim is to have two layers in Photoshop of the same photo but edited separately in Lightroom (I can do this by opening each from Lightroom and the copy/paste one image to form a layer on the other). So, for example, I could have two versions of the same photo with different exposure levels.

My problem is that I want to selectively "paint" from one layer to the other. I would like to use a brush type tool to selectively copy from one layer. For example when I have a sunrise photo in which everything below the horizon is too dark I could edit one version of the photo for the sky and the second for the land. I could then paint over the layer with the underexposed land from the corrected layer.

I have tried using a Layer mask but when I try to edit the mask all I get is a black and white silhouette showing the selection so I cannot see which parts of the image I am editing.

Is there a tool or simple way to selectively "paint/copy" from one layer to the one underneath it. If I was simply editing in Photoshop (and not Lightroom) I could use the history brush tool to paint from one version to another. But I want each layer edited separately in Lightroom.

I use Photoshop CS3 (but do preliminary editing in Lightroom 5).
 

thebestcpu

Guru
Messages
2,988
Likes
2,747
Doesn't Lightroom 5 have an Adjustment Brush where you can selectively paint on your image a different tone (exposure/contrast/etc etc) to achieve the same effect while staying just in Lightroom.

The way to do it in Photoshop is using a Layer Mask and properly painting on the Layer Mask with the appropriate brush softness and opacity. It has limits thought. When coming back form Photoshop, it would come back as a third image not as the original two separate images. So that path you are taking sounds much more complex than using an Adjustment Brush in Lightroom. I may not understand all of your requirements though
John Wheeler
 

IamSam

Administrator
Staff member
Administrator
Messages
22,721
Likes
13,258
My problem is that I want to selectively "paint" from one layer to the other. I would like to use a brush type tool to selectively copy from one layer. For example when I have a sunrise photo in which everything below the horizon is too dark I could edit one version of the photo for the sky and the second for the land. I could then paint over the layer with the underexposed land from the corrected layer.
As John has already pointed out, this is accomplished using layer masks in Photoshop.

I have tried using a Layer mask but when I try to edit the mask all I get is a black and white silhouette showing the selection so I cannot see which parts of the image I am editing.
You are just not using the layer mask properly.

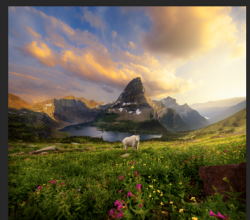
Here is an image.......
Screen Shot 2020-06-18 at 9.56.09 PM.png

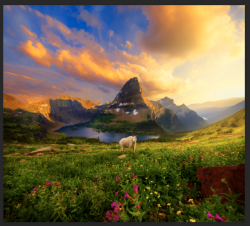
Here's the same image that's been altered in Lr.
Screen Shot 2020-06-18 at 9.55.56 PM.png

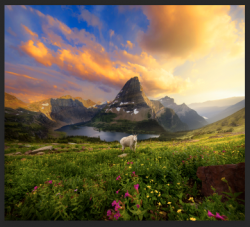
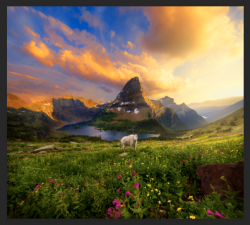
Here is a combination of both blended with a layer mask.
Screen Shot 2020-06-18 at 9.59.51 PM.png
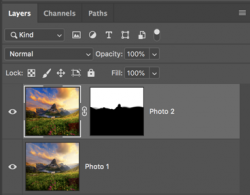
Screen Shot 2020-06-18 at 10.09.45 PM.png

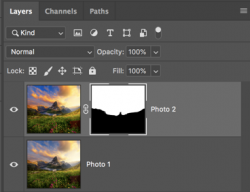
Editing is just a matter of selecting the layer mask by clicking on it, make sure the layer mask is surrounded by white brackets.
Then use the brush tool to make the changes.
Edited image.
Screen Shot 2020-06-18 at 10.05.54 PM.png

Edited layer mask (note: layer mask is selected with white brackets)
Screen Shot 2020-06-18 at 10.11.35 PM.png
 

ncop

Member
Messages
6
Likes
1
Doesn't Lightroom 5 have an Adjustment Brush where you can selectively paint on your image a different tone (exposure/contrast/etc etc) to achieve the same effect while staying just in Lightroom.

The way to do it in Photoshop is using a Layer Mask and properly painting on the Layer Mask with the appropriate brush softness and opacity. It has limits thought. When coming back form Photoshop, it would come back as a third image not as the original two separate images. So that path you are taking sounds much more complex than using an Adjustment Brush in Lightroom. I may not understand all of your requirements though
John Wheeler

Many thanks for this.

I have tried using the adjustment brush but I would prefer to make several global adjustments (such as exposure, clarity, contract, colour etc) in Lightroom. And then when I am happy with the result (for each version) export them to Photoshop and combine them. A typical use would be a sunrise photo where the top is overexposed and the lower half under-exposed.

It seems, as you say, a Layer Mask is the way to go. I will try this again - it appears I was not doing this correctly as all I got what a black and white silhouette. My aim is to "paint" from one Lightroom edited version to another. This would be analogous to using the History Brush tool to paint from one Photoshop edited image from another version.
 

ncop

Member
Messages
6
Likes
1
As John has already pointed out, this is accomplished using layer masks in Photoshop.


You are just not using the layer mask properly.

Here is an image.......
View attachment 113252

Here's the same image that's been altered in Lr.
View attachment 113253

Here is a combination of both blended with a layer mask.
View attachment 113254
View attachment 113260

Editing is just a matter of selecting the layer mask by clicking on it, make sure the layer mask is surrounded by white brackets.
Then use the brush tool to make the changes.
Edited image.
View attachment 113256

Edited layer mask (note: layer mask is selected with white brackets)
View attachment 113261
Many thanks for this.

As you say, it seems I have not understood how Layer Masks work. I will try again as you explain above and see if I can achieve what I am trying to do. All I really want to do is have two version of an image edited in Lightroom (with global adjustments) and then in Photoshop selectively "paint" from one to the other. This would be analogous to using the History Brush tool to paint from one Photoshop edited image from another version.This would be analogous to using the History Brush tool to paint from one Photoshop edited image from another version.
 

ncop

Member
Messages
6
Likes
1
Doesn't Lightroom 5 have an Adjustment Brush where you can selectively paint on your image a different tone (exposure/contrast/etc etc) to achieve the same effect while staying just in Lightroom.

The way to do it in Photoshop is using a Layer Mask and properly painting on the Layer Mask with the appropriate brush softness and opacity. It has limits thought. When coming back form Photoshop, it would come back as a third image not as the original two separate images. So that path you are taking sounds much more complex than using an Adjustment Brush in Lightroom. I may not understand all of your requirements though
John Wheeler

I have tried the Layer Mask approach again and now I am using it correctly it does what I was looking for. But I realise it is tricker than I thought because the border line between the two versions can be very obvious unless great care is taken to apply the brush correctly. And as you say I need to experiment with the brush softness and opacity. The image I am editing is a sunrise photo in which the land is very dark and the sea/sky is very light - having created the layer mask I find that it is difficult to make the border line (where the land meets the sea) appear natural but I will practice.

Thanks again for your help.
 

IamSam

Administrator
Staff member
Administrator
Messages
22,721
Likes
13,258
Also remember....

A white layer mask reveals the layer it's masking and conceals the underlying layer.

A black layer mask conceals the layer it's masking and reveals the underlying layer.

If you use a Black brush on a white layer mask, you see through the masked layer where you are brushing, through to the underlying layer.

If you use a White brush on a black layer mask, you are concealing the underlying layer thus reveling the masked layer .
 

ncop

Member
Messages
6
Likes
1
Also remember....

A white layer mask reveals the layer it's masking and conceals the underlying layer.

A black layer mask conceals the layer it's masking and reveals the underlying layer.

If you use a Black brush on a white layer mask, you see through the masked layer where you are brushing, through to the underlying layer.

If you use a White brush on a black layer mask, you are concealing the underlying layer thus reveling the masked layer .

Thanks for this - all very clear.
 

thebestcpu

Guru
Messages
2,988
Likes
2,747
Here is a link that goes through the basics and adds some tips not already covered in the posts above.
https://helpx.adobe.com/photoshop/how-to/combine-image-layer-mask.html
Besides painting with the brush tool, most any other adjustment tool can be used on the mask as well.
If you have sharp boundaries on the Layer Mask that you want softened, you could use the Blur Tool, or even apply a Blur Filter such as a Gaussian Blur.

So many ways to get the job done. The Layer Mask is just another canvas upon which to paint. Just limited to white, black, and gray tones.
John Wheeler
 

Top