What's new
Photoshop Gurus Forum

Welcome to Photoshop Gurus forum. Register a free account today to become a member! It's completely free. Once signed in, you'll enjoy an ad-free experience and be able to participate on this site by adding your own topics and posts, as well as connect with other members through your own private inbox!

how do you shrink photos?


hello
click on the layer of that photo and hit (command+T for mac or Ctrl+T for windows) then reduce it by dragging the border of the image down to the wished size ..
that's it ,
hope that helpd
 
in that you need to stroking the image by doing this :
*double click on the image layer
*the layer style window popes out you go down to Stroke
* then personalize your frame as you want.
 
i attatched a photo. i want a background for the photo like they did the grey background
 

Attachments

  • 326448_344969968865394_100000571812997_1288570_1972859048_o.jpg
    326448_344969968865394_100000571812997_1288570_1972859048_o.jpg
    115.9 KB · Views: 0
for that one you will have to use the gradient tool :
----------------
Access the Gradient Tool:

gradienttool.gif
Using the tool is straight forward but understanding the behavior of the tool can take some getting use to. Fill a selection by clicking and dragging the pointer across the canvas or selection. The larger the drag the more gradual the gradient will be. All of the control of the tool lies in the dragging of the pointer. Pressing and holding theshift key will create perfectly aligned gradients.
Gradient the Canvas:

  1. Select the paint bucket tool (G then shift+G).
  2. Click and drag a gradient path to fill the canvas with a gradient.
    gradientthecanvas.jpg
Mastering the behavior of this tool takes time and practice. Take time to play around with the foreground colors and try many different gradients before diving too deep into other features of the gradient tool.
photoshop - gradient tool option bar

The option bar for this tool is loaded with features to customize gradients. Everything from presets to the opacity of the fill can be found along the top of the screen while the gradient tool is selected.
Gradient Tool Options Bar:

gradienttooloptionsbar.gif
Be sure to remember to save gradient tools as presets if you find a combination of features you enjoy.
photoshop - gradient tool editor

We mentioned above that gradients can be fully customized. A throng of options can be accessed via the gradient editor located along the gradient options bar.
Gradient Tool Editor:

  1. Click the drop down list located next to the gradient tool icon in the options bar.
    gradienttooleditor.gif
The editor brings up a listing of each of Photoshop's built-in presets and lists more specific details about each preset. These details are customizable, lets run through some of the details to aid you in your gradient customization.
The first two fields allow you to change the name of the gradient and to select the type of gradient. Two types are available: solid and noise. The next field adjusts the smoothness of the transition between each gradient color. Run through these options just to see what changes take place, the smoothness adjustment is very subtle.
Name, Type, and Smoothness:

nametypesmoothness.gif
Pressing the New button creates officially creates the gradient and saves it to the presets with the name you specified.
At the bottom of the editor lies an image of the gradient that acts as a preview of the changes you made to your gradient. The sliders at the top and bottom of the gradient serve as points where fine tuning your gradient is done.
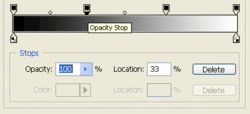
The top sliders are called opacity stoppers can be moved around by either clicking and dragging them or changing the location input field to a setting between 1 and 100. The top sliders adjust the opacity setting of that point of the gradient. This allows you to soften the transition of the gradient or simply allow the gradient to overlay another image. Additional top sliders can be added by clicking along the top border of the image.
Top Sliders: Opacity:

topslidersopacity.gif
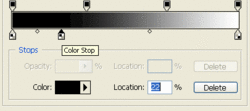
The bottom sliders work similarly to the top ones as fas as adding additional bottom sliders and adjusting the location of each slider. The different between the two is that the bottom sliders are called Color Stopps and allow you to change the color of the gradient at that selected point.
Bottom Sliders: Color:

bottomsliderscolor.gif
Additionally, the points located between each stopper can be adjusted or slid from side to side altering the gradient slightly. As you may deduce, there are limitless options available to the gradient tool, toy with the settings and develop an understanding of how this editor works. This tool proves very useful in the world of web development and design.
photoshop - gradient types

The type of gradient can be changed by clicking the different icons at the top of the gradient tool options bar. You may select one of five gradient options:
  • Linear
  • Radial
  • Angle
  • Reflected
  • Diamond
Linear gradients are the default setting and are the type of gradient we have been working with thus far. Let's take a quick and dirty look at a few of these different types of gradients.
Gradient Types:

  1. Radial Gradient
    radialgradient.jpg
  2. Angle Gradient
    anglegradient.jpg
  3. Diamond Gradient
    diamondgradient.jpg
Select the reverse check box from the options bar to reverse the gradient. Change the opacity or blending options to create some very gnarly effects. The trick to this tool is to invest some time and effort to create some very great effects for your publications.
 
Nice tutorial on the use of gradient. The gradient is actually one of the many tools in Photoshop that can be used to create creative designs and effects in photographs and other graphics.
 

Back
Top