What's new
Photoshop Gurus Forum

Welcome to Photoshop Gurus forum. Register a free account today to become a member! It's completely free. Once signed in, you'll enjoy an ad-free experience and be able to participate on this site by adding your own topics and posts, as well as connect with other members through your own private inbox!

How to add image as a mural to a wall with the correct perspective


gravy_baby

Member
Messages
13
Likes
2
Hi All,

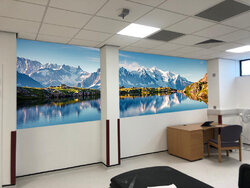
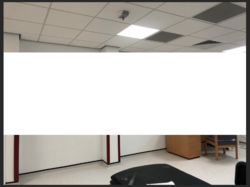
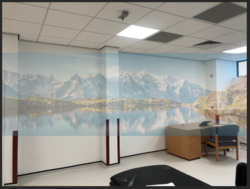
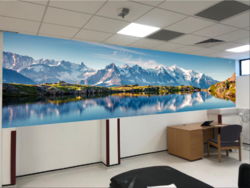
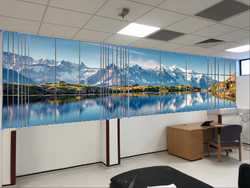
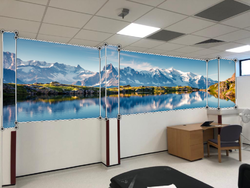
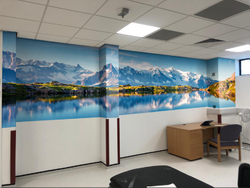
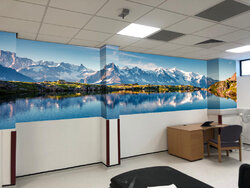
I am new here! Basically I need to add the image of the mountains onto the back wall of the background image as a mural above the dark maroon metal strips. The thing thing that is tricky is that I need to have the mural be on the columns as well as the back wall. I have been trying to use the vanishing point filter but it is rather tricky, as well as masking the columns out and applying the same mural image and trying to manually match the perspective, but again its really difficult to figure out the best way to make it work. Any advice and instruction on how I can do this for myself would be appreciated. Thanks!
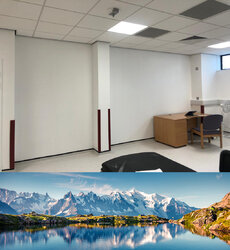
Art Test together V2.jpg
 
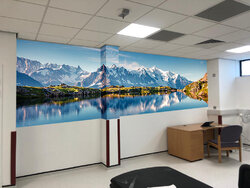
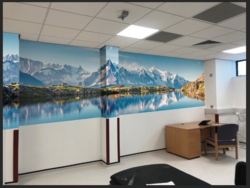
@Rich54 - don't know what the OP's opinion will be...but the column version is awesome!

Thanks. I'm pretty sure the second version is what's being asked for. But possibly he wants the mural wrapped around all the columns, even the ones on the far left and right. Once I get confirmation, I'll explain what I did.
 
Rich rightfully corrected me, thanks...........I was skimming again. Looking forward to seeing your solution for this effect!

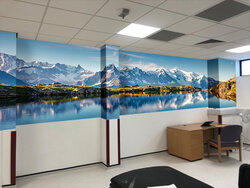
I tried the effect quickly this morning using smart objects. This gives you the ability to edit the scene with no effort once the work is done. But I don't know that I can explain the process easily.

Screen Shot 2022-04-01 at 8.41.04 AM.png
Screen Shot 2022-04-01 at 8.41.42 AM.png
 
Rich rightfully corrected me, thanks...........I was skimming again. Looking forward to seeing your solution for this effect!

I tried the effect quickly this morning using smart objects. This gives you the ability to edit the scene with no effort once the work is done. But I don't know that I can explain the process easily.

View attachment 128439
View attachment 128440
wow that looks so so good!! thanks so much for giving it a go! it just needs to be applied to the columns on the left too but I could that a whirl myself, I would be so grateful if you could explain to me how you went about it using the smart objects? I understand you said it isn't easy to explain but I would really appreciate it. The fact that you said that the scene can be edited afterwards with other art after the work is done would actually be perfect and so helpful to know.

Edit: Maybe if it's too hard to say the process in words you could maybe record your screen doing it and then you could send me the video and I could follow it?
 
Last edited:
Ok, here's how I did mine. I relied heavily on the Pen Tool, which allows you to make precise selections and then tweak them by moving the anchor points as needed. Some people are put-off by the Pen Tool because it seems too complicated, but in this case we're using only straight lines, no curves.

To do this scientifically, you need to establish the vanishing point, which sits off the page on the far right. Instead of that, I just did this first part by eye.
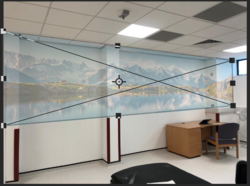
  • We need two perspective guidelines:
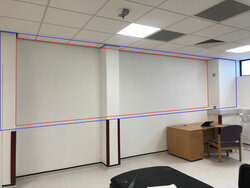
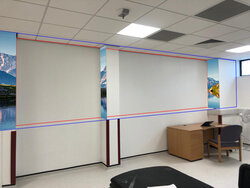
  • The first one (outlined in blue) shows the perspective as if the mural were stretched across the front of the columns. It can be created by following the angle where the columns meet the ceiling, and by the height of the maroon metal strips.
  • The second guideline (outlined in red) shows the perspective of the mural if it were only on the back wall. Use the ceiling line to establish the top border and—in the absence of the vanishing point—estimate the bottom border by eye.
  • Use the Pen Tool to create these two separate rectangular paths. Then apply a blue and red stroke to them on a new layer to establish the guidelines, like in the image below.
Mural Slide1.jpg


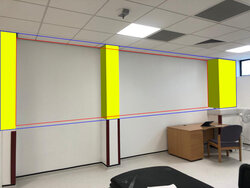
  • The next step is to use the Pen Tool to create five more rectangular paths: the fronts of the columns (shown in bright yellow for illustration) and the sides of the columns (shown in green). Each of these five shapes should be their own individual Pen path.
  • You'll notice that the top and bottom of the bright yellow shapes follow the angle of the blue guideline.
  • For the green shapes, the top and bottom edges start at the blue guideline and converge to the red guideline as they recede away from us.
Mural Slide2.jpg


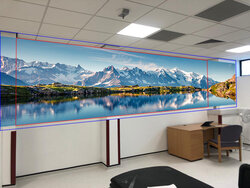
  • Now that you've created all these Pen paths, it's time to fit the mural to the wall.
  • Position your mural so that it fits the blue guideline in the horizontal direction and fits the red guideline in the vertical direction.
  • To fit it like this, you'll need some combination of Edit>Transform>Scale, Edit>Transform>Skew, and Edit>Transform>Distort.
  • Using these transforms, fit the mural like below.
  • Once you've got that done, duplicate the mural so that you have it on two layers. Label the first layer "Mural on Back Wall" and label the other layer "Mural on Columns".

Mural Slide3.jpg


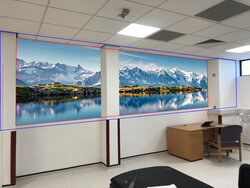
  • Turn off the visibility of the layer called Mural on Columns.
  • Add a layer mask to the layer called Mural on Wall. Using the five paths that you created for the five faces of the columns, mask away the columns, leaving the mural only on the back wall.
  • Like this:
Mural Slide4.jpg


  • Temporarily, turn off the visibility of the layer Mural on Wall. Turn-on the visibility of Mural on Columns.
  • Using the five path shapes you created for the columns, create a selection of each one and copy slices of the mural to their own layers.
  • When you're done, you'll have five separate layers. You can now turn off the visibility of the layer called Mural on Columns.
  • The layers for the fronts of each column need to be made taller to fit the angle of the blue guidelines. Use Edit>Transform>Skew to adjust each corner separately.
  • The layers for the sides of the columns also need to be adjusted using Edit>Transform>Skew. The corners need to meet the red guidelines as they recede away from us, and the other corners that are closest to us need to meet the blue guidelines.
  • Below shows three of the five shapes, thus far.
Mural Slide5.jpg


  • Once you've got all the column faces conforming to the blue or red guidelines, turn off the layer for the guidelines and turn on the layer called Mural on Back Wall.
  • In order to "sell" the illusion, we need some shading. If you look at the empty room (before any mural), you'll see areas of the wall and columns that are in shadow.
  • Create a Levels adjustment to darken the image. Then fill the layer mask of the Levels adjustment with black.
  • Using your Pen paths, create selections of the left sides of the columns and paint with white in the Levels mask. This creates shadows on the left side of each column.
  • Create another Levels adjustment shadow layer with only 50% of the strength of the first one. Study the blank wall (without the mural) and paint additional shadows on your mural corresponding to the actual shadows you see in the room.
  • At this point, you're essentially done. But there is one further nuance to consider, discussed below.
Mural Slide6.jpg


  • In the image below, the red arrows are pointing to the far sides of the columns that we cannot see. In theory, those portions of your mural should be hidden from view.
  • The right way to do that is copy the areas of the mural on the back wall, expand them to the left, and then delete that expanded area. The deleted portion would correspond to the mural that we cannot see because it's behing the column.
  • If this were a mural with people or recognizeable objects, this last step would be worth doing. But in this case, the mountains and shoreline all kinda look the same anyway, so it would be a lot of work for little gain. Your call.

Mural Slide7.jpg
 
Last edited:
Ok, here's how I did mine. I relied heavily on the Pen Tool, which allows you to make precise selections and then tweak them by moving the anchor points as needed. Some people are put-off by the Pen Tool because it seems too complicated, but in this case we're using only straight lines, no curves.

To do this scientifically, you need to establish the vanishing point, which sits off the page on the far right. Instead of that, I just did this first part by eye.
  • We need two perspective guidelines:
  • The first one (outlined in blue) shows the perspective as if the mural were stretched across the front of the columns. It can be created by following the angle where the columns meet the ceiling, and by the height of the maroon metal strips.
  • The second guideline (outlined in red) shows the perspective of the mural if it were only on the back wall. Use the ceiling line to establish the top border and—in the absence of the vanishing point—estimate the bottom border by eye.
  • Use the Pen Tool to create these two separate rectangular paths. Then apply a blue and red stroke to them on a new layer to establish the guidelines, like in the image below.
View attachment 128446


  • The next step is to use the Pen Tool to create five more rectangular paths: the fronts of the columns (shown in bright yellow for illustration) and the sides of the columns (shown in green). Each of these five shapes should be their own individual Pen path.
  • You'll notice that the top and bottom of the bright yellow shapes follow the angle of the blue guideline.
  • For the green shapes, the top and bottom edges start at the blue guideline and converge to the red guideline as they recede away from us.
View attachment 128450


  • Now that you've created all these Pen paths, it's time to fit the mural to the wall.
  • Position your mural so that it fits the blue guideline in the horizontal direction and fits the red guideline in the vertical direction.
  • To fit it like this, you'll need some combination of Edit>Transform>Scale, Edit>Transform>Skew, and Edit>Transform>Distort.
  • Using these transforms, fit the mural like below.
  • Once you've got that done, duplicate the mural so that you have it on two layers. Label the first layer "Mural on Back Wall" and label the other layer "Mural on Columns".

View attachment 128451


  • Turn off the visibility of the layer called Mural on Columns.
  • Add a layer mask to the layer called Mural on Wall. Using the five paths that you created for the five faces of the columns, mask away the columns, leaving the mural only on the back wall.
  • Like this:
View attachment 128452


  • Temporarily, turn off the visibility of the layer Mural on Wall. Turn-on the visibility of Mural on Columns.
  • Using the five path shapes you created for the columns, create a selection of each one and copy slices of the mural to their own layers.
  • When you're done, you'll have five separate layers. You can now turn off the visibility of the layer called Mural on Columns.
  • The layers for the fronts of each column need to be made taller to fit the angle of the blue guidelines. Use Edit>Transform>Skew to adjust each corner separately.
  • The layers for the sides of the columns also need to be adjusted using Edit>Transform>Skew. The corners need to meet the red guidelines as they recede away from us, and the other corners that are closest to us need to meet the blue guidelines.
  • Below shows three of the five shapes, thus far.
View attachment 128453


  • Once you've got all the column faces conforming to the blue or red guidelines, turn off the layer for the guidelines and turn on the layer called Mural on Back Wall.
  • In order to "sell" the illusion, we need some shading. If you look at the empty room (before any mural), you'll see areas of the wall and columns that are in shadow.
  • Create a Levels adjustment to darken the image. Then fill the layer mask of the Levels adjustment with black.
  • Using your Pen paths, create selections of the left sides of the columns and paint with white in the Levels mask. This creates shadows on the left side of each column.
  • Create another Levels adjustment shadow layer with only 50% of the strength of the first one. Study the blank wall (without the mural) and paint additional shadows on your mural corresponding to the actual shadows you see in the room.
  • At this point, you're essentially done. But there is one further nuance to consider, discussed below.
View attachment 128456


  • In the image below, the red arrows are pointing to the far sides of the columns that we cannot see. In theory, those portions of your mural should be hidden from view.
  • The right way to do that is copy the areas of the mural on the back wall, expand them to the left, and then delete that expanded area. The deleted portion would correspond to the mural that we cannot see because it's behing the column.
  • If this were a mural with people or recognizeable objects, this last step would be worth doing. But in this case, the mountains and shoreline all kinda look the same anyway, so it would be a lot of work for little gain. Your call.

View attachment 128458
Thank you so much for the thorough explanation! it means the world to me. I will give it a whirl and report back :)
 
Ok. We are going to be using Synced Smart Objects. Not to be mistaken for Linked Smart Objects.

Let me first explain how the SSO works.

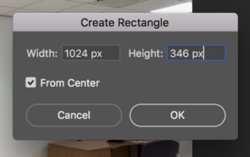
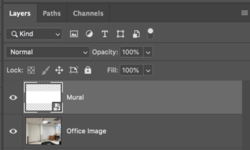
As it might relate to this particular project, Once I have the office image open, on a new layer I create a rectangle with the Rectangle Tool (Not the Rectangular Marquee Tool) that is the same size as the mural image. In this case it's original Mountain scene that was 1024px x 346px at 72ppi.
Screen Shot 2022-04-02 at 8.19.08 AM.png

It doesn't really matter where the rectangle is or what color it is. Be sure stroke is deactivated.
Screen Shot 2022-04-02 at 8.19.45 AM.png

Name the rectangle layer. In this case I called it "Mural".
Right click in the body of the layer and choose, "Convert to smart object".
Screen Shot 2022-04-02 at 8.25.28 AM.png

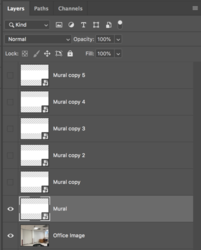
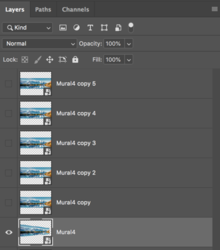
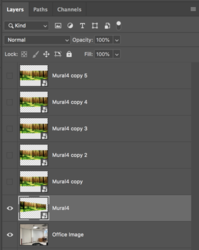
With the SO layer highlighted/selected, use Cmd/Cntrl + J to duplicate the SO layer 5 times.
Deactivate all duped layers except the main one.
Screen Shot 2022-04-02 at 8.30.08 AM.png

For this part of the demo, mouse over the thumbnail of the "Mural" SO layer and double click.
This opens a separate PSB document.
Screen Shot 2022-04-02 at 8.33.30 AM.png

While holding the shift key, now drag and drop the Mountain scene image onto the PSB document. Hit enter or OK.
Screen Shot 2022-04-02 at 8.33.51 AM.png

Now hit Cmd/Cntrl + S to save the state change of the PSB document.
Now go back to your original Mural document and see what happens to all of the synced smart objects!
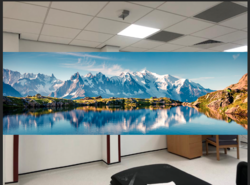
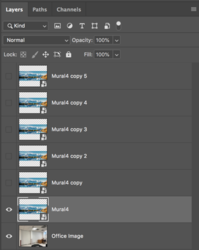
Notice that they have all updated to the Mountain scene!
Screen Shot 2022-04-02 at 8.38.22 AM.png
Screen Shot 2022-04-02 at 8.38.10 AM.png

OK, here's the really cool part.
Let's use free transform to fit the rectangle to the wall.

Lower the layers opacity so you can see through it.
Screen Shot 2022-04-02 at 8.43.01 AM.png

Use Cmd/Cntrl + T to enter free transform, right click and select "distort"
Click and drag the corner nodes to their proper position.
Screen Shot 2022-04-02 at 8.44.06 AM.png

Hit enter or OK to accept the state change.
Return the opacity to 100%.
Note, that while you did need to work out perspective of the transform box, the image inside was transformed by the SO.
Screen Shot 2022-04-02 at 8.44.21 AM.png

Note only that SSO layer was affected by the free transform. All the other SSo's are waiting their turn to be transformed.
Note: You always want to be left with an original version of the SSO rectangle. So as you use them, add more if needed by duplicating.
Screen Shot 2022-04-02 at 8.49.22 AM.png

This part explains how the SSO's work. The next part is almost identical to Rich's technique. Will cover that when I get the chance.
 
I tried to use Perspective Warp for this one, just for fun.
Everything is the same as others did: used Vanishing Point to make visual guides, converted mural image to SO, transformed it accordingly:

Mural_SO.png

Then used Perspective Warp. Here is Layout view:
Mural_PW_layout.png

And here is Warp view:

Mural_PW_Warp.png

As you can see the hidden sides can be just "squeezed out".

The final image:
Mural_PW_Final.png

Although I admit that Perspective Warp is not a perfect tool sometimes and it takes a lot of getting used to:)
Just tried to explore the other ways...
 
I tried to use Perspective Warp for this one, just for fun.
Everything is the same as others did: used Vanishing Point to make visual guides, converted mural image to SO, transformed it accordingly:
As you can see the hidden sides can be just "squeezed out".
Although I admit that Perspective Warp is not a perfect tool sometimes and it takes a lot of getting used to:)
Just tried to explore the other ways...

Nice one. My very old version of Photoshop (CS5) doesn't have perspective warp, so I didn't even know it existed. I like the way you easily dealt with the portion of the mural that we can't see because it's behind the column.
 
Ok, here's how I did mine. I relied heavily on the Pen Tool, which allows you to make precise selections and then tweak them by moving the anchor points as needed. Some people are put-off by the Pen Tool because it seems too complicated, but in this case we're using only straight lines, no curves.

To do this scientifically, you need to establish the vanishing point, which sits off the page on the far right. Instead of that, I just did this first part by eye.
  • We need two perspective guidelines:
  • The first one (outlined in blue) shows the perspective as if the mural were stretched across the front of the columns. It can be created by following the angle where the columns meet the ceiling, and by the height of the maroon metal strips.
  • The second guideline (outlined in red) shows the perspective of the mural if it were only on the back wall. Use the ceiling line to establish the top border and—in the absence of the vanishing point—estimate the bottom border by eye.
  • Use the Pen Tool to create these two separate rectangular paths. Then apply a blue and red stroke to them on a new layer to establish the guidelines, like in the image below.
View attachment 128446


  • The next step is to use the Pen Tool to create five more rectangular paths: the fronts of the columns (shown in bright yellow for illustration) and the sides of the columns (shown in green). Each of these five shapes should be their own individual Pen path.
  • You'll notice that the top and bottom of the bright yellow shapes follow the angle of the blue guideline.
  • For the green shapes, the top and bottom edges start at the blue guideline and converge to the red guideline as they recede away from us.
View attachment 128450


  • Now that you've created all these Pen paths, it's time to fit the mural to the wall.
  • Position your mural so that it fits the blue guideline in the horizontal direction and fits the red guideline in the vertical direction.
  • To fit it like this, you'll need some combination of Edit>Transform>Scale, Edit>Transform>Skew, and Edit>Transform>Distort.
  • Using these transforms, fit the mural like below.
  • Once you've got that done, duplicate the mural so that you have it on two layers. Label the first layer "Mural on Back Wall" and label the other layer "Mural on Columns".

View attachment 128451


  • Turn off the visibility of the layer called Mural on Columns.
  • Add a layer mask to the layer called Mural on Wall. Using the five paths that you created for the five faces of the columns, mask away the columns, leaving the mural only on the back wall.
  • Like this:
View attachment 128452


  • Temporarily, turn off the visibility of the layer Mural on Wall. Turn-on the visibility of Mural on Columns.
  • Using the five path shapes you created for the columns, create a selection of each one and copy slices of the mural to their own layers.
  • When you're done, you'll have five separate layers. You can now turn off the visibility of the layer called Mural on Columns.
  • The layers for the fronts of each column need to be made taller to fit the angle of the blue guidelines. Use Edit>Transform>Skew to adjust each corner separately.
  • The layers for the sides of the columns also need to be adjusted using Edit>Transform>Skew. The corners need to meet the red guidelines as they recede away from us, and the other corners that are closest to us need to meet the blue guidelines.
  • Below shows three of the five shapes, thus far.
View attachment 128453


  • Once you've got all the column faces conforming to the blue or red guidelines, turn off the layer for the guidelines and turn on the layer called Mural on Back Wall.
  • In order to "sell" the illusion, we need some shading. If you look at the empty room (before any mural), you'll see areas of the wall and columns that are in shadow.
  • Create a Levels adjustment to darken the image. Then fill the layer mask of the Levels adjustment with black.
  • Using your Pen paths, create selections of the left sides of the columns and paint with white in the Levels mask. This creates shadows on the left side of each column.
  • Create another Levels adjustment shadow layer with only 50% of the strength of the first one. Study the blank wall (without the mural) and paint additional shadows on your mural corresponding to the actual shadows you see in the room.
  • At this point, you're essentially done. But there is one further nuance to consider, discussed below.
View attachment 128456


  • In the image below, the red arrows are pointing to the far sides of the columns that we cannot see. In theory, those portions of your mural should be hidden from view.
  • The right way to do that is copy the areas of the mural on the back wall, expand them to the left, and then delete that expanded area. The deleted portion would correspond to the mural that we cannot see because it's behing the column.
  • If this were a mural with people or recognizeable objects, this last step would be worth doing. But in this case, the mountains and shoreline all kinda look the same anyway, so it would be a lot of work for little gain. Your call.

View attachment 128458
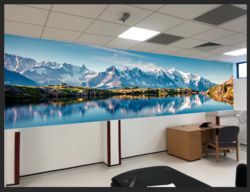
Worked a charm! Thanks so much for all the help! I've attached a pic below. One thing I would love to know you said earlier "This gives you the ability to edit the scene with no effort once the work is done" I would love to know how you go about putting in another image and having it replace the first one and completely changing the scene.

Export.jpg
 
I tried to use Perspective Warp for this one, just for fun.
Everything is the same as others did: used Vanishing Point to make visual guides, converted mural image to SO, transformed it accordingly:

View attachment 128483

Then used Perspective Warp. Here is Layout view:
View attachment 128484

And here is Warp view:

View attachment 128487

As you can see the hidden sides can be just "squeezed out".

The final image:
View attachment 128488

Although I admit that Perspective Warp is not a perfect tool sometimes and it takes a lot of getting used to:)
Just tried to explore the other ways...
WOW lovely stuff! Funny you should mention it I seen a post on insta of someone using the perspective warp tool and thought it would work a charm, ive never used it before and couldn't get used to the grid and having it look the way I wanted but I think you've explained exactly how to go about it so I can this a whirl too! Also it seems pretty handy to pull the back part of the mural to the left a bit so that it pulls the mural behind the column parts so thanks a bunch! Also I love what you've done with the shadows! did you paint those in?
 
Worked a charm! Thanks so much for all the help! I've attached a pic below. One thing I would love to know you said earlier "This gives you the ability to edit the scene with no effort once the work is done" I would love to know how you go about putting in another image and having it replace the first one and completely changing the scene.

Nice job. I don't think I've ever done something like this before. so it was fun to figure it out and to see other people's approaches.

Regarding the ability to edit the scene, that was IamSam's approach, not mine. If you look at IamSam's most recent post in this thread, he creates a blank rectangle in the exact dimension of your mural and then converts that rectangle to a Smart Object. I'm over-simplifying, but essentially he does all the perspective manipulations on the blank rectangular Smart Object. Once you've done that, you can then insert any image into the Smart Object and that new image will automatically be coverted to the correct perspective view.
 
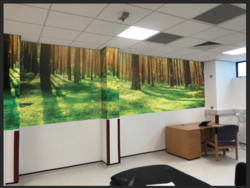
I would love to know how you go about putting in another image and having it replace the first one and completely changing the scene.
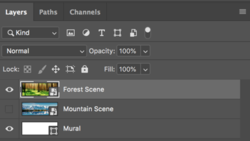
This is done using the SSO's.

Return to the PSB document or double click any of the SSO's.
Turn off the original "Mountain Scene"

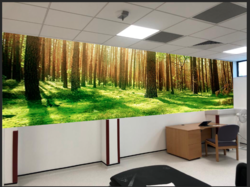
Then drag and drop a new scene.........in this case a "Forrest Scene"
Cmd/Cntrl + S to save and update the all SSO's

This is the PSB file/document
Screen Shot 2022-04-02 at 7.51.10 PM.png
Screen Shot 2022-04-02 at 7.52.59 PM.png

This will update the original document (Mural)
Screen Shot 2022-04-02 at 7.54.16 PM.png
Screen Shot 2022-04-02 at 7.54.28 PM.png

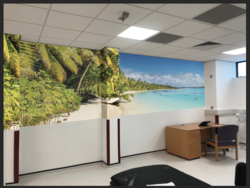
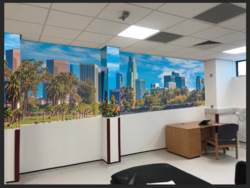
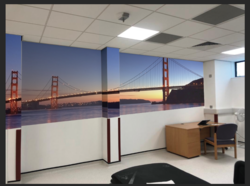
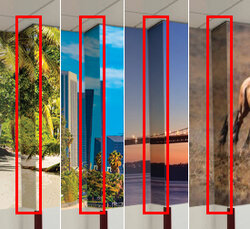
Had we used the SSO's to create our wall mural. It would be instantly updated!


Example from my first demo in post #5.......

Beach
Screen Shot 2022-04-02 at 8.00.51 PM.png

City
Screen Shot 2022-04-02 at 8.03.01 PM.png

Godengate
Screen Shot 2022-04-02 at 8.05.41 PM.png

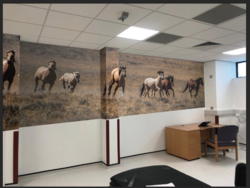
Wild Horses
Screen Shot 2022-04-02 at 8.08.04 PM.png

You can change it instantly anytime present or future to any image you wish to have on the wall.
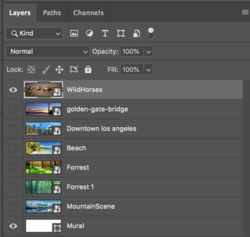
PSB document layers panel.....
Screen Shot 2022-04-02 at 8.09.19 PM.png
 
This is done using the SSO's.

Return to the PSB document or double click any of the SSO's.
Turn off the original "Mountain Scene"

Then drag and drop a new scene.........in this case a "Forrest Scene"
Cmd/Cntrl + S to save and update the all SSO's

This is the PSB file/document
View attachment 128490
View attachment 128491

This will update the original document (Mural)
View attachment 128492
View attachment 128493

Had we used the SSO's to create our wall mural. It would be instantly updated!


Example from my first demo in post #5.......

Beach
View attachment 128494

City
View attachment 128495

Godengate
View attachment 128496

Wild Horses
View attachment 128497

You can change it instantly anytime present or future to any image you wish to have on the wall.
PSB document layers panel.....
View attachment 128498
Thanks a million for explaining how to do this! This will be so handy I will have to give it a whirl.
 

Back
Top