What's new
Photoshop Gurus Forum

Welcome to Photoshop Gurus forum. Register a free account today to become a member! It's completely free. Once signed in, you'll enjoy an ad-free experience and be able to participate on this site by adding your own topics and posts, as well as connect with other members through your own private inbox!

How to create attractive T-shirt


Nancy021

Member
Messages
6
Likes
0
Hello all,
I am a newbie here and newbie in Photoshop. I easily learn, but I've been stuck in creating T-shirts (not design, I am fine with it, just T-shirt).
I have been searching for tutorials for weeks now, but didn't find anything. Maybe someone may help me.
Actually I sell designed shirts and I would like to present them in a great style. I noticed others do it perfect. I am also absolutely sure they do it in Photoshop. The attractive example is not a real photo.
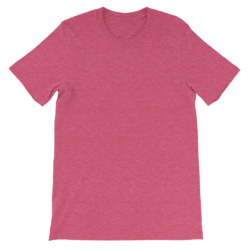
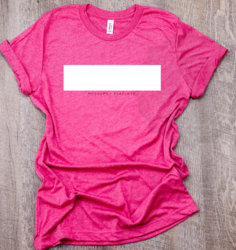
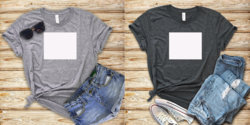
So, my question is how to create some realistic shirts with wrinkles and folds, folded sleeve? I am providing examples of one plain shirt they use to get an attractive shirt.
Thank you.
Nancy
 

Attachments

  • EMPTY222_mockup_Front_Flat_Heather-Raspberry.png
    EMPTY222_mockup_Front_Flat_Heather-Raspberry.png
    1.1 MB · Views: 1
  • EXAMPLE.jpg
    EXAMPLE.jpg
    1.2 MB · Views: 1
So, my question is how to create some realistic shirts with wrinkles and folds, folded sleeve?
You photograph them yourself.

Both of the image examples of t-shirts you provided are photographs. These were not created in Photoshop.
 
You'll have to add the wrinkles in yourself, check this tutorial out:
 
@Nxxl Since this is not your video I feel safe in stating that the technique in the video looks very very fake. Two major problems happen with this technique, one is that the texture of the material would not be present in the faked wrinkles and the second is that there is no edge fabric distortion corresponding to the newly added fake wrinkles.

I'm not saying that someone can't create a wrinkled or folded t-shirt using Ps, it's just labor intensive and very hard to make it look realistic.

You would do better using an existing photo of a real t-shirt and using a Ps warping function to add wrinkles, folds, and distortions. But remember, the OP has already stated that they are new to Photoshop. These are more advanced techniques.......you cant run before you learn to walk.

But if you want to save yourself some time, you should consider photographing the wrinkled and folded tees yourself.
 
This videp pops up every time I search on Google. Unfortunatelly I am not satisfied with it, especially I used to experiment with that kind of wrinkles before. Anyway, I am enormously grateful for your time and help, Nxxl.
IamSam, I will check out the link you provided and also, many many thanks for your time and effort.
 
IamSam. I bought two shirts with different colors, if you pay attention you will notice exactly the same wrinkles and shades. So, I think it's photoshoped. Maybe one is a photograph the other is not.
 

Attachments

  • EXAMPLE444.jpg
    EXAMPLE444.jpg
    1.9 MB · Views: 0
It's a T shirt mockup that they are using - an image of a T shirt onto which they photoshop the different patterns and designs.

But still, you will have to photograph a plain T shirt (without any designs and favorably a light, solid color) placed in the way you want it and create a mock-up out of that.
 
About the first two photos I sent: Yes the first is photography, the second, attractive one is manipulated by Photoshop. I know that because of it's unnatural and unrealistic color. I got the same color exploring with distrort-displace...
 
1. Start off by getting / taking a picture of a Plain T shirt with a Solid, Light color.

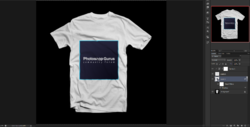
2. Make a Selection (using any of the selection tools) on the T Shirt, in the shape of the pattern that you will be adding onto the T Shirt. In my case, I was going to be adding a Rectangular Logo, hence I made a Rectangular Selection. If you're changing the pattern and color of the T shirt, select the whole shirt (I haven't tried this, so I'm not sure of the exact results.)

3. Fill the selection with any color of you choice; it's just to demarcate where the design goes. Right Click on this layer and select the option "Convert to Smart Object". This lets you edit this Red Area any number of times and add in your designs, while maintaining the shape, transformations (like warping etc) to it, as well as the "Displacement" Effect to it, which I have explained further on.
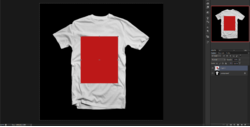
Capture1.PNG

4. [Optional] - In case your T shirt is being worn by a person, you will have to warp the Red Area in order to take the Curves and Bends on the sides of the person, so that it looks realistic. Do this by Selecting the Red Area Layer > Ctrl+T > Right Click on the Transformation Box > Warp.

5. Now double click on the Red Area Layer OR right click on the layer and select the "Edit Contents" option. This will open a New Layer Window (which has a .psb extention). Now, this is where you will add your design. Drag and Drop your Design into this Window, adjust it to fit within the bounds of the layer. Hide the Red Color Area so that only your design is visible.
Hit Ctrl+S after you've done your adjustments.
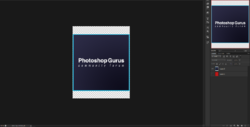
Capture2.PNG

6. You will now see your design on the shirt. But as you can see, it doesn't have the wrinkles on it, and it looks pasted on. To add in the wrinkles, make a selection conforming to the shape of the Design you have added. You can do this by holding Ctrl and clicking on the Layer containing your design. Now select the background layer (which contains only the T shirt) and press Ctrl+J. This will create a new layer containing only the selection. Drag this new layer ABOVE the Layer containing your Design.
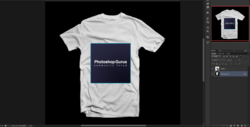
Capture3.PNG

  • Layer 1 = Contains the Design
  • Layer 2 = Contains the T Shirt Wrinkles (new layer containing what was selected)
7. Now open a Curves Adjustment Layer and clip it onto Layer 2. Do this by holding Alt and clicking on the edge between Curves Layer and Layer 2 (your cursor will change into a small down arrow). Now adjust the Curves layer in such a way that the layer becomes as White as possible while the wrinkles are still visible, like I have done.
[This is why you need a plain T shirt with a light color. It makes this step 10 fold easier.]
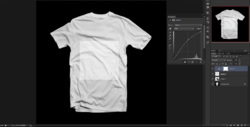

Capture4.PNG

8. Now right click on Layer 2 and change its Blend Mode to "Multiply". Now the wrinkles will be visible on the Design.
But if you look closely, the Text does not bend along with the wrinkles and folds on the T shirt.
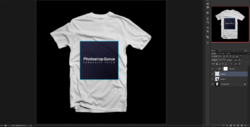
Capture5.PNG

9. To make the text and the borders etc to bend along with the curves and the folds of the T shirt, we will use the "Displacement" Filter.
Hide the Layer containing the Design (Layer 1) so that only the Wrinkles later and curves adjustment layer are visible.
Save this as a .PSD to anywhere on your desktop, with any name you want. Here I have named it 'Wrinkles.psd".
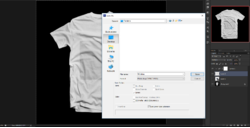
Capture6.PNG

10. Now make the Design Layer visible and select it. Navigate to Filter > Distort > Displace. Set any value for you Horizontal Scale and your Vertical Scale. Since your Design Layer is a Smart Object, you can change these values at any time. Capture7.PNG
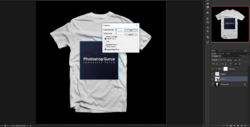
11. Once you click OK, you will have to select the .PSD file that you had saved earlier. I had saved it as "Wrinkles". Once you select the file, you get these results.
The design has conformed with the wrinkles and folds on the T shirt. You can now double click on the Smart Filter (visible below your Design Later) and change the Horizontal and Vertical Scale values to your liberty.Capture8.PNG

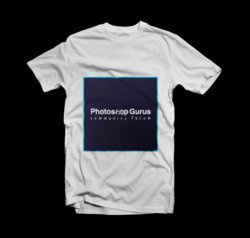
This is the Final Result.

Capture9.jpg

I hope the way I've explained isn't too confusing. Feel free to ask me any questions.
 
Nxxl Thank you so much for this amazing tutorial. I will follow it step by step. I am so amazed, I hope this will help others who are interested in same projects.
 
@IamSam. I bought two shirts with different colors, if you pay attention you will notice exactly the same wrinkles and shades. So, I think it's photoshoped. Maybe one is a photograph the other is not.........About the first two photos I sent: Yes the first is photography, the second, attractive one is manipulated by Photoshop. I know that because of it's unnatural and unrealistic color. I got the same color exploring with distrort-displace...
No matter what, both images are PHOTOGRAPHS, even after it has been manipulated using Photoshop, it's still a photograph.

I was paying very close attention! You never asked about changing the colors. You can change the color of the tees but you asked about adding wrinkles and folds. Here's your original question....."So, my question is how to create some realistic shirts with wrinkles and folds, folded sleeve? I am providing examples of one plain shirt they use to get an attractive shirt."

Here are some other tutorials about displacement mapping.....
https://www.youtube.com/results?search_query=photoshop+displacement+map

https://www.youtube.com/results?search_query=photoshop+displacement+map+on+tshirts

Here are some tutorials on changing the color of shirts....
https://www.youtube.com/results?search_query=Photoshop+change+color+of+tshirt
 

Back
Top