What's new
Photoshop Gurus Forum

Welcome to Photoshop Gurus forum. Register a free account today to become a member! It's completely free. Once signed in, you'll enjoy an ad-free experience and be able to participate on this site by adding your own topics and posts, as well as connect with other members through your own private inbox!

How to make specific selections


knowoneuno

Well-Known Member
Messages
111
Likes
11
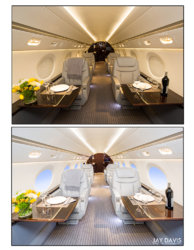
I want to learn the BEST and quickest way to make a precise selection around these windows without having
a jagged edge around the inside part of the windows, so I can add a gradient to the inside part of the windows.

I am NOT a photoshop expect at all, but you all were so wonderful a year ago or so, to help me learn how to do
a realistic reflection, I'd thought I would ask you again for help.

I viewed a few Photoshop videos yet still can't figure out the best way.

Some showed using a mask, others didn't. Any help would be greatly appreciated.

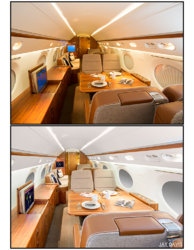
Here is a "before/after" example of what I am trying to accomplish.

Thank you!

G-V TET Interior Compare.jpg

G-450 BED Interior Compare.jpg

Gulfstream 450 HOU Interiors compare.jpg
 

Rich54

Guru
Messages
1,732
Likes
3,412
The Pen Tool is the best way to make precise curved selections. The Pen Tool can be very confusing at first, but with a little patience you'll get the hang of it. I recommend that you watch a few videos and then practice with it. (One tip: use as few "anchor points" as possible when making your path. This allows the curves connecting your anchor points to flow smoothly into each other.)


knowoneuno

Well-Known Member
Messages
111
Likes
11
The Pen Tool is the best way to make precise curved selections. The Pen Tool can be very confusing at first, but with a little patience you'll get the hang of it. I recommend that you watch a few videos and then practice with it. (One tip: use as few "anchor points" as possible when making your path. This allows the curves connecting your anchor points to flow smoothly into each other.)

Thanks.

So is there no way to draw around a window in the jet, for examples, using a lasso tool or something else and refining the edges where it isn't so jaded or the magic wand? Just curious.
 

Rich54

Guru
Messages
1,732
Likes
3,412
You asked for the best way to make a precise selection. The lasso tool, the magic wand, etc. will all give you a selection of varying degrees of precision, and they are all easier (at first) than the Pen Tool, so it's a trade-off of ease vs. precision. After the Pen Tool, I suppose the next best way might be to use Quick Mask mode.


knowoneuno

Well-Known Member
Messages
111
Likes
11
You asked for the best way to make a precise selection. The lasso tool, the magic wand, etc. will all give you a selection of varying degrees of precision, and they are all easier (at first) than the Pen Tool, so it's a trade-off of ease vs. precision. After the Pen Tool, I suppose the next best way might be to use Quick Mask mode.

If it is the best way to make a precise selection, I'll go with it. Thank you!
 

knowoneuno

Well-Known Member
Messages
111
Likes
11
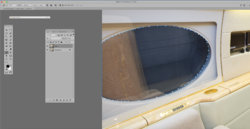
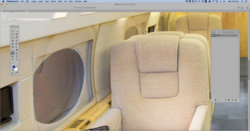
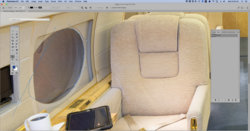
I used the pen tool to go around this window, yet I don't get the "marching ants". What have I done wrong and how do I make the selection even more precise?
Screen Shot 2018-12-24 at 11.00.41 AM copy.jpg
 

Rich54

Guru
Messages
1,732
Likes
3,412
You're almost there, but there's an important idea that you're missing. The whole point of the Pen Tool is to create perfectly smooth curves between your anchor points by manipulating the adjustment handles contained within each of the anchor points. What you have done instead is to simulate a curve by using perhaps 50 anchor points spaced very close together around the window. But yours is an imperfect curve because the Pen Tool connects each of your anchor points with a straight line. Instead, the trick is to use as few anchor points as possible and to then drag and manipulate the adjustment handles to create smooth curves between the anchor points.

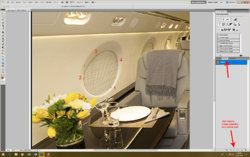
If you look at my image below, I have created a path around one of your airplane windows using only 4 anchor points (labeled 1-4) and then manipulating the adjustment handles to create a smoothly flowing curve between the four anchor points. (I first tried using only three anchor points but couldn't quite get it right.) This is the part that you need to practice and re-visit in the tutorials. You can see one of the adjustment handles extending upward from my #2 anchor point below. By manipulating the length and angle of that handle you can adjust the shape of the curve in and out of that anchor point.

Here's how to get the marching ants: Once you have created a path using the Pen Tool, go into the Paths palette (see upward-pointing red arrow in my attachment) and save it with a name so that you don't accidentally over-write it. (I named my path "window", which you can see below.) To create a marching-ants selection from the saved path, click on the path to activate it and then click the Selection icon (see the other red arrow in my attachment).

The Pen Tool is most definitely very confusing at first, but if you keep at it you'll find that it's invaluable.

airplane window.jpg
 

knowoneuno

Well-Known Member
Messages
111
Likes
11
You're almost there, but there's an important idea that you're missing. The whole point of the Pen Tool is to create perfectly smooth curves between your anchor points by manipulating the adjustment handles contained within each of the anchor points. What you have done instead is to simulate a curve by using perhaps 50 anchor points spaced very close together around the window. But yours is an imperfect curve because the Pen Tool connects each of your anchor points with a straight line. Instead, the trick is to use as few anchor points as possible and to then drag and manipulate the adjustment handles to create smooth curves between the anchor points.

If you look at my image below, I have created a path around one of your airplane windows using only 4 anchor points (labeled 1-4) and then manipulating the adjustment handles to create a smoothly flowing curve between the four anchor points. (I first tried using only three anchor points but couldn't quite get it right.) This is the part that you need to practice and re-visit in the tutorials. You can see one of the adjustment handles extending upward from my #2 anchor point below. By manipulating the length and angle of that handle you can adjust the shape of the curve in and out of that anchor point.

Here's how to get the marching ants: Once you have created a path using the Pen Tool, go into the Paths palette (see upward-pointing red arrow in my attachment) and save it with a name so that you don't accidentally over-write it. (I named my path "window", which you can see below.) To create a marching-ants selection from the saved path, click on the path to activate it and then click the Selection icon (see the other red arrow in my attachment).

The Pen Tool is most definitely very confusing at first, but if you keep at it you'll find that it's invaluable.

View attachment 94726
Thank you so much for explaining this better. I have watched the tutorial about six times already, guess I'll watch it another six times and practice your tips also. Really appreciate this!
 

Rich54

Guru
Messages
1,732
Likes
3,412
Here's another Pen Tool tutorial that may also help you. The first 5 minutes explains the basic functionality of making straight lines and curves. Then there's a middle section that is not particularly relevent to your airplane windows, but if you skip to 15:40 in the video he uses the pen tool to make a selection of a coffee cup, and everything there is applicable to selecting your windows.

When outlining the coffee cup, you'll notice that he sometimes changes his mind about where to place the next anchor point. That comes with practice and after a while you'll begin to see the right spot to establish an anchor point where one curve flows into the next. But always remember that you want as few anchor points as possible so that the pen tool can create a perfect arc between those points. Once you've created a path, if you later find that you need to add or delete anchor points, there are specific tools to do that.


knowoneuno

Well-Known Member
Messages
111
Likes
11
Here's another Pen Tool tutorial that may also help you. The first 5 minutes explains the basic functionality of making straight lines and curves. Then there's a middle section that is not particularly relevent to your airplane windows, but if you skip to 15:40 in the video he uses the pen tool to make a selection of a coffee cup, and everything there is applicable to selecting your windows.

When outlining the coffee cup, you'll notice that he sometimes changes his mind about where to place the next anchor point. That comes with practice and after a while you'll begin to see the right spot to establish an anchor point where one curve flows into the next. But always remember that you want as few anchor points as possible so that the pen tool can create a perfect arc between those points. Once you've created a path, if you later find that you need to add or delete anchor points, there are specific tools to do that.

I swear this is going to be the death of me. Surely this can't be that hard to understand, but your's truly cannot grasp this, at all. I even watched another video and I still get hung up.


I want to master this but still cannot figure out exactly how to make the curves flow correctly into my windows. Also, I want a "smooth edge" on the windows, nothing jagged, so do I "feather" the selection when I start?

example copy.jpg
 

Rich54

Guru
Messages
1,732
Likes
3,412
Feathering creates a blurred edge that fades off. You want a crisp edge for your airplane windows, so you do not want any feathering. As far as jagged edges, Photoshop is pixel-based software, meaning that the smallest possible unit of color information is one pixel, which is a square. You can actually see the individual pixels in your photos if you zoom-in to about 1,000% magnification. If you attempt to create a smoothly curved shape that is actually comprised of tiny square-shaped pixels, you will eventually—and unavoidably—encounter jagged edges at extreme levels of magnification. The Pen Tool is the best possible choice within Photoshop to minimize jagged edges on curved shapes, but if you truly want an absolutely perfect smooth curve then you need vector-based software such as Adobe Illustrator, which does not rely on pixels at all. (Aside from that, I know nothing about Illustrator.)

The other way to minimize jagged edges is to start with a large (high-resolution) photo. The airplane photos that you originally posted here are rather small, so it doesn't take much magnification to start noticing jagged edges. If you shot exactly the same photo on an image containing 5x as many pixels, then at normal viewing magnification each individual pixel would appear roughly 5x smaller and any inherent jaggedness would be imperceptible.

I'm going out shortly, but unless I'm hopelessly hung-over tomorrow I'll try to give you some simple steps to outline your windows with the pen tool.
 

knowoneuno

Well-Known Member
Messages
111
Likes
11
Feathering creates a blurred edge that fades off. You want a crisp edge for your airplane windows, so you do not want any feathering. As far as jagged edges, Photoshop is pixel-based software, meaning that the smallest possible unit of color information is one pixel, which is a square. You can actually see the individual pixels in your photos if you zoom-in to about 1,000% magnification. If you attempt to create a smoothly curved shape that is actually comprised of tiny square-shaped pixels, you will eventually—and unavoidably—encounter jagged edges at extreme levels of magnification. The Pen Tool is the best possible choice within Photoshop to minimize jagged edges on curved shapes, but if you truly want an absolutely perfect smooth curve then you need vector-based software such as Adobe Illustrator, which does not rely on pixels at all. (Aside from that, I know nothing about Illustrator.)

The other way to minimize jagged edges is to start with a large (high-resolution) photo. The airplane photos that you originally posted here are rather small, so it doesn't take much magnification to start noticing jagged edges. If you shot exactly the same photo on an image containing 5x as many pixels, then at normal viewing magnification each individual pixel would appear roughly 5x smaller and any inherent jaggedness would be imperceptible.

I'm going out shortly, but unless I'm hopelessly hung-over tomorrow I'll try to give you some simple steps to outline your windows with the pen tool.


Thanks for all your help with this. I shoot in high resolution RAW format. These are just converted over to JPEGS for this thread only.

Drink LOTS of water tonight, it will help the hangover. Or so I've been told! LOL !! :)
 

polarwoc

Guru
Messages
1,576
Likes
1,421
I swear this is going to be the death of me. Surely this can't be that hard to understand, but your's truly cannot grasp this, at all. I even watched another video and I still get hung up.
I want to master this but still cannot figure out exactly how to make the curves flow correctly into my windows. Also, I want a "smooth edge" on the windows, nothing jagged, so do I "feather" the selection when I start?
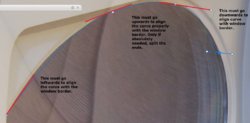
I was once where you are right now, and I am not too far ahead:rolleyes:. Check the comments made below.
example copy-.jpg
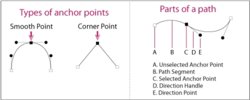
It is important you get the direction handles to align the curve (path segment) with the window border. Anchor points can be moved and positioned to suit. Try going for the Smooth Points as much as possible, but if necessary, use Corner Points. You will understand that the Direction Handles are tangents to the Path Segments. Terminology is illustrated below and is from this page.
wood6_fig02.jpg
 

polarwoc

Guru
Messages
1,576
Likes
1,421
Especially for Smooth Points, since every Direction Handle is related to the previous Path Segment, moving one will affect the other. This may cause frustration in the beginning. Sometimes, you think you got it all correct but you go to change position of one Direction Point on one of the Anchor Points and you would have to make adjustments to a lot of other Direction Points as a cascading effect.
This will be a struggle, but only after mastering this will you get better with PS. Even on illustrator you would need to use Pen tool. For accuracy, this is be best tool.

All the best. Post your results and share your progress if you can.
 

Rich54

Guru
Messages
1,732
Likes
3,412
Ok... here's a slightly different approach. In most tutorials, they simultaneously click & drag with the Pen Tool, which both creates the anchor point and curves the path. I'm going to separate those two actions: we'll first establish the anchor points and then we'll go back later and curve them.

Step1:
Use the Pen Tool to create a closed triangle around your window, as in the image below. You can start anywhere for the first anchor point, but once you start, go clockwise around the window to create anchor points 2 and 3 and then go back to point #1 to close the path into a triangle shape. Once you've done this, save the path with a name so that it is not accidentally deleted. (see Post #7 above to name a path.)
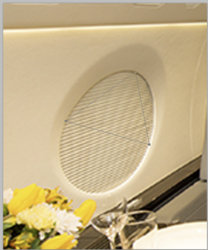
Step1.jpg

Step2:
The Pen Tool icon has other sub-tools built into it. Go into the Pen Tool icon on the toolbar and select the tool where the red arrow is pointing. It's called the Convert Point tool.
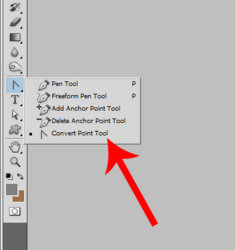
Step2.jpg

Step3:
With the Convert Point Tool active, click it anywhere on your path to activate the anchor points. Starting at the topmost anchor point, click this tool exactly on the anchor point, hold down the mouse and drag to the right (in the direction of the red arrow). This has now opened the adjustment handles on the first anchor point and has begun to curve the path. Repeat this for anchor points 2 and 3—dragging in the direction of the red arrows (i.e., clockwise)—until your path looks like the image below. (Obviously, we are not even close to the shape of the window. That's coming soon.)

While you're dragging your adjustment handles, experiment with the length of the drag and the angle of the drag and notice what it does to the path leading into and out of your anchor point. Also notice that the adjustment handles extend equally in both directions. That's a subtlety I'll talk about next to exactly fit the curve to the window.
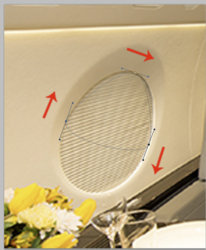
Step3.jpg

Step4:
For the bottom two anchor points, we now want to change the length of the adjustment handles in one direction only, so that they no longer extend equally in both directions. There's another tool for that in the toolbar. Look at the image below and activate the tool called Direct Selection Tool.
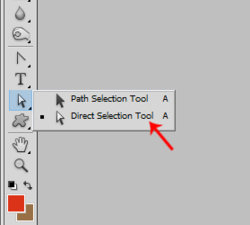
Step4.jpg

Step5:
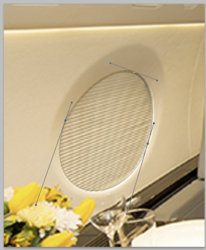
Using the Direct Selection tool, click on one of your bottom anchor points and drag only the lower adjustment handle. This independently adjusts the curve in a downward direction but leaves the upper half of the curve unaffected. Do the same for the other bottom anchor point. There's a lot of trial & error, but the goal is to manipulate the length and angle of the adjustment handles to exactly match the curve of the airplane window. Once you've got the bottom curve done, use this same tool on the upper half of the window to adjust those curves to a good fit. When you're all done, the adjustment handles of each of your three anchor points should look like the image below and the curved path should match the window very nicely. Once you've established the path, you can create a marching-ants selection using the steps in Post #7 above.

The path for this particular airplane window can be created with just three anchor points, but sometimes you simply can't get the curve to match and you'll find that you need more (or fewer) anchor points. Rather than starting over from the beginning, there are tools for this. Go back to my image above labeled Step2 and you'll see that within the Pen Tool are sub-tools called Add Anchor Point and Delete Anchor Point. You can use these on an existing path, rather than starting over. But always remember... the fewer anchor points, the better.
Step5.jpg
 

knowoneuno

Well-Known Member
Messages
111
Likes
11
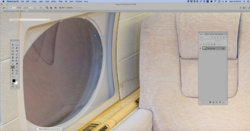
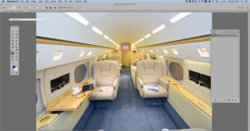
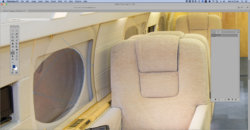
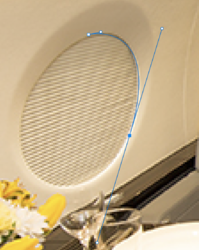
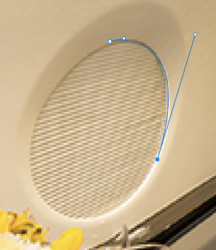
Thank you for explaining this new technique which I think I can finally grasp. I still think I messed up somewhere along the way. Still have trouble with getting only the top portion to move without it not changing the bottom portion.

Here are four screen shots.

1st screen shot.jpg

2nd screen shot.jpg

3rd screen shot.jpg

4th screen shot.jpg
 

JJLAPIN

Guru
Messages
1,064
Likes
1,316
To get the top portion as you say to not move, Option Click on your last point to remove that arm.
1.png
2.png
 

Top