What's new
Photoshop Gurus Forum

Welcome to Photoshop Gurus forum. Register a free account today to become a member! It's completely free. Once signed in, you'll enjoy an ad-free experience and be able to participate on this site by adding your own topics and posts, as well as connect with other members through your own private inbox!

How to make text background over image like below


AdonayG

Member
Messages
5
Likes
0
Hi guys,

I am completely new to photoshop and I want to create a transclucent text background to put over an image on a webiste I'm making. I want to create something like the blue grainy/translucent text background like in the image below. I don't want a rectangular block. Please make me a text background like the one in the image. I'm also open to any other ideas you may have.
1617387778584.png

Thanks,
AG
 

Babine

Guru
Messages
2,698
Likes
3,767
Here's the text (white below) in PNG (transparent background) format. Now the file can be placed over the background of choice, colour added, etc.

Text.pngText.png

For example .....

Tex-Example.jpg
 

AdonayG

Member
Messages
5
Likes
0
Here's the text (white below) in PNG (transparent background) format. Now the file can be placed over the background of choice, colour added, etc.

View attachment 120028View attachment 120030

For example .....

View attachment 120029
Hey Gary, thanks for your response.

However, I'm not concerned about the text. I want to create the blue grainy background that's behind the text.

The text wouldn't look readable or good if the picture didn't have that blue layer on it. I want to create that layer.
 

Babine

Guru
Messages
2,698
Likes
3,767
Hey Gary, thanks for your response.

However, I'm not concerned about the text. I want to create the blue grainy background that's behind the text.

The text wouldn't look readable or good if the picture didn't have that blue layer on it. I want to create that layer.

OK. There are many routes to try. The one in my example above was a simple gradient placed on a blank layer below the text. Grain and/or noise can then be added on another new layer overtop so that the opacity and blend mode can be adjusted independently. Check out the many sites where you can download gradients, BG for photoshop etc.
 

ex_teacher

Guru
Messages
569
Likes
1,179
I’m not sure exactly where the stumbling block is but here is how I would approach the problem.

Load Image:
Open your background image in Photoshop, crop if needed and then go to the ‘Layers Palette’.

Duplicate:
Duplicate that image onto another layer ( Crtl + J) … OR … right-click on ‘Background’ layer and select ‘Duplicate Layer’

Color Shift:
If your desired image needs to be color shifted …say blue… you can create a layer above your copy via the “Create new fill or adjustment layer’ with its icon on the bottom of the Layers Palette. You can apply a apply a photo filter… OR … a ‘Color Balance’ Layer.. although there are other ways to do this that many prefer. You can also fiddle with this layer when it is highlighted by modifying the drop-down ‘Opacity‘ just below the top of the Layers Palette.

Granularize:
Click on the ‘Copy of Background’ layer. To produce your “granular effect” you have a variety of processes to get the desired look to your image.
… you can go up to ;the ‘Filter’ drop down menu and select one of the many ‘Blur’, ‘Noise’ or ‘Texture’ filters (Grain is in the last) ….or maybe a combination of them. This is a good time to learn undo ( ‘Ctrl Z’ ) and/or use the ‘History’ Palette..

At this point you have at least 3 layers: Background, Copy of Background and at least one procedural layer.

Text:
To create a Text layer, click on the existing top layer and go to the capital T’ Text (‘Horizontal Type Tool’) tool and have at it. At a minimum this will create your Text layer and it allow you to choose a font, choose a font color, Choose a font size in points and Justify text ( right, left or center). The Opacity dropdown also works with this layer. Text is now in Photoshop defined not as a bitmap but rather as a structured/vector graphic overlaying your bitmap image. Resising ther bBackground will not affect ther text adversely. When you get the image the way you want it you have the option to ‘Rasterize’ this layer via a right click and selecting ‘Rasterize Type’. At this point everything is a bitmap and thus resizing will adversely affect fonts as well as your background image.

Good luck and ‘Save and Save often’. :)

screenshot.jpg
 

IamSam

Administrator
Staff member
Administrator
Messages
22,721
Likes
13,258
Hello.

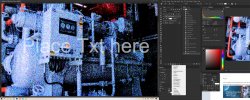
Open an image.
Screen Shot 2021-04-02 at 8.09.33 PM.png

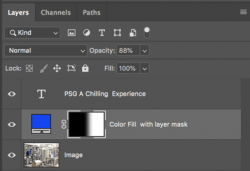
Add a solid color adjustment layer above the image layer in the color you desire.
Screen Shot 2021-04-02 at 8.09.53 PM.png

Lower the solid color adjustment layers opacity.
Screen Shot 2021-04-02 at 8.10.06 PM.png

Use a gradient on the solid color adjustment layer-layers mask in the position you desire.
Screen Shot 2021-04-02 at 8.10.16 PM.png

Add a text layer on top.
Screen Shot 2021-04-02 at 8.10.58 PM.png

Screen Shot 2021-04-02 at 8.11.10 PM.png

This was a brief description. If you need further details, let me know.
 

IamSam

Administrator
Staff member
Administrator
Messages
22,721
Likes
13,258
@AdonayG - Just letting you know that you need to post only ONE thread on the subject, not two. Also, the free edit forum is for having work done for you and not asking questions. The General Ps board is the place to ask questions.

I have moved this thread to the proper forum.
 

IamSam

Administrator
Staff member
Administrator
Messages
22,721
Likes
13,258
I don't think the translucent area in your example layer is "grainy". I think this is illusion caused by the lighting or a lighting effect (Lens Flare) that was added. I could be wrong.

But you can add graininess using a noise filter on your color fill layer. Converting it to a Smart Object is the easiest way.
Screen Shot 2021-04-02 at 8.26.46 PM.png
 

AdonayG

Member
Messages
5
Likes
0
OK. There are many routes to try. The one in my example above was a simple gradient placed on a blank layer below the text. Grain and/or noise can then be added on another new layer overtop so that the opacity and blend mode can be adjusted independently. Check out the many sites where you can download gradients, BG for photoshop etc.
okay thanks
 

AdonayG

Member
Messages
5
Likes
0
I don't think the translucent area in your example layer is "grainy". I think this is illusion caused by the lighting or a lighting effect (Lens Flare) that was added. I could be wrong.

But you can add graininess using a noise filter on your color fill layer. Converting it to a Smart Object is the easiest way.
View attachment 120052
Thanks so much! This is what I wanted!
 

AdonayG

Member
Messages
5
Likes
0
I’m not sure exactly where the stumbling block is but here is how I would approach the problem.

Load Image:
Open your background image in Photoshop, crop if needed and then go to the ‘Layers Palette’.

Duplicate:
Duplicate that image onto another layer ( Crtl + J) … OR … right-click on ‘Background’ layer and select ‘Duplicate Layer’

Color Shift:
If your desired image needs to be color shifted …say blue… you can create a layer above your copy via the “Create new fill or adjustment layer’ with its icon on the bottom of the Layers Palette. You can apply a apply a photo filter… OR … a ‘Color Balance’ Layer.. although there are other ways to do this that many prefer. You can also fiddle with this layer when it is highlighted by modifying the drop-down ‘Opacity‘ just below the top of the Layers Palette.

Granularize:
Click on the ‘Copy of Background’ layer. To produce your “granular effect” you have a variety of processes to get the desired look to your image.
… you can go up to ;the ‘Filter’ drop down menu and select one of the many ‘Blur’, ‘Noise’ or ‘Texture’ filters (Grain is in the last) ….or maybe a combination of them. This is a good time to learn undo ( ‘Ctrl Z’ ) and/or use the ‘History’ Palette..

At this point you have at least 3 layers: Background, Copy of Background and at least one procedural layer.

Text:
To create a Text layer, click on the existing top layer and go to the capital T’ Text (‘Horizontal Type Tool’) tool and have at it. At a minimum this will create your Text layer and it allow you to choose a font, choose a font color, Choose a font size in points and Justify text ( right, left or center). The Opacity dropdown also works with this layer. Text is now in Photoshop defined not as a bitmap but rather as a structured/vector graphic overlaying your bitmap image. Resising ther bBackground will not affect ther text adversely. When you get the image the way you want it you have the option to ‘Rasterize’ this layer via a right click and selecting ‘Rasterize Type’. At this point everything is a bitmap and thus resizing will adversely affect fonts as well as your background image.

Good luck and ‘Save and Save often’. :)

View attachment 120039
Thank you so much. This is what I was looking for!
 

Top