What's new
Photoshop Gurus Forum

Welcome to Photoshop Gurus forum. Register a free account today to become a member! It's completely free. Once signed in, you'll enjoy an ad-free experience and be able to participate on this site by adding your own topics and posts, as well as connect with other members through your own private inbox!

How to remove lines created when adding highly saturated colors


peterglass

Member
Messages
12
Likes
1
I photograph in RAW using Canon 5D Mark II and Mark III cameras. I've been highly saturating some of the colors in my portraits using Adobe Camera Raw and Photoshop. Sometimes, the border between an area I've saturated and the unsaturated area appears as a dark or colored, unnatural-looking line. I'd like to remove that line. I've had some success using the Blur Tool or the Healing Brush Tool in Photoshop, but I wonder if anybody has a better suggestion. In the attached image, you can see the line around her hair, pillow, and especially around her hand. Thank you.lrs2-27.JPG
 
Hi @peterglass

A couple of thoughts.
For forum members to provide targeted recommendations, it would help you be more specific. I can see several areas in boundaries where there are overlapping color issues, and somewhere, there is a luminosity issue. If you could circle or point to the area(s) causing a problem?

It also may be easier to provide a way to increase saturation from the initial image that doesn't create the issue of concern. So providing the starting image would be helpful, and even more helpful would be the PSD file showing exactly the way you increase saturation. Without this information, the only option is to try how to fix a problem that might have been able to be prevented in the first place.

Just a couple of suggestions
John Wheeler
 
Hi John,

Thanks for your response. And I do apologize for not getting back to you sooner.

I have attached the zipped image which includes three files: CR2, xmp, and acr. The image was edited entirely and only in Adobe Camera Raw.

I've drawn a light circle around a portion of her left hand to indicate the problem. But, as you correctly indicated, the problem is not limited to just that one area.

Thanks again -

Peter Glass
 

Attachments

Hi @peterglass
No problem about the wait.

The source of the issue is in the masked adjustment section for Mask #1. Having the Texture slider moved to the left creates that undesired band. An alternative to getting the softness without that effect is to move the harness slider to the left, which is in the "Detail" section for that particular mask.

There may be other issues to address yet I believe this covers the main problem you had brought up.

Also, I note that you have two masks that are almost inverts of each other, yet they are not exact inverts (probably in the softness of edge in one and hardness in the other) for Mask 1 and Mask 4 in the area of the hand. Using a positive mask with some adjustments and a negative mask with alternate adjustments often creates issues (at least for me), so that is another area to consider in the future.

I hope this provides some help with your issue.
John Wheeler
 
Hello,
I'd like to readdress this issue. I know I overprocessed this image to cause the problem mentioned in my original post (the problem being the unnatural lines visible around the model's hand and pillows behind her). However, except for that problem, I'm happy with the look of the picture (I'm currently re-editing a bunch of my photos in this manner. I understand how to avoid getting those lines, but my question is how to remove those lines if they do happen to appear in the picture. Thank you.
 
Hi @peterglass
I will tell you my approach, but there may be faster ways for the image's originator (you).

First, I am assuming you have a layered PSD file where the issue was created, and we are not talking about a baked-in image (i.e., one that was flattened to a single layer or saved/exported as a single-layer image file (e.g., PNG, JPEG, etc.).

With that assumption, I do a divide-and-conquer approach to track the problem.
1) Turn on and off layers to see which one has some impact
2) Do the same with Smart Objects and open them up to expose their layer to check them out.
Alter the various adjustment points/sliders individually to see if one is associated with the problem. If the slider is unrelated to the problem, I return it to its original setting.
4) Once I find the adjustment associated with the problem, I reverse engineer what causes it and look for alternatives that will achieve the same effect without the problem arising again.

So, part of this is just step-by-step work, and part of it is experience with image processing (e.g., Photoshop) and when issues might crop up.

That is how I found your original problem and looked for an alternative.

Now, when one is already very familiar with their image and the Layers, one may or may not need to take this divide-and-conquer approach, yet I found it helps me get to the root cause pretty quickly.

Hope that helps
John Wheeler
 
Hi John,

Thanks for once again addressing my issue.

The image above (and most all of my images) was processed exclusively in Adobe Camera Raw.

Let me restate my query: I know I overprocessed this image to cause the problem mentioned in my original post (the problem being the unnatural lines visible around the model's hand and pillows behind her). However, except for that problem, I'm happy with the look of the picture. I understand how to avoid getting those lines, but my question is how to remove those lines if they do happen to appear in the picture. What I've been doing (successfully sometimes, unsuccessfully other times) is to create a Mask and to reduce its Texture and Sharpness. Then, with a small brush, I paint over the unnatural lines. Any other ideas? Thanks.
 
If you can't fix the problem at the source and, instead, you need to repair the final image, I can suggest two basic approaches to remove these halos.

If the problem area has a clear, distinct edge:
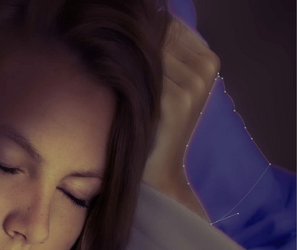
  • Use the Pen tool to create a path where the halos exist.
  • Make a selection from the Pen path. (Sometimes, the Pen tool is too sharp. If this is the case, as it would be here, then feather the selection as needed.)
  • Use the clone stamp (or a soft brush of the appropriate color) to cover the halo in the interior of the selection.
  • Invert the selection and use the clone stamp (or brush) again to cover any stray halo in the exterior of the selection.
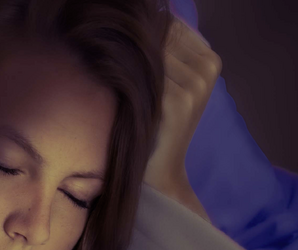
  • Here's an example from the area near her hand. (You might want even more feathering than what I did here.)

1718995617619.png

1718995838672.png


The second type of problem area has no distinct edge, such as hair.
  • I initially tried making a loose selection of the hair halo using the lasso tool.
  • Then I opened a Hue/Saturation adjustment layer and—within the Magenta channel—attempted to change the Hue to a deep blue. It kinda worked, but not great. Something like this approach might work better on a different image.
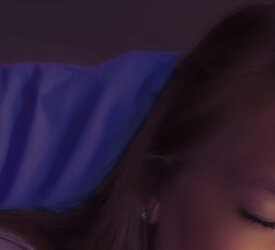
  • Instead, I used the Colorize option on the Hue/Saturation layer to get a deep blue. Then I brushed-in that colorization using a soft brush in the layer mask.
  • Final result below.


example1.jpg

example2.jpg
 
HI @peterglass

I will assume you have a baked-in image where you want to remove a line and leave the rest the same.
As @Rich54 already demonstrated, there are various ways to do this.

One generic approach I often use is separating the Luminosity component of an image and working on it separately from the Color Component, then adding the color component back in.

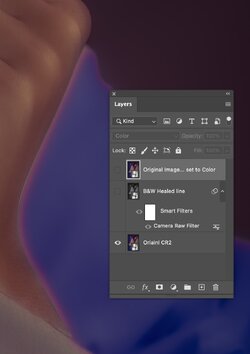
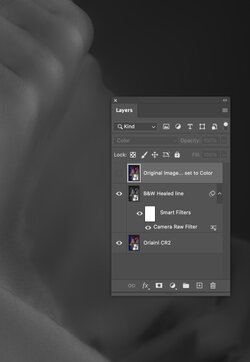
The Layer Stack in the image shows the three Layers I used. The first is just the original Layer, which I duplicated twice. This image is the original CR2 image.

Screenshot 2024-06-21 at 4.31.47 PM.jpg

In the second Layer, I isolate the luminosity component and eliminate the line. There are many ways to do this, yet in this case, I just made the original image a Smart Object, applied a Camera Raw filter, set it to B&W, and used the healing brush to eliminate the bright line. If you want to leave a sharper edge, you can use whatever tools you want to reduce the brightness of the line in this B&W image:

Screenshot 2024-06-21 at 4.32.00 PM.jpg

I saved the changes from the Smart Object, and in the top Layer, it is just the original image with the blend mode set to Color to add the Color component back in.
In this case, I did nothing else, yet if I wanted to change the color, I could have made those changes in this Layer as well:

?hash=bafc9dd14cb3658e094a743253aeba7a.jpg

Just one more approach to a generalized problem
Hope that helps
John Wheeler

Screenshot 2024-06-21 at 4.32.14 PM.jpg
 

Back
Top