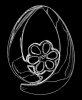
What's new
Photoshop Gurus Forum

Welcome to Photoshop Gurus forum. Register a free account today to become a member! It's completely free. Once signed in, you'll enjoy an ad-free experience and be able to participate on this site by adding your own topics and posts, as well as connect with other members through your own private inbox!

How to retouch this piece


Messages
11
Likes
1
strange with 8 years of experience,
ok, it looks like levels, soft brush and liquifiy+smudge tool on a clipping mask

the center looks more like a smuddgetool than a softbrush
 
I can't see the benefit of the after result.
sprucemagoo is right, i too prefer more contrasted and textured images.
honestly, look like some advanced 3-rd party filtering has been applied here, sa noone does such numberous models as jewlery mannually. try some of popular filtering packs in order to achieve desired results.
i always recommend my ctrl+j than ctrl+L than minus pipette click the grayest part of the background that you want to loose
than soft edge erase brush over the affected parts of the object on new layer. ctrl+e enjoy
 
Last edited:
tried filters that i have but just can't get it right. it has to be something that may be done in a few clicks.
 
even thought those where two different shots, taken under similar conditions, but looking at the exif info it is the same shot. tried filling only dark sections with average gray and so on just cant get the equal result. obviously, on the large zoom it was gray color fill in painted over as well as somehow soften as seen on the flower part of the image. it was desaturated too.
again, i believe it was not manually achieved but automate filtered, cause it will take more time than it worth.
 
Personally I feel the paint tool in airbrush mode was used to do this retouch. Plus a bit of blurring on the edges of the fills. The blurring makes it kinda raw, though.

photoeditingretouch.... I suggest you look up AIRBRUSHING TECHNIQUES (the manual airbrushing) most especially the masking process. And apply it in Photoshop.
 
But to give an idea what to do...

You have to use the pen tool to create the basic shape of the jewelry. And create mask selections within it to act as mask of details for adding more color and shades later.

Use a feathered paint tool set to airbrush at different strengths to achieve the gradient look of some parts - solid for full color , then at weaker levels for edges with darker or lighter color.


Which is why I said, study manual AIRBRUSH TECHNIQUE. Then think "manual airbrushing" using Photoshop.
 
Last edited:
"...You have to use the pen tool to create the basic shape of the jewelry. And create mask selections within it to act as mask of details for adding more color and shades later...."

Exactly! This is the general approach I, too, would take.

Although it's a pure preference, about the only difference is that I might try to save some time with the manual pen tool by first doing a good job of detecting edges in PS, and then using the better path tools in Illustrator to make the paths. I might even do some of the initial shading in Illustrator instead of PS, then taking it back into PS for the final tweaks, selective blending back the original in some areas, etc..

However, I agree with sprucemagoo's comment that the results don't justify all the xtra work, at least IMHO. If all it involved was a couple of button pushes, or the client demanded this look, maybe, but left to my own devices, I wouldn't bother.

Tom M
 

Attachments

  • jewbefor-01_acr-ps01a-01_edges_only_de_speckle.jpg
    jewbefor-01_acr-ps01a-01_edges_only_de_speckle.jpg
    168.8 KB · Views: 12

Back
Top