What's new
Photoshop Gurus Forum

Welcome to Photoshop Gurus forum. Register a free account today to become a member! It's completely free. Once signed in, you'll enjoy an ad-free experience and be able to participate on this site by adding your own topics and posts, as well as connect with other members through your own private inbox!

I Add Color to Black and White Photos


Not to be critical but skin and even eyes are not one solid color. Skin has tones of red, yellow, brown etc., and even a subtle blue tones for men's beard areas. Skin can also sometimes reflect surrounding colors, and adding those tones will make your work appear much more realistic. This is one I did a long time ago:
Screen Shot 06-22-18 at 10.56 AM.JPG
 
Not to be critical but skin and even eyes are not one solid color. Skin has tones of red, yellow, brown etc., and even a subtle blue tones for men's beard areas. Skin can also sometimes reflect surrounding colors, and adding those tones will make your work appear much more realistic. This is one I did a long time ago:
View attachment 89423
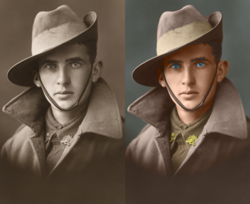
Fantastic job Hawkeye! I’ve Been working on colorizing and have a difficult time finding the perfect tone/color for various items, especially skin. I have looked at many YouTube videos, but still have problems achieving results. Do you know of any good videos or information sources that might be of help? Your picture is excellent!
 
Here is a method that I have used. Find an image of a face that is similar (lighting etc.).
Add a solid color adjustment layer (any neutral color for now) and set it to color mode.
Fill the mask with black and make a selection over the area you want to color match, fill selection with white. You will now see a mismatched color square over your sample image.
Zoom into the sample area.
Double click the solid color layer to bring up the color picker, then adjust the color until your patch area disappears (close as you can get). You have your first color.
Do the same for various areas until you develop a complete color palette.
Name the colors for the areas to which they correspond and save the collection in your color library.
Obviously the colors will need some tweaking for each individual image, but they are a good starting point. You can also alter the opacity if required.Screen Shot 07-07-18 at 08.08 AM 001.JPGScreen Shot 07-07-18 at 08.08 AM.JPGScreen Shot 07-07-18 at 08.09 AM.JPG
 
Thanks very much Hawkeye! Your help and examples have really been a boost to my learning curve, although that learning curve is not quite as fast when you get into your late 70’s, ☺️ Now I will practice, practice and practice. I’m determined to get good at this. Thanks again.
John.
 
You're welcome. I'm almost 71, age isn't a limiter. I might mention too, that what I suggested before is mainly for the base colors. You can add other colors on top of those (using separate layers) with a low opacity low flow brushes. You don't always have to use color mode, experiment with blend modes and opacity to get the look you're after. Always use layer masks and make sure to label your layers. It's also good to use groups, particularly with complex images.
If you'd like to practice, try doing like I did below. Take a color photo and convert 1/2 to black and white with an adjustment layer. Then attempt to make both sides match. Take your time, and have fun.

Screen Shot 07-08-18 at 08.53 AM.JPG
 
Thanks, I am following your advice, but I'm using my wife, she's much better looking than I am! I will post a picture when I get it to an acceptable quality. Thanks!
 

Back
Top