Photoshop Gurus Forum
Welcome to Photoshop Gurus forum. Register a free account today to become a member! It's completely free. Once signed in, you'll enjoy an ad-free experience and be able to participate on this site by adding your own topics and posts, as well as connect with other members through your own private inbox!
You are using an out of date browser. It may not display this or other websites correctly.
You should upgrade or use an alternative browser.
You should upgrade or use an alternative browser.
Light lines effect
- Thread starter evren
- Start date
I can get halfway there, but I can't seem to get the lines smooth and glowing like your sample. Maybe somebody will see this and be able to improve upon it.
Start with something like this. The dots need to be on their own layer.

Apply a strong Radial Blur to the dots. You can experiment with the settings, but I used this:
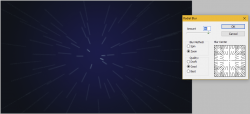
Now copy this layer several times to build-up the opacity and brightness. Merge all those duplicate layers down to one.

Copy the layer one more time and rotate it.
Use Edit>Transform>Scale to enlarge it by 30% to 50%.
Use a layer mask to erase whatever seems "too much".

On a new layer just below your glowing lines, add some stars in the background.
Combine all your glowing lines and the stars into one layer group and add a layer mask to the group. Apply a heart-shaped mask in the center.
This does not have the clean lines and the glow of your sample. I experimented with layer styles (outer glow, etc.) but that didn't work. I can't figure out that part.

Start with something like this. The dots need to be on their own layer.

Apply a strong Radial Blur to the dots. You can experiment with the settings, but I used this:

Now copy this layer several times to build-up the opacity and brightness. Merge all those duplicate layers down to one.

Copy the layer one more time and rotate it.
Use Edit>Transform>Scale to enlarge it by 30% to 50%.
Use a layer mask to erase whatever seems "too much".

On a new layer just below your glowing lines, add some stars in the background.
Combine all your glowing lines and the stars into one layer group and add a layer mask to the group. Apply a heart-shaped mask in the center.
This does not have the clean lines and the glow of your sample. I experimented with layer styles (outer glow, etc.) but that didn't work. I can't figure out that part.

This challenge has been bugging me and I came up with another alternative. It still isn't exactly like your sample, but this one has the advantage that the lines are clean and vibrant.
Please note that I have an old version of Photoshop (CS5), so it's possible that some of the settings and menus are different in newer versions.

Please note that I have an old version of Photoshop (CS5), so it's possible that some of the settings and menus are different in newer versions.
- Start with a basic background layer filled with black or dark blue.
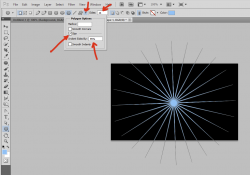
- Activate the Polygon Shape tool and set it to 24 sides.
- Click the little black triangle (where the red arrow is pointing) to open the Polygon Options box. Activate the box that says "star" and set the indent to 95%.
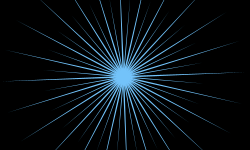
- Set the color to light blue and drag-out a polygon, like this:

- Duplicate the layer, rotate it, and then shrink it by about 30%.
- Change it to a darker blue, if you like.

- From here, you can apply layer styles like gradient overlays, outer glow, etc.
- Add a heart-shaped layer at the center. Use layer masks to edit any of the glowing lines to make them less uniform.

- Messages
- 2,693
- Likes
- 3,129
I've been playing with a script that might get you close to what your want. You need at least Photoshop 2018 for this.

Script can be found here:
I found the presets mentioned in the tutorial on my drive here:
C:\Users\<MyUsername>\AppData\Roaming\Adobe\Adobe Photoshop 2020\Presets\Deco
Video tutorial can be found here:
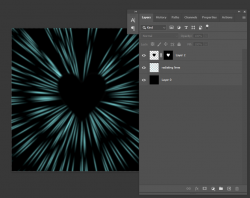
I used the radiation preset and also applied a gaussian blur to the lines as well as the heart.
Fairly simple to do in just 3 layers -

Script can be found here:
Adobe Exchange
exchange.adobe.com
I found the presets mentioned in the tutorial on my drive here:
C:\Users\<MyUsername>\AppData\Roaming\Adobe\Adobe Photoshop 2020\Presets\Deco
Video tutorial can be found here:
I used the radiation preset and also applied a gaussian blur to the lines as well as the heart.
Fairly simple to do in just 3 layers -

- Messages
- 2,693
- Likes
- 3,129
Actually you did find a way - I just lucked into something different...Now I don't feel so bad that I couldn't come up with it.

