
Photoshop Gurus Forum
Welcome to Photoshop Gurus forum. Register a free account today to become a member! It's completely free. Once signed in, you'll enjoy an ad-free experience and be able to participate on this site by adding your own topics and posts, as well as connect with other members through your own private inbox!
You are using an out of date browser. It may not display this or other websites correctly.
You should upgrade or use an alternative browser.
You should upgrade or use an alternative browser.
Logo design help.
- Thread starter Hudson
- Start date

- Messages
- 24,301
- Likes
- 13,731
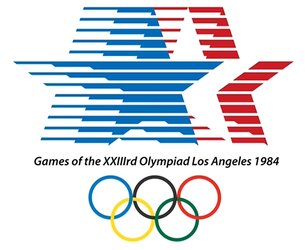
Yes.I'm interested to know if the effect on this star logo is possible to be created in Photoshop
The effect has no specific name since it's relatively a simple combination of shapes and layer masking.OR the name of the effect if possible,
It may take some explaining, so give us some time.much appreciated if someone can help.
- Messages
- 24,301
- Likes
- 13,731
OK, I played with this and did a crappy job because I was working fast and not really measuring my horizontal lines. I was more or less roughly trying the technique I decided would work best. I apologize for the slop but I'm not interested in trying to make it perfect. It was actually more work than I anticipated.
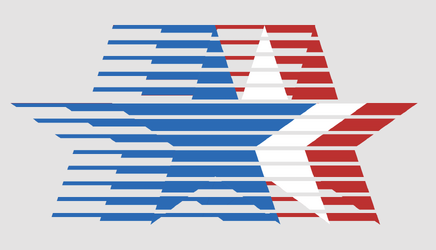
The entire pattern is based on the stars. I used the Polygon Tool to make a star which I then copied 5 times, changed their colors and positioned. 2 of the stars (left) are just for masking.
I placed these in a group.

I then started making my horizontal lines for masking.
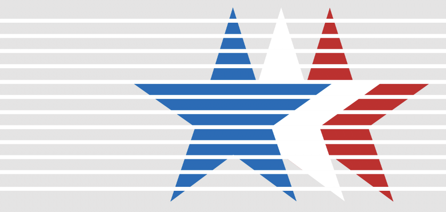
Which I masked out by adding a layer mask to the star group, making a selection of the lines.

Then I made Red stripe layer and a Blue stripe layer. Added layers masks to both.
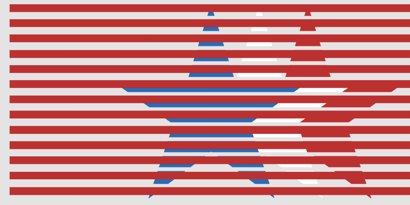
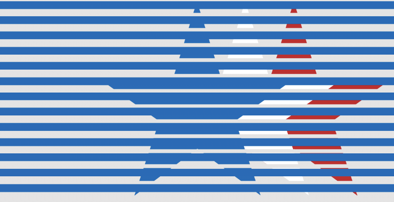
Then the final set of horizontal lines used for masking out the blue and the red lines.

The rest was just about making selections, going from layer mask to layer mask and using the Brush Tool to mask out areas I did not want on the red and blue stripes including the shapes of the stars. I will admit that I would have a very difficult time explaining this process..................so I'm not going to try.
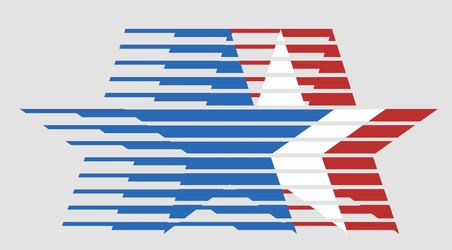
You need to resource Ps videos on making multiple selections. This can also involve inverting some selections. It will be a challenge.
For example: Here I have made a selection of the stars and then added in a selection of one of the stripes. This allows me to erase/mask using a layer mask, areas that I want to remove from the red and blue stripes.
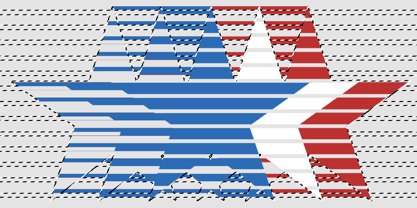
The entire pattern is based on the stars. I used the Polygon Tool to make a star which I then copied 5 times, changed their colors and positioned. 2 of the stars (left) are just for masking.
I placed these in a group.
I then started making my horizontal lines for masking.
Which I masked out by adding a layer mask to the star group, making a selection of the lines.
Then I made Red stripe layer and a Blue stripe layer. Added layers masks to both.
Then the final set of horizontal lines used for masking out the blue and the red lines.
The rest was just about making selections, going from layer mask to layer mask and using the Brush Tool to mask out areas I did not want on the red and blue stripes including the shapes of the stars. I will admit that I would have a very difficult time explaining this process..................so I'm not going to try.
You need to resource Ps videos on making multiple selections. This can also involve inverting some selections. It will be a challenge.
For example: Here I have made a selection of the stars and then added in a selection of one of the stripes. This allows me to erase/mask using a layer mask, areas that I want to remove from the red and blue stripes.
@IamSam,
Nice job. This was a real brain teaser. I puzzled over this for about an hour last night and got as far as your step where you added white lines and masked them to fit within the stars. Then I got stuck. I was going to try again today with a fresh mind but you've already cracked the case.
Nice job. This was a real brain teaser. I puzzled over this for about an hour last night and got as far as your step where you added white lines and masked them to fit within the stars. Then I got stuck. I was going to try again today with a fresh mind but you've already cracked the case.
- Messages
- 24,301
- Likes
- 13,731
Thanks Rich! I wish I was motivated to recreate this effect with exact measurements...................unfortunately I'm not.
I really could not find a good video on making complex multiple selections, so I will try to demonstrate with simple shapes.
Here I have 3 shapes on their own separate layers. A white rectangle, a yellow rectangle, and a blue circle/ellipse. All on a grey background.
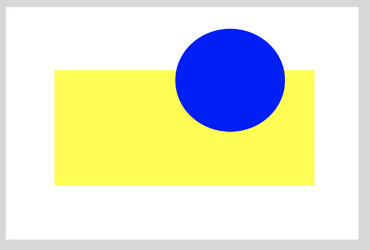
Let's say I want to remove the Yellow and blue shapes from the white shape.
First I place a layer mask on the white shape layer.
I can select the yellow rectangle by holding the command key and clicking the yellow rectangles thumbnail.
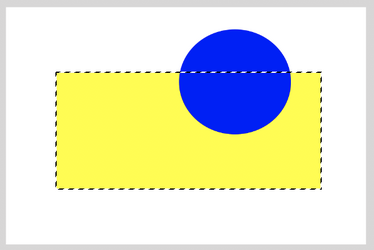
What about the blue circle?
I can make 2 different selections to also include the blue circle into the yellow rectangles selection.
If I hold down the shift key and the command key at the same time and then click the blue rectangles thumbnail, it will add a selection of the blue circle to the yellow rectangles selection.
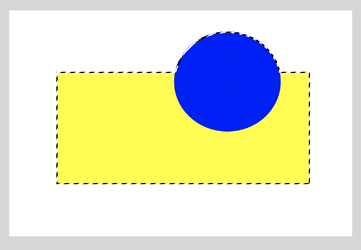
If I hold down the shift key, and the option key at the same time and then click the blue rectangles thumbnail, it will add a different selection of the blue circle to the yellow rectangles selection.
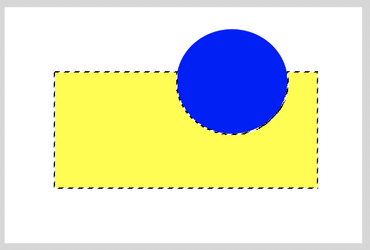
So now if I turn the yellow rectangle layer and the blue circle layer off, select the white rectangles layer mask, and add black to the selection, this is what I get.....

Now to make it a little more complicated, I could invert (shift+cmd+I) the selections of the yellow rectangle layer and the blue circle layer like this....
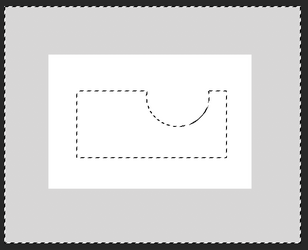
Now when I select the white rectangles layer mask, and add black to the selection, this is what I get.....

I really could not find a good video on making complex multiple selections, so I will try to demonstrate with simple shapes.
Here I have 3 shapes on their own separate layers. A white rectangle, a yellow rectangle, and a blue circle/ellipse. All on a grey background.
Let's say I want to remove the Yellow and blue shapes from the white shape.
First I place a layer mask on the white shape layer.
I can select the yellow rectangle by holding the command key and clicking the yellow rectangles thumbnail.
What about the blue circle?
I can make 2 different selections to also include the blue circle into the yellow rectangles selection.
If I hold down the shift key and the command key at the same time and then click the blue rectangles thumbnail, it will add a selection of the blue circle to the yellow rectangles selection.
If I hold down the shift key, and the option key at the same time and then click the blue rectangles thumbnail, it will add a different selection of the blue circle to the yellow rectangles selection.
So now if I turn the yellow rectangle layer and the blue circle layer off, select the white rectangles layer mask, and add black to the selection, this is what I get.....
Now to make it a little more complicated, I could invert (shift+cmd+I) the selections of the yellow rectangle layer and the blue circle layer like this....
Now when I select the white rectangles layer mask, and add black to the selection, this is what I get.....
- Messages
- 24,301
- Likes
- 13,731
Now to complicate it a bit more, lets say I want to only remove the portion of the blue circle that intersects with the yellow rectangle!
I can select the yellow rectangle by holding the command key and clicking the yellow rectangles thumbnail.
Then I hold down the shift key + the option key + command key and then click the blue rectangles thumbnail.
This is the selection I get....
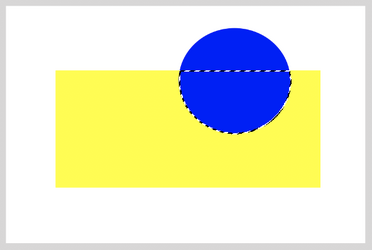
Now turn off the yellow and blue layers, and when I select the white rectangles layer mask, and add black to the selection, this is what I get.....

Or, as explained above in first post, I can invert the selection and get this...

I can select the yellow rectangle by holding the command key and clicking the yellow rectangles thumbnail.
Then I hold down the shift key + the option key + command key and then click the blue rectangles thumbnail.
This is the selection I get....
Now turn off the yellow and blue layers, and when I select the white rectangles layer mask, and add black to the selection, this is what I get.....
Or, as explained above in first post, I can invert the selection and get this...
- Messages
- 24,301
- Likes
- 13,731
You can also make a selection of the top of the blue circle where it intersects with the yellow rectangle.
Hold the command key and then click the blue rectangles thumbnail, then hold the option key and the command key and click the yellow rectangles thumbnail. You get this...
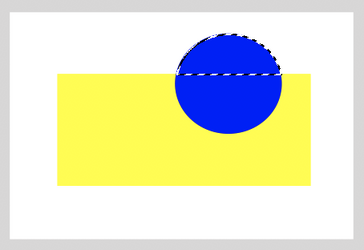
Then you mask it the way it needs to be. As is or inverted. I think you can get the idea now!
This is how I made the selections to create the star effect. Once I had all of the horizontal line layers created, I made these selections and removed the areas I did not want from the blue and red stripes which had layer masks. There's really no way I could explain each step of the star effect! It would be a 10 page (or better) thread.
I will see if I can figure out an easier way to accomplish this effect. As usual, there are always multiple ways to create things in Ps.
Hold the command key and then click the blue rectangles thumbnail, then hold the option key and the command key and click the yellow rectangles thumbnail. You get this...
Then you mask it the way it needs to be. As is or inverted. I think you can get the idea now!
This is how I made the selections to create the star effect. Once I had all of the horizontal line layers created, I made these selections and removed the areas I did not want from the blue and red stripes which had layer masks. There's really no way I could explain each step of the star effect! It would be a 10 page (or better) thread.
I will see if I can figure out an easier way to accomplish this effect. As usual, there are always multiple ways to create things in Ps.