What's new
Photoshop Gurus Forum

Welcome to Photoshop Gurus forum. Register a free account today to become a member! It's completely free. Once signed in, you'll enjoy an ad-free experience and be able to participate on this site by adding your own topics and posts, as well as connect with other members through your own private inbox!

Specific Make background completely opaque.


Igiloca

Member
Messages
15
Likes
1
Hi guys!

Once again i turn to you wise gurus for guidance and/or help.
I have two pictures where the background needs to be fully opaque. I managed to make most of the background see-through, but i can't seem to get rid of the pixels surrounding my image. Can anyone do a better job than me? 😩
I uploaded the images with background, and then also my results...
logokamelen.png logoshisha.png
logokamelen1.png logoshisha1.png
 

JeffK

Guru
Messages
2,486
Likes
2,890
Hi -
I've been poking at this for a couple of days - couldn't find the perfect solution for now. Best compromise was to leave the gray areas inside the image but remove the gray from the outside. I basically just used Select and Mask, then used the Refine Edge tool to remove the gray edges. Once I had the masked layer, I selected the mask and went to Filter - Other - Minimum and pulled the mask in by .5 pixel.
The more refined edge would be the pen tool but still leaving some of the interior gray. Might attempt that later.
I only worked on the water pipe for now just to see if this works for you.
- Jeff
water pipe edited.png
 

Igiloca

Member
Messages
15
Likes
1
You guys seem to be having trouble with this one. The Blend If sliders will do this perfectly in less than a minute, haha.
View attachment 116912View attachment 116913
OMG this is great!! Thank you! I did see that I didn't uploaded the image with max resolution. Is it too much to ask to do the same for these? 😅 Can you maybe also explain what you did so that I can try it myself the next time?
OH Screenshot_20201112_212838.jpgScreenshot_20201112_212819.jpgand could you perhaps also make it an ai or EPS file?? You guys really are wizards 🙃❤
 

MentosCubing

Power User
Messages
400
Likes
428
Of course! Here is how I did it (though it is worth noting that I do not own Photoshop, and these tutorial images are themselves edited to show you how to do it in Photoshop instead of in the software I use):
In the layers panel, if you double-click on the right side of any layer, it should bring up the Layer Styles dialogue box. In that box, you'll find these Blend If sliders.
Blend If - Step 0.png
Since the background is brighter than the foreground, you can just clip out the brighter pixels by dragging the right portion of the top slider a little to the left, like this:
Blend If - Step 1.png
This will likely give you a pretty harsh, jagged edge. So to smooth it out a little, just hold the Alt key (Option on Mac) and click on that same slider. This will break it in half. Then you can move both halves to create a gradual transition from opaque to transparent.
Blend If - Step 2.png
(Again, do note that these images are edited. I do not have access to Photoshop. The exact positions of the sliders may not be ideal for these images.)

This is actually one of those rare instances where I am grateful to use Affinity Photo rather than Photoshop. In Affinity Photo, instead of these sliders, you get a graph, kind of like a Curves adjustment layer for the alpha channel! This is what my graph looks like for these images:
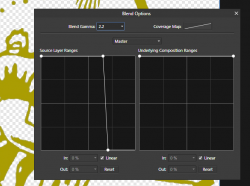
1605231969602.png
And the results!
transparent 1.pngtransparent2.png
(obviously I also had to remove the red spots, but I just did that by painting on them with white, since I was going to be removing the background anyway.)
Note that if you change the channel from Grey to Blue in the drop-down menu, the same trick can work beautifully for sky replacements!
(It is also worth noting that this method does give you a slight halo. To fix this, simply create a new Solid Colour Fill adjustment layer, and fill it with the colour you'd like your image to be. Place the solid colour layer above the main layer, then place the main layer into a Group (by itself). Then you can select the solid colour layer again, and press Ctrl+Alt+G to create a clipping mask and limit it to the alpha values of the underlying layer. Since the halo is not noticeable on a white or black background in this case, I did not bother, but you can if you'd like.)
 
Last edited:

JeffK

Guru
Messages
2,486
Likes
2,890
@MentosCubing - thanks for going thru the process. Appreciated the extra tips about splitting the slider to smooth out the edges and adding the solid color layer above the group.
Ran thru a couple of videos and really intrigued by this. Have to play with a bit more.
Thanks again for the intro! :thumbsup::)
- Jeff
 

Top