What's new
Photoshop Gurus Forum

Welcome to Photoshop Gurus forum. Register a free account today to become a member! It's completely free. Once signed in, you'll enjoy an ad-free experience and be able to participate on this site by adding your own topics and posts, as well as connect with other members through your own private inbox!

Making a selection within a certain luminosity range. (L value in LAB color space)


Amada

Member
Messages
16
Likes
1
Hello,

I have a black & white image and would like to make a selection of that image consisting of all pixels that fall within the luminosity range of L:45 to L:55 (using the LAB color scale).

I'm trying to make selection base on value of L in Lab color. Let say my selection to be from L=45 to L=55 which represents Zone #5 in zone system.
I did try few luminosity masks panels but it is not what I'm looking for. I like to create selection for any combination of L, clean selection - with no feather, or any other modification.
(PS CC, Windows 10, RGB converted to B&W)
Thx in advance
 

Rich54

Guru
Messages
1,732
Likes
3,412
In theory, this might be done using Select>Color Range on a B&W image, but when you adjust the fuzziness slider it's just by eye... I don't believe there is any way to set the fuzziness to exactly get the range of L45 to L55.

Rich
 

Rich54

Guru
Messages
1,732
Likes
3,412
I wonder if John Wheeler (thebestcpu) is reading this thread. He seems to know a lot about this type of thing.
 

IamSam

Administrator
Staff member
Administrator
Messages
22,721
Likes
13,258
I wonder if John Wheeler (thebestcpu) is reading this thread. He seems to know a lot about this type of thing.
Agreed.

Now that I understand what Amada wants, I will be looking for a solution.
 

Amada

Member
Messages
16
Likes
1
Thank you guys so much - I hope you will be able to help me. I'm looking forward for suggestions. You can ask why I need this. I'm working with B&W images. Very often Zone #5 is distracting. By selecting Zone #5 it would be easy to change it to Zone #6 or Zone #4 - it depends of picture. But to this right I need clear selection/pure selection. OK - what I'm doing now:
I use Lumenzia. From Lumenzia I select Zone #%, but selection or mask base on this selection is extremally soft with lat of feathering. It is impossible to fix it - at least for me. So I have to redone this selection by using path. I convert selection to path, and back to selection. Now I have clean selection. The problem is that it is not accurate - Zones in Lumenzia are far from Ansel Adams zone system.
Very interesting is fact that when I try to create selection from RGB channel (Ctrl + Click on RGB) - I'm getting selection with the same effect - no sharp selection, very soft or blur or whatever it is - I do not know what is this.
Iven more - when you create manually 11 zones - using L in Lab space and create pasterize gradient from L=100 to L=0 into 11 blocks - both are different.
There are tons of contradictory information on internet in this topic.
 

thebestcpu

Guru
Messages
2,988
Likes
2,747
I believe I have a solution that will work though not as elegant as I desire (there may be other ways yet this was the first that came to min)

I will assume that you all values of your image are R=G=B for all pixels if in RGB or you are in grayscale mode.

1) First you need to know for color space you are in (e.g. sRGB, Adobe RGB, ProPhoto RGB, what the RGB values are for the desired range of L that you want to capture in a selection. E.G for sRGB L=40 is when R=G=B= 40. Also for L=60 R=G=B = 144 (or 145). You can determine these values by going into the color checker, set the L value and observe the RGB values

2) Above you B&W Layer/Image create a simple all White Layer

3) Set the Blend If sliders to grayscale and set the left slider to 144 and the right slider to 94 (NOTE - the sliders will cross pass each other to make this happen). What you should now see as in the example below is all areas that are not between L=40 and L=60 to be white.

4) Select the white area with the magic wand with tolerance set to 0 and no anti alias (unless that is what you want). This is the inverse selection of what you want.
5) Just do Enter+Cmd+I (Shift+Cntrl+I on PCs) to invert the selection and you have now selected the desired L range

Not sure this approach is perfect yet seems to do the trick. There could be corner cases where it does not work as I have not tried all possible cases. Here are the images

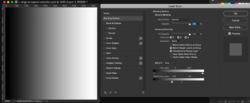
First image is a grayscale gradient just as an example with the Layer Styles shown yet not activated (Layer was turned off)

Screen Shot 2019-04-22 at 9.16.23 PM.png

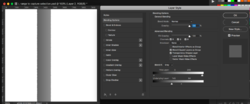
Here is the same shot with the White Layer visible and Layer Style Active

Screen Shot 2019-04-22 at 9.17.00 PM.png

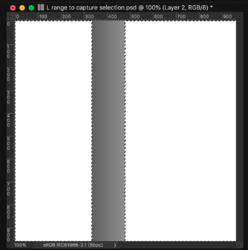
Here is selecting the white areas:

Screen Shot 2019-04-22 at 9.17.18 PM.png


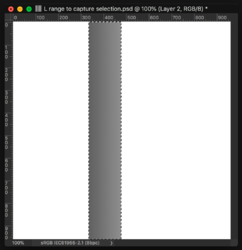
And here it is with the selection inverted

Screen Shot 2019-04-22 at 9.17.32 PM.png

Hope this works for you
John Wheeler


PS - The numbers on the images won't match the numbers I gave you because they were screen shots which are in my monitors colorspace.
PPS - The above technique does not work if the selection range includes L=0 or L=100. That can be solved with another approach using the same numbering scheme to translate L to RGB and using a Threshold Adjustment Layer instead of a white Layer with the Layer Style FYI
 
Last edited:

IamSam

Administrator
Staff member
Administrator
Messages
22,721
Likes
13,258
Yes.

Using the info panel I created 2 set points, 1 at L:40 and 1 at L:50 (L:40 = RGB:94 and L:50 = RGB:119)
I then set 2 guidelines to define the "area of selection"
Screen Shot 2019-04-23 at 12.18.57 AM.png

I then used Johns technique as described above and produced a fairly accurate selection!
Screen Shot 2019-04-23 at 12.19.28 AM.png

Sooooo...........in this B&W image..........
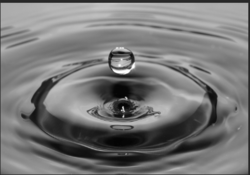
Screen Shot 2019-04-23 at 12.26.32 AM.png

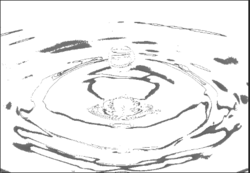
Using Johns technique, I was able to identify all the pixels that fall within the luminosity range of L:40 and L:50!
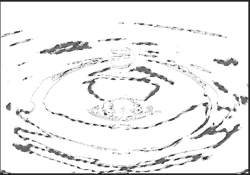
Screen Shot 2019-04-23 at 12.26.45 AM.png

I was able to make a selection from that layer.
Screen Shot 2019-04-23 at 12.31.11 AM.png

Thanks John!
 

revnart

Power User
Messages
362
Likes
327
My first idea was also blendif but I think you could just try using magic wand tool with deselected "contiguous" with tolerance set to 5 and clicking a pixel with L50 should select all pixels from L45 to L55 (best to try in L channel directly)

EDIT: Nope :p It's not working as I suspected :)

EDIT2:

This is longer solution but as far as I tested works 100%

1. Create Threshold adjustment layer and set its value to - your number * 2,55 - so 45*2,55 = 115 (the closest full number)
2. using shortcut Cmd+Shift+2 load luminosity as selection
3. Save selection as channel using menu: Select>Save Selection > Ne Channel
4. Change value of Threshold adjustment layer to you second value 55 * 2,55 = 140
5. load luminosity as selection
6. Remove selected pixels from channel you created earlier

This way you have a mask which should contain all pixels from L45 to L55 which you can load as selection just by ctrl+click on channel miniature
 
Last edited:

Amada

Member
Messages
16
Likes
1
Hello. Thank you so much for your help - I will try all of them. I'll let you know.
 

Amada

Member
Messages
16
Likes
1
I believe I have a solution that will work though not as elegant as I desire (there may be other ways yet this was the first that came to min)

I will assume that you all values of your image are R=G=B for all pixels if in RGB or you are in grayscale mode.

1) First you need to know for color space you are in (e.g. sRGB, Adobe RGB, ProPhoto RGB, what the RGB values are for the desired range of L that you want to capture in a selection. E.G for sRGB L=40 is when R=G=B= 40. Also for L=60 R=G=B = 144 (or 145). You can determine these values by going into the color checker, set the L value and observe the RGB values

2) Above you B&W Layer/Image create a simple all White Layer

3) Set the Blend If sliders to grayscale and set the left slider to 144 and the right slider to 94 (NOTE - the sliders will cross pass each other to make this happen). What you should now see as in the example below is all areas that are not between L=40 and L=60 to be white.

4) Select the white area with the magic wand with tolerance set to 0 and no anti alias (unless that is what you want). This is the inverse selection of what you want.
5) Just do Enter+Cmd+I (Shift+Cntrl+I on PCs) to invert the selection and you have now selected the desired L range

Not sure this approach is perfect yet seems to do the trick. There could be corner cases where it does not work as I have not tried all possible cases. Here are the images

First image is a grayscale gradient just as an example with the Layer Styles shown yet not activated (Layer was turned off)

View attachment 97756

Here is the same shot with the White Layer visible and Layer Style Active

View attachment 97757

Here is selecting the white areas:

View attachment 97758


And here it is with the selection inverted

View attachment 97759

Hope this works for you
John Wheeler


PS - The numbers on the images won't match the numbers I gave you because they were screen shots which are in my monitors colorspace.
PPS - The above technique does not work if the selection range includes L=0 or L=100. That can be solved with another approach using the same numbering scheme to translate L to RGB and using a Threshold Adjustment Layer instead of a white Layer with the Layer Style FYI

It looks very good. Only I do not know how you get this selection. Is it from background layer active?
 

Amada

Member
Messages
16
Likes
1
My first idea was also blendif but I think you could just try using magic wand tool with deselected "contiguous" with tolerance set to 5 and clicking a pixel with L50 should select all pixels from L45 to L55 (best to try in L channel directly)

EDIT: Nope :p It's not working as I suspected :)

EDIT2:

This is longer solution but as far as I tested works 100%

1. Create Threshold adjustment layer and set its value to - your number * 2,55 - so 45*2,55 = 115 (the closest full number)
2. using shortcut Cmd+Shift+2 load luminosity as selection
3. Save selection as channel using menu: Select>Save Selection > Ne Channel
4. Change value of Threshold adjustment layer to you second value 55 * 2,55 = 140
5. load luminosity as selection
6. Remove selected pixels from channel you created earlier

This way you have a mask which should contain all pixels from L45 to L55 which you can load as selection just by ctrl+click on channel miniature

It looks also good. Only one question: what is shortcut to load luminosity as selection? Ctrl+Shift+2 doesn't work. I know Ctrl+Alt + 2 make selection.
 

thebestcpu

Guru
Messages
2,988
Likes
2,747
HI Amada
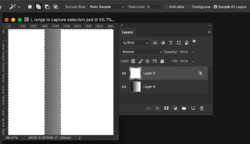
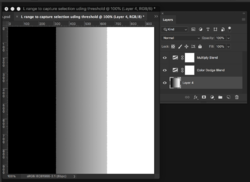
Here is a screen shot of the two Layers used i.e. Your image layer (I used a gradient) and the white Layer above it with the prescribed Layer Style from my post.
Also shown in the cut and paste is the Magic Wand tool which with the white layer selected and the settings shown for the Magic Wand Tool I just clicked in a white area of the image to get the selection for the white areas. This of course was followed by inverting the selection with the keyboard shortcuts I gave.

Hope this clarifies things yet if not, just keep asking
John Wheeler

Screen Shot 2019-04-23 at 8.42.38 AM.png
 

thebestcpu

Guru
Messages
2,988
Likes
2,747
Here is another approach that can also work.
1) Add Threshold Adjustment Layer above your image and set the Blend to Color Dodge. Set slider value to the higher "L" point desired using the conversion from my prior posts. This will make all parts of the image white above the Threshold value
2) Add another Threshold Adjustment Layer on top and set the Blend mode to Mulitply. Set the slider value to the lower "L" point desired using the conversion from my prior posts. This will make all of the parts of the image below this Lower Threshold value black
3) Using the Magic Wand tool set to 0 tolerance and point sample and in the Add mode, click on the solid black area and the solid white area consecutively. Then invert this selection. Now you have a section representing all values in the desired L range.

Following is the Layer Panel with the image at the point where I just selected the full black and full white areas.
Hope this gives you another option to consider
John Wheeler

Screen Shot 2019-04-23 at 9.31.36 AM.png
 

revnart

Power User
Messages
362
Likes
327
Download script from my link, it will be zipped so first you need to unzip it.
Then just go to photoshop open your image and go to File>Scripts>Browse and search for downloaded jsx file.
Script will ask for your desired range and make a selection.
 

Amada

Member
Messages
16
Likes
1
Download script from my link, it will be zipped so first you need to unzip it.
Then just go to photoshop open your image and go to File>Scripts>Browse and search for downloaded jsx file.
Script will ask for your desired range and make a selection.

It is exactly what I was looking for. Just one question - it works only for B&W - not for color. Just asked because did try on color layer and didn't get any selection. After converted to B&W it works perfectly. Thank you so much.
 

Amada

Member
Messages
16
Likes
1
HI Amada
Here is a screen shot of the two Layers used i.e. Your image layer (I used a gradient) and the white Layer above it with the prescribed Layer Style from my post.
Also shown in the cut and paste is the Magic Wand tool which with the white layer selected and the settings shown for the Magic Wand Tool I just clicked in a white area of the image to get the selection for the white areas. This of course was followed by inverting the selection with the keyboard shortcuts I gave.

Hope this clarifies things yet if not, just keep asking
John Wheeler

View attachment 97779
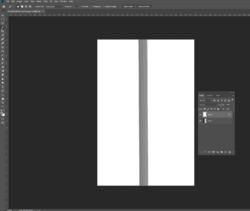
Sorry John but still have problem with selection. If white layer is active, using magic wand make selection of entire area - what in my opinion make sense because this layer is entirely white. Because blend-if we can see part of background layer. which is not part of white layer. Every time when click white I got entire selection. Untitled 4.png
 

revnart

Power User
Messages
362
Likes
327
It is exactly what I was looking for. Just one question - it works only for B&W - not for color. Just asked because did try on color layer and didn't get any selection. After converted to B&W it works perfectly. Thank you so much.
Will try to make it more configurable, but unfortunately tomorrow 😕
 

Top