Photoshop Gurus Forum
Welcome to Photoshop Gurus forum. Register a free account today to become a member! It's completely free. Once signed in, you'll enjoy an ad-free experience and be able to participate on this site by adding your own topics and posts, as well as connect with other members through your own private inbox!
You are using an out of date browser. It may not display this or other websites correctly.
You should upgrade or use an alternative browser.
You should upgrade or use an alternative browser.
Need help to create this item in Photoshop.
- Thread starter Smithz
- Start date
- Messages
- 24,122
- Likes
- 13,708
There would be many ways to accomplish this in Ps. Here is one.
Open a document.
Optional: You can create a background layer. Here I have made a grey BG layer.
Set centered guide lines using VIEW > NEW GUIDE > Horiz/Vert and 50% as your position.
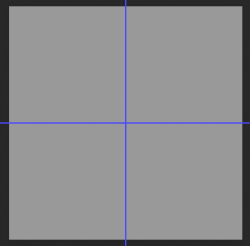
Create a new layer.
Use your Rectangular Marquis Tool to make a selection of the Left half.
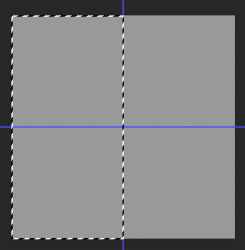
Fill the Left half with desired color. (I chose Yellow) Note: you can use the Paint Bucket Tool to fill in the color.
Hit Cmd/Cntrl + D to deselect the selection.
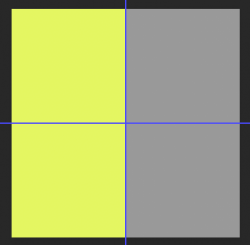
Create a new layer.
Use your Rectangular Marquis Tool to make a selection of the Right half.
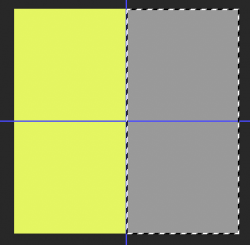
Fill the Right half with desired color. ( I chose Red)
Hit Cmd/Cntrl + D to deselect the selection.
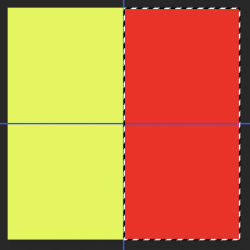
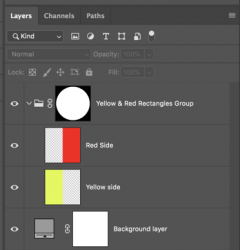
OK........now click on the body of the Yellow layer in the Layers Panel. This will highlight/select the layer.
Hold down the shift key on your keyboard and click on the body of the Red layer in the Layers Panel. This will add (highlight/Select) the Red layer.
No hold the Cmd/Cntrl key and hit the G key. This is a keyboard shortcut to creating a group. This will combine your Yellow and Red layers into a group. You can name the Group.
Make sure the group layer is highlighted/selected.
Now select your Elliptical Marquis Tool.
Place your cursor over the center of the guides. Hold the Shift and Opt/Alt key and drag out a circle to the desired size.
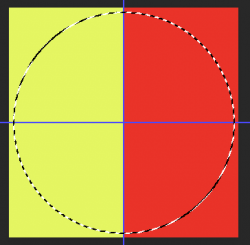
Now go to LAYER > LAYER MASK > REVEAL SELECTION. This will place a layer mask in the shape of your selection on the group layer.
Cmd/Cntrl + H will hide the guides or go to VIEW > CLEAR GUIDES to remove them.
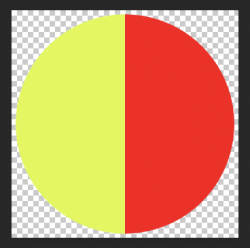
It will now look like this....
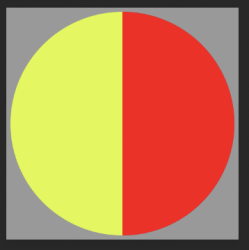
Turn off the background layer and it will look like this....
Layers Panel.
Open a document.
Optional: You can create a background layer. Here I have made a grey BG layer.
Set centered guide lines using VIEW > NEW GUIDE > Horiz/Vert and 50% as your position.

Create a new layer.
Use your Rectangular Marquis Tool to make a selection of the Left half.

Fill the Left half with desired color. (I chose Yellow) Note: you can use the Paint Bucket Tool to fill in the color.
Hit Cmd/Cntrl + D to deselect the selection.

Create a new layer.
Use your Rectangular Marquis Tool to make a selection of the Right half.

Fill the Right half with desired color. ( I chose Red)
Hit Cmd/Cntrl + D to deselect the selection.

OK........now click on the body of the Yellow layer in the Layers Panel. This will highlight/select the layer.
Hold down the shift key on your keyboard and click on the body of the Red layer in the Layers Panel. This will add (highlight/Select) the Red layer.
No hold the Cmd/Cntrl key and hit the G key. This is a keyboard shortcut to creating a group. This will combine your Yellow and Red layers into a group. You can name the Group.
Make sure the group layer is highlighted/selected.
Now select your Elliptical Marquis Tool.
Place your cursor over the center of the guides. Hold the Shift and Opt/Alt key and drag out a circle to the desired size.

Now go to LAYER > LAYER MASK > REVEAL SELECTION. This will place a layer mask in the shape of your selection on the group layer.
Cmd/Cntrl + H will hide the guides or go to VIEW > CLEAR GUIDES to remove them.
It will now look like this....

Turn off the background layer and it will look like this....

Layers Panel.

Hi, there are multiple ways of approaching the target. Described below is one of the ways:
Open a new document, take the Elliptical Marquee Tool, draw a circle while holding Shift to get a proper circle and not an ellipse. Now, you will have a circular selection with marching ants.
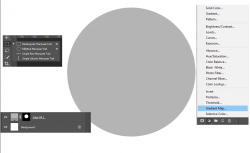
Select New Fill or Adjustment Layer and select Solid Colour, Select Grey to fill the above circle with Grey colour.
This is what you will end up with as of now.
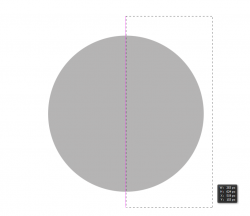
Now, select the Rectangular Marquee Tool, draw a rectangle roughly such that it cuts through half of the circle. If you want the rectangle to cut through exact center of the circle, you need to do the following: While still holding the mouse button as you draw the rectangle, hold and press down Shift key - this allows you to move the rectangle. Make very slow movement towards the center of the circle, and at the exact center you will observe a Pink line as shown below. This means your rectangle is passing through the center of the circle.
Now, again select New Fill or Adjustment Layer and select Solid Colour, Select Green to fill the above rectangle with Green colour. Make sure this Green rectangle layer is above the Grey circle layer in the layer panel as shown:
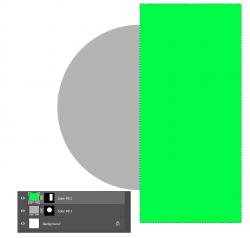
Now, click and hold Alt button while hovering your mouse in between the two shape layers to observe that the cursor changes to a downward pointing arrow. When you see it, click. This will create a Clipping Layer. Now click Control + D to deselect any active selections. Following will result:
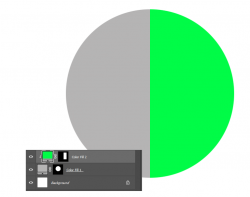
If you have any questions, revert.
Note: Unlike me, please name your layers for easier management.
Open a new document, take the Elliptical Marquee Tool, draw a circle while holding Shift to get a proper circle and not an ellipse. Now, you will have a circular selection with marching ants.
Select New Fill or Adjustment Layer and select Solid Colour, Select Grey to fill the above circle with Grey colour.
This is what you will end up with as of now.

Now, select the Rectangular Marquee Tool, draw a rectangle roughly such that it cuts through half of the circle. If you want the rectangle to cut through exact center of the circle, you need to do the following: While still holding the mouse button as you draw the rectangle, hold and press down Shift key - this allows you to move the rectangle. Make very slow movement towards the center of the circle, and at the exact center you will observe a Pink line as shown below. This means your rectangle is passing through the center of the circle.

Now, again select New Fill or Adjustment Layer and select Solid Colour, Select Green to fill the above rectangle with Green colour. Make sure this Green rectangle layer is above the Grey circle layer in the layer panel as shown:

Now, click and hold Alt button while hovering your mouse in between the two shape layers to observe that the cursor changes to a downward pointing arrow. When you see it, click. This will create a Clipping Layer. Now click Control + D to deselect any active selections. Following will result:

If you have any questions, revert.
Note: Unlike me, please name your layers for easier management.
Last edited:
- Messages
- 24,122
- Likes
- 13,708
For edit-ability, you can use the Ellipse Tool (Not the Elliptical Marquis Tool) to create editable round shapes whereby the color can be changed easily and quickly by double clicking the shape layers thumbnail.
You can just use a layer mask (created by using center guides and the Rectangular Marquis Tool as shown above) on the uppermost shape layer.
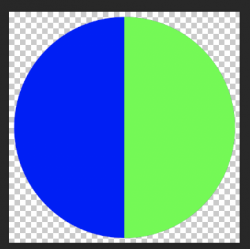
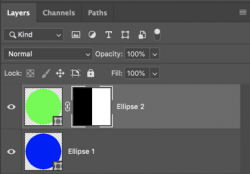
You can just use a layer mask (created by using center guides and the Rectangular Marquis Tool as shown above) on the uppermost shape layer.


[ iLLuSioN ]
Power User
- Messages
- 428
- Likes
- 457
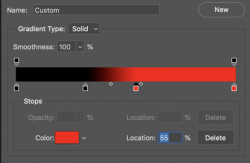
You can also use a simple round shape and a hard gradient map...nothing more
[ iLLuSioN ]
Power User
- Messages
- 428
- Likes
- 457
[ iLLuSioN ]
Power User
- Messages
- 428
- Likes
- 457
Brilliant! Thank you for sharing the secret. Now I am able to replicate the same.If you take a closer look at the gradient, you will see that there are two color breaks in the middle at exactly 50%.
You learn something new everyday. Spent quite some time on this today, trying to get that. Thanks again, Illusion.
I have one more question for you - how do I get your user name with the @ symbol to reference you? For example, if I type @+iam it prompts @IamSam but when I do @+iLL, I do not see your ID.
thebestcpu
Guru
- Messages
- 3,325
- Likes
- 3,071
I have one more question for you - how do I get your user name with the @ symbol to reference you? For example, if I type @+iam it prompts @IamSam but when I do @+iLL, I do not see your ID.
Its a website issue with special characters such as "brackets"
To get around the issue, precede the left bracket with a backslash and the automatic member lookup will work with just @\[
and you will get @[ iLLuSioN ]
Had the same problem and stubbled across the workaround and reported to @IamSam
Unfortunately, the member lookup works yet not sure it will send a notification for other reasons.
John Wheeler
Brilliant! That worked, John! Thank you.To get around the issue, precede the left bracket with a backslash and the automatic member lookup will work with just @\[
Today is a blessed day of learning lots of new things I did not know before.
- Messages
- 24,122
- Likes
- 13,708
Yeah, we're currently working on that issue.I have one more question for you - how do I get your user name with the @ symbol to reference you? For example, if I type @+iam it prompts @IamSam but when I do @+iLL, I do not see your ID.
- Messages
- 24,122
- Likes
- 13,708
I am new to Photoshop & needs help to create this in Photoshop. How to do it step by step?
Sorry that this took me so long to comment on.You can also use a simple round shape and a hard gradient map...nothing more
I was aware of this technique and while it is simple for a more advanced Ps user, it can be a bit confusing for beginners and rather cumbersome to change colors.
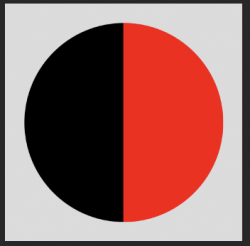
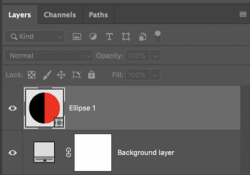
Four color stops have to be repositioned and edited and then positioned back in order to change colors.
[ Illusion] This is a great technique!
Per the OP's request, can you make a step by step tutorial on how to do this technique? Like how to add the Gradient Fill (not map) to a shape? How to use the Gradient Editor? This would be extremely helpful for newbies in future searches on the subject of this thread and probably helpful to some of the more advanced users who are not aware of the technique.
...and until yesterday, that included me! It was a brilliant technique to learn, thanks to @[ iLLuSioN ] .and probably helpful to some of the more advanced users who are not aware of the technique.
Hi, there are multiple ways of approaching the target. Described below is one of the ways:
Open a new document, take the Elliptical Marquee Tool, draw a circle while holding Shift to get a proper circle and not an ellipse. Now, you will have a circular selection with marching ants.
Select New Fill or Adjustment Layer and select Solid Colour, Select Grey to fill the above circle with Grey colour.
This is what you will end up with as of now.
View attachment 118622
Now, select the Rectangular Marquee Tool, draw a rectangle roughly such that it cuts through half of the circle. If you want the rectangle to cut through exact center of the circle, you need to do the following: While still holding the mouse button as you draw the rectangle, hold and press down Shift key - this allows you to move the rectangle. Make very slow movement towards the center of the circle, and at the exact center you will observe a Pink line as shown below. This means your rectangle is passing through the center of the circle.
View attachment 118624
Now, again select New Fill or Adjustment Layer and select Solid Colour, Select Green to fill the above rectangle with Green colour. Make sure this Green rectangle layer is above the Grey circle layer in the layer panel as shown:
View attachment 118626
Now, click and hold Alt button while hovering your mouse in between the two shape layers to observe that the cursor changes to a downward pointing arrow. When you see it, click. This will create a Clipping Layer. Now click Control + D to deselect any active selections. Following will result:
View attachment 118631
If you have any questions, revert.
Note: Unlike me, please name your layers for easier management.
Hi,
The 1st circle and 2nd rectangle needs to be drawn in layer 1 & 2 respectively?
Please ignore that I said Elliptical Marquee Tool and use the Ellipse Tool and Rectangle Tool instead as suggested by @IamSamThe 1st circle and 2nd rectangle needs to be drawn in layer 1 & 2 respectively?
For edit-ability, you can use the Ellipse Tool (Not the Elliptical Marquis Tool)
One of the advantages is you do not have to fill colour later on. Another advantage is, you can change size later on if needed.
But, to answer your question, you need not specifically select a new layer. The Marquee tool selects its own layer as soon as colour is filled without having to select new layer.
Hi, there are multiple ways of approaching the target. Described below is one of the ways:
Open a new document, take the Elliptical Marquee Tool, draw a circle while holding Shift to get a proper circle and not an ellipse. Now, you will have a circular selection with marching ants.
Select New Fill or Adjustment Layer and select Solid Colour, Select Grey to fill the above circle with Grey colour.
This is what you will end up with as of now.
View attachment 118622
Now, select the Rectangular Marquee Tool, draw a rectangle roughly such that it cuts through half of the circle. If you want the rectangle to cut through exact center of the circle, you need to do the following: While still holding the mouse button as you draw the rectangle, hold and press down Shift key - this allows you to move the rectangle. Make very slow movement towards the center of the circle, and at the exact center you will observe a Pink line as shown below. This means your rectangle is passing through the center of the circle.
View attachment 118624
Now, again select New Fill or Adjustment Layer and select Solid Colour, Select Green to fill the above rectangle with Green colour. Make sure this Green rectangle layer is above the Grey circle layer in the layer panel as shown:
View attachment 118626
Now, click and hold Alt button while hovering your mouse in between the two shape layers to observe that the cursor changes to a downward pointing arrow. When you see it, click. This will create a Clipping Layer. Now click Control + D to deselect any active selections. Following will result:
View attachment 118631
If you have any questions, revert.
Note: Unlike me, please name your layers for easier management.
Hi @polarwoc,
I am stuck at this point.
"Now, click and hold Alt button while hovering your mouse in between the two shape layers to observe that the cursor changes to a downward pointing arrow. When you see it, click. This will create a Clipping Layer. Now click Control + D to deselect any active selections.".
Not able to see a downward pointing arrow when performing this step. Kindly please show me.
Many Thanks,
Smithz.
thebestcpu
Guru
- Messages
- 3,325
- Likes
- 3,071
Hi @polarwoc,
I am stuck at this point.
"Now, click and hold Alt button while hovering your mouse in between the two shape layers to observe that the cursor changes to a downward pointing arrow. When you see it, click. This will create a Clipping Layer. Now click Control + D to deselect any active selections.".
Not able to see a downward pointing arrow when performing this step. Kindly please show me.
Many Thanks,
Smithz.
HI @Smithz
Since @Polarwac had not responding right away (I do that too) here is a link to an Adobe help file that shows several ways to create a clipping mask.
How to create a clipping mask
Holding the Alt Key (Option keys on a Mac) and hovering between the two Layers is one one and the link.
A third way not mentioned in the link is to right click on an open area of the upper Shape Layer in the Layers Panel and chose the option "Create Clipping Mask"
I have had trouble before with the hovering between two Layers with the Alt/Opt key pressed and never sure why that did not work all the time for me.
Hope this helps
John Wheeler
So sorry, I was unable to log on yesterday.Not able to see a downward pointing arrow when performing this step. Kindly please show me.
This would be the easiest way to create a clipping mask.A third way not mentioned in the link is to right click on an open area of the upper Shape Layer in the Layers Panel and chose the option "Create Clipping Mask"
If you face any difficulties, just ask. It is great to see that you are trying. Keep it up.

