Thank you Ctrl-Z, following ibclare advice i tryied to screenshot and comment the process.
Hope it's gonna be clear. I'm not a great english witer and it's the first time i write something like a tutorial :-(
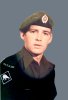
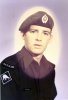
The following process is the one i used to restore the picture below from the left state to the right one. My personal choise is to try to keep the original photographic grain intact and to work as much as non destructively as possible.

A)
First of all open the picture at the start of the thread. We want to create an oval selection around the area burnt by the sun.
Select the elliptical marquee tool (Shift+M to lop change between elliptical marquee and rectangular marquee)
Click not the top right edge and without releasing the mouse button press Space Bar to move your selection. Releasing the space bar will let you resize the selection. Select the oval burnt area

B)
Refine the selection. Click Alt+Command+R and adjust the feather to incorporate the little halo around the more contrasted yellowish oval shape.

C)
Go on the channels palette and click on the second button on the bottom to save your selection for further use.
Double click the standard name of the selection and rename it.
Command-click on the small picture of the channel to recall your selection. Go to the layer palette.

D)
Press Command+shift+i to inverse your selection and click on the adjustment layer button at the bottom of the palette and click on Curves…

We are gonna adjust the white balance to get rid of the color cast on the outside of the selection. The adjustment level will affect only the pixels that in the mask attached are painted white. Click on the white eyedropper and click on the picture around the rectangular edge of the kiwi symbol, try couple of time until you get a nice washed grey background with the picture grain intact.

E)
Go to Select>Inverse and click o the adjustment layers button and add another Curves… layer. using the same tool of the previous layer try to match the color of the uniform around the neck with the color of the uniform outside the burt area.
With the black eyedropper you can pick the black level and with the white eyedropper you pick the white.

F)
Now deselect any active selection, click on the adjustment layer button and add a Hue/saturation… layer.
Select the layer and click on the button at the left of the adjustment layers button. A white square will appear at the right of your layer's thumbnail.
Click Command+A to select the all picture select the black color from the foreground swatch on the tools and press Alt+backspace to fill the mask of black.
Now select the white color, select the mask layer and press B to select a brush. Crtl cick on the picture and increase the size to about 165 and the hardness to 0.
Double click on the Hue/Saturation adjustment layer, increase the saturation to 100 press B and paint on the mask only on the right shoulder.A crazy green will appear so now you have a sample area t match hue and saturation.

Move the sliders until the color beneath of the ruined elliptical area matches more or less the uniform and then correct the rest of the halo painting with the color white on the mask. (You can see more or less the result in the miniature of the mask).

Now select all the layers you have created until now with Shift+click or Command+click, go on the menu of the Layers palette and click New group from layers… and in the pop up select Blending mode: Normal and click OK. Collapse the group clicking on the arrow on the left of the group icon.
G)
Go to Select>All, and Edit>Copy merged (or Command+Shift+C).
Click Command+v to paste the merged selection. A new layer that is the sum of all the correction made since now will appear. In your layer palette.
Now we are gonna use to correct some parts of the picture.
(in my picture i'm gonna put before and after from left to right)
1- PATCH TOOL: we are gonna use this to fill some of the desaturated area with different color preserving the texture. SElect the bleached area piece by piece and move the selection in an area with a more saturated color. Try to select the areas by lightness. Repeat the process until satisfied and Go to Select>All, Edit>Copy merged (or Command+Shift+C) and Click Command+v .

2-BURN-DODGE TOOLS: use them to darken and enlighten areas to match the shadows and highlight in the picture. You are gonna fill gaps in the shadows. Then Go to Select>All, Edit>Copy merged (or Command+Shift+C) and Click Command+v .

3-HEALING BRUSH TOOL: With this tool you are gonna correct the halo around the head. Select the tool, select a brush a little bigger of the halo trace and Command+click to sample the out side background and paint it over the halo.

H)
In this step using the Quick selection tool on the last picture you corrected you are gonna select the face and add an adjustment layer Hue/Saturation.
Do the same process also for the uniform, the red elliptical badge on the cap and the background.
The game is playing with Saturation and Hue (Touch the lightness the least possible) and match all parts of the picture in a realistic color relationship.
On the bottom side of the uniform you are gonna have a little color cast, click the "colorize" option on the adjustment level to get rid of it. Almost there!

I)
Go to Select>All, Edit>Copy merged (or Command+Shift+C) and Click Command+v. Select your new merged layer and go to Filter>Sharpen>Smart sharpen and increase the sharpness a little bit. The values on the picture are the actual values I used.

In the pictures there are two more adjustment layers but they are not vital to the restoration. Following thee steps to here you should have a nice restored picture!
That's all folks, tank you for reading!
")
Cbez