What's new
Photoshop Gurus Forum

Welcome to Photoshop Gurus forum. Register a free account today to become a member! It's completely free. Once signed in, you'll enjoy an ad-free experience and be able to participate on this site by adding your own topics and posts, as well as connect with other members through your own private inbox!

Pen Tool Won't Stroke - Force Fill


Screeech

Member
Messages
12
Likes
1
Morning Everyone
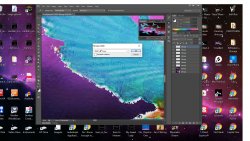
I had been using the pen tool to sharpen the edge of images that still had some white along the edges and then right clicking to select eraser. All of a sudden it no longer erased. I checked images and it showed Fill rather than stroke right below it. I selected stroke and tried again with the same results. When I tried to use erase tool instead the erase tool will not erase either. Same deal again with the fill stroke under images. I hit control > D just in case and made certain the right Layer was selected in layers - all was what it was supposed to be.

I even closed the program without saving - sacrificing the latest changes and reopened - same thing. Any ideas???
 
I had been using the pen tool to sharpen the edge of images that still had some white along the edges and then right clicking to select eraser.
Hey, not sure I understand. The Pen Tool(s) in either path or shape mode does not offer an "erase" option when right clicked. Could you be describing a different tool? What is force fill? Can you post some screenshots?

Also........you should never use the Eraser Tool for anything.
 
Create a path with the pen tool - right click - see image
Why should I never use erase?

zzz.jpg
 
Force fill = When I go to images and select stroke - and then try to use the erase (above) it does nothing - go back to images you will find fill selected
 
OK. Now I understand. Create a path, right click, choose stroke path, then choose the Eraser Tool to provide the stroke. This makes better sense!

Not at all sure as to why you are trying to use this method here, but I will try to recreate your problem.
 
I use the pen tool to make my path by clicking on points along whatever - right click - the window opens in the image ii gave you - choose erase inthe drop down menue - and it erases along the path you set - at least it was.
 
Hi Screech
When using the Erase option with the Path, both the Path and the Layer with the pixels you want to erase need to be selected
The Path is selected because you can access the tool so I suspect that you do not have the appropriate pixel Layer selected.
Note that in your image you have a Layer selected that looks empty according to the thumbnail
That's my best guess and hope that is the issue since it would be an easy fix. Fingers crossed
John Wheeler
 
I use the pen tool to make my path by clicking on points along whatever - right click - the window opens in the image ii gave you - choose erase inthe drop down menue - and it erases along the path you set - at least it was.
Yes...........I have already stated that I understood this in post #5...........
OK. Now I understand. Create a path, right click, choose stroke path, then choose the Eraser Tool to provide the stroke. This makes better sense!
Why are you repeating this?

What I still don't understand is your explanation of "force fill". What do you mean when you say....."Force fill = When I go to images and select stroke"????

I'm very sorry if I'm not understanding..............it's just a communication issue.

Other that what John has suggested and observed above, the only thing I can guess is that your Eraser Tool brush settings have changed. Please check them.
 
@thebestcpu - Just sharing my observation and not being critical........I suspect that the layer he/she has selected is not empty. If you compare the Navigator panel with the layers panel, you will see 2 active background layers (the uppermost being used) and 7 active additional "bird/McCaw" layers corresponding with the image in nav panel. Also note the zoom box on the nav panel.

While I'm not certain what's causing the Pen Tool issue, I think that he/she would do better using a layer mask for the original bird layer and then duplicating, transforming, then positioning.
 
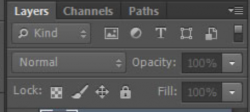
The only thing I'm not sure about is why parts of the layers panel are greyed out???? I can't recreate this circumstance.
Screen Shot 2020-05-29 at 9.51.31 PM.png

I did figure out that the Eyedropper Tool always appears during this function in three different versions of Ps. It's very odd but normal.
 
Here is one possible direction to explore.
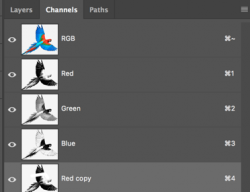
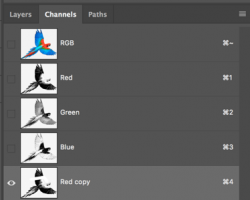
If one has an extra channel created (as can be seen in the Channel panel) and RGB and that extra channel has the visibility icon turned on and the extra channel is selected (highlighted), then the Layers panel visibility icons will dim and any stroking etc will be done to that extra channel and not any of the RGB/pixel Layers. Depending on what is in that extra channel and how your are stroking, it may be totally invisible.
Since the Channel panel has not been shown I would give that a look.
This would fit both not seeing stroke results and erase results as well as the dimming of the Layer visibility icons.
This is just my best shot given what the OP wrote and the comments from both @Screeech and @IamSam
Still a mystery until we get more from Screech
 
If one has an extra channel created (as can be seen in the Channel panel) and RGB and that extra channel has the visibility icon turned on and the extra channel is selected (highlighted), then the Layers panel visibility icons will dim and any stroking etc will be done to that extra channel and not any of the RGB/pixel Layers. Depending on what is in that extra channel and how your are stroking, it may be totally invisible.
Excellent! We are on the same wavelength if I understood you. I tried this as well and it (the pen tool technique in question) erased the extra channel layer only, but it was visible on the canvas.

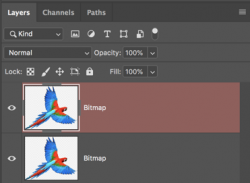
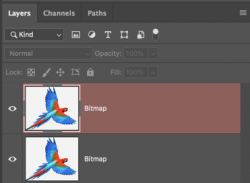
My layers panel acted in the expected manner by highlighting the layer in red.
All of my layers panel options were visible.
Screen Shot 2020-05-29 at 11.38.37 PM.png
Screen Shot 2020-05-29 at 11.38.30 PM.png

When what you described was the case, when I only selected the the duplicated channel, I was able to see the layers panel options be limited.
As you can see I had the red highlighted layer and I lost blending, lock, opacity, and fill options. I still had filter options.
Screen Shot 2020-05-29 at 11.38.58 PM.png
Screen Shot 2020-05-29 at 11.39.09 PM.png

In the OP's screenshot, he/she does not have the red highlighted layer and has lost all layers panel options including filters.
 
Hi @IamSam
Just a thought to consider. I think we are both possibly going down the same rabbit hole and the same time. I know we both look at the details of provided screenshots of those with problems to solve looking for clues to what is going on. In this particular case, I think we both saw at the same time what appeared to be dimmed out panel icons and wording ---- and then down the rabbit hole.

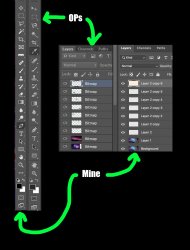
I took a second look by going to the tool bar and noticed that the "whites" that I was normally expecting were also dim. So is it possible that the OPs screen whites for some reason (settings, montor calibration, PS version, etc) are just dimmer yet they are just actual "on" and not "grayed out".

The first image below is comparing Screeches screen elements against my elements. The whites are mine are just whiter.
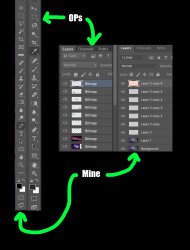
The second image is where I used a curves adjustment Layer on my tool and layer panels to match the tone of the OPs tools panel. Note that at the same time, now the visibility icons in my Layers panel now looked dimmed out as well. So that is why I am thinking we went down a rabbit hole. What do you think?

Side by side view of Screeches panel vs my panels

Side-by-side-of-panels-normal.jpg


Same image with my panels tone adjustment to make the tool panel match with the OPs

My-tools-panel-tone-adjusted-to-match-OPs.jpg
 
@thebestcpu - I think you are probably right!!! Thanks for your help on this matter, it's really appreciated!

I'm going to wait for the OP to chime back in on this conversation.
 
Your welcome @IamSam. Sometimes its a joint effort for tough problems. I think that the OP will be able to shed some light yet wanted to share or expand on my first post.

I am not certain about exactly what the OP was communicating. Sometimes its a language barrier and sometimes its just me. I am thinking that in all the communication, it might be that everything the OP was trying was trying to erase and that is all that is failing (I am not sure). If it is, I believe I have a plausible explanation. I am using the clues in the image the OP posted.

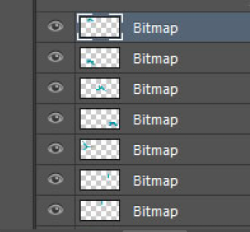
First, a blow up of the Layer Panel. All of the mostly transparent Layers may be representing one for each bird for the background. If you look closely, there are a few colored pixlels in each Layer positioned to exactly correspond to the location of the birds. One "bitmap" Layer per bird:

Screen Shot 2020-05-30 at 6.48.18 PM.png


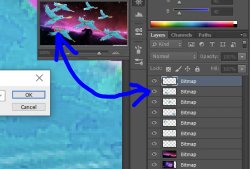
Now backing out and showing and including the navigator panel, the little red "zoom in square" corresponds with the bird in the Layer second from the top as I pointed out in the image.

Navigator-to-Layer.jpg


Yet the Layer the is selected is the Layer for the bird in another area and where the Path is set to erase is already totally transparent. Therefore, erasing on the selected Layer will show no change since it is trying to erase pixels that are not there already on that Layer.

I think this could at least partially explain things based on this one image.

Just a possibility to consider
John Wheeler
 
After all this - I've been snookered by this before and I've had this nagging feeling all along - I selected each layer and hit Cotrol D for each - that released everything and it's working normal now. Must have been something selected somewhere that could not be seen.
 

Back
Top