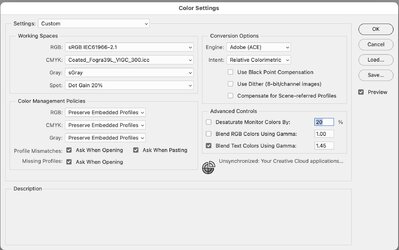
Hi
@PutinHuilo
Glad you got to root cause of your problem.
Just to let you know, I use a Mac and not a PC so cannot advise you on the Color Management Settings in a Windows machine.
The quick answer is no you should not convert your images to your monitor profile. I will give you my quick summary of why below yet here is a link that goes to some very good tutorials about Color Management that I bet would answer / clarify a lot your questions:
https://www.cambridgeincolour.com/color-management-printing.htm
If you system and applications that your are using are all Color Managed, they will handle having the colors displayed / printed properly.
So I will give you an analogy that works for me yet may not work for you (in which case go read the link(s) for the tutorials on Color Management).
There are many color space (profiles) with one of the primary differences are the total color gamut or range of saturation of colors they support.
Think of these color spaces as their own language. So your monitor color space, printer color space, and editing color space are all different languages and to the first order won't understand each other without help. Note that the most common editing spaces are sRGB, Adobe RGB, Display P3, and ProPhoto RGB)
So what is needed when going from one color space to another color space you need a universal language translator (that is what Color Management does). To make this work, this universal translator needs a superset language of all other possible languages and not dependent on any particular device. There are a couple superset languages that meet this need yet the one most common is the Lab Color space. It can represent all the colors the eye can see and is an an absolute color space (does not change from device to device)
So what color management does from your image in PS is to convert the color data numbers of you Editing Color Space your are using to Lab (superset color space), and then from Lab to the desired device color space e.g. your monitor, or printer.
This allows each color space to be translated to another color space.
What is critical when doing the conversion with the Universal Translator (Color Management) is that the Universal Translator needs to know the Color Space/Profile of the incoming image (e.g. by having the color profile embedded in the image) and it must also know the color space of the destination device to know which language to translate from and to. If that incoming and outgoing color profile is not specificed then a default color profile which certainly could be a wrong guess.
So you embed the editing color space in the image, and the Universal Translator will query the system for the color profile with the monitor. In the case of printing, some printers can read the color profile in the image and convert to the printers color space. Some printers will just assume that the incoming image is in sRGB if it is not embedded. Another options is to have a color profile for the printer and in PS's printer module, have PS manage colors and give the color profile of the printer. In that case one needs to make sure the printer has its color management turned off.
As an additional note on printer color profiles, one needs a specific profile based on the combination of printer (the ink it uses) as well as the paper in use. Each will have a different profile. Many companies that sell photo paper will provide a color profile to use with each of their papers for a number of printers.
With the specified color space be it for a monitor or a printer/paper combination, the Universal Translator (Color Management) will translate from your editing space to the target end device color space.
There are other areas of Color Management that I am not covering e.g.:
- when the image color space is larger than the destination color space there can be colors that cannot be represented in the destination device. Those out of gamut colors have to be mapped into an existing color in the destination color space (this has to do with rendering intent)
- It is helpful if you can preview how the image will appear in the desitnation space such as a printer. That is done with Color Proofing function in PS
So bottom line:
- use a standard editing space
- Always embed your editing color space
- Make sure your system has access to your monitor color profile for viewing and that you can provide a printer/paper color profile when printing.
Hope this helps and if not, just go to the link I provided above.
John Wheeler

