Photoshop Gurus Forum
Welcome to Photoshop Gurus forum. Register a free account today to become a member! It's completely free. Once signed in, you'll enjoy an ad-free experience and be able to participate on this site by adding your own topics and posts, as well as connect with other members through your own private inbox!
You are using an out of date browser. It may not display this or other websites correctly.
You should upgrade or use an alternative browser.
You should upgrade or use an alternative browser.
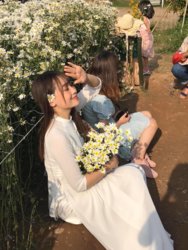
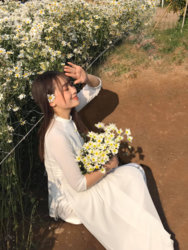
Specific Please remove the people and shadow of photographer
- Thread starter tuanlt
- Start date
@Rich54 Excellent work!
If you do not mind, I would like to learn from your PSD.
Thank you. Unfortunately, my PSD file won't be of much use. When I do these edits, I do every little step on its own layer, but I don't save all those layers. For example, I probably used at least 10 layers just to remove the photographer's shadow from the bottom of the dress, where each layer is a certain section of the dress with different shading or seams. Then once I'm satisfied, I collapse it all down to one master layer for the dress, delete the interim layers, and move on to another part of the image. If I literally kept every single layer the file size would get too large and I'd start getting lost because I'm not very diligent about labeling my layers. (I know that many of you are cringing in horror at this admission, but I generally wait quite a while before I delete layers and I wait until I'm 95% satisfied. I also save my paths and most of my important masks, so it's not as if I'm literally discarding everything.)
Generally speaking, the way I approach these kinds of edits is to use the Pen Tool to create clean borders for all the major shapes. For example, I created a path that outlines the entire right side of the young lady; I have separate paths for all the shadows that the lady casts; I have separate paths for all the different planes at the bottom of her dress. Once all of those paths are done and saved, I can then afford to be sloppy with the clone stamp and other copying techniques. I'm not concerned if I accidentally cover the young lady with the clone stamp because I can perfectly mask that away using the paths I created.
To fill-in all the background (dirt path, grassy areas, flowers), I'm usually quite liberal with the clone stamp and the patch tool and I cover a greater area than I need. But periodically, I will collapse every layer into a layer group, apply a mask to the group, and fill the entire mask with black. Then I'll be very careful about painting white into the mask to reveal my edits only in the spots where I actually need to cover up something. The goal is to keep as much of the original image as possible. If the result of this step reveals noticeable seams where my edits are obvious, then I'll do additional work to blend-in those seams.
Rich
Thank you for a detailed run through of the steps you followed. There are some nice techniques I gleaned from your post, such as the one you described about doing more area than needed in the grassy areas but revealing only where necessary while retaining the original layer as much as possible. Definitely learnt something that I will try to incorporate into my work.Thank you. Unfortunately, my PSD file won't be of much use. When I do these edits, I do every little step on its own layer, but I don't save all those layers. For example, I probably used at least 10 layers just to remove the photographer's shadow from the bottom of the dress, where each layer is a certain section of the dress with different shading or seams. Then once I'm satisfied, I collapse it all down to one master layer for the dress, delete the interim layers, and move on to another part of the image. If I literally kept every single layer the file size would get too large and I'd start getting lost because I'm not very diligent about labeling my layers. (I know that many of you are cringing in horror at this admission, but I generally wait quite a while before I delete layers and I wait until I'm 95% satisfied. I also save my paths and most of my important masks, so it's not as if I'm literally discarding everything.)
Generally speaking, the way I approach these kinds of edits is to use the Pen Tool to create clean borders for all the major shapes. For example, I created a path that outlines the entire right side of the young lady; I have separate paths for all the shadows that the lady casts; I have separate paths for all the different planes at the bottom of her dress. Once all of those paths are done and saved, I can then afford to be sloppy with the clone stamp and other copying techniques. I'm not concerned if I accidentally cover the young lady with the clone stamp because I can perfectly mask that away using the paths I created.
To fill-in all the background (dirt path, grassy areas, flowers), I'm usually quite liberal with the clone stamp and the patch tool and I cover a greater area than I need. But periodically, I will collapse every layer into a layer group, apply a mask to the group, and fill the entire mask with black. Then I'll be very careful about painting white into the mask to reveal my edits only in the spots where I actually need to cover up something. The goal is to keep as much of the original image as possible. If the result of this step reveals noticeable seams where my edits are obvious, then I'll do additional work to blend-in those seams.
Rich
Thank you once again.
Wow. Thank you very much . I really like how you keep the shadow of the flower and shadow of her dress.


