What's new
Photoshop Gurus Forum

Welcome to Photoshop Gurus forum. Register a free account today to become a member! It's completely free. Once signed in, you'll enjoy an ad-free experience and be able to participate on this site by adding your own topics and posts, as well as connect with other members through your own private inbox!

Quick way to close gaps in line drawing?


16mmWaste

Member
Messages
5
Likes
0
Im working on a rotoscope animation in photoshop and am losing a lot of time on a step that I'm sure there must be a better solution to.
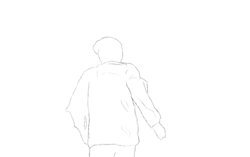
I'm doing quick, rough sketches around the subject of the frame, and filling in with white (eventually may add color). problem is my sketched line drawing often has some gaps, and in order to get a good selection with the magic wand, I'm having to go back through to find and close any gaps. This is a problem because 1) it adds more work/time and 2) I like the rough look and would like to preserve these natural line gaps as much if possible.

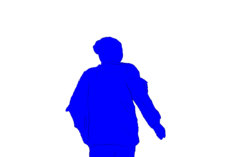
The attached image here is the final look im going for. Here I went through and quickly closed the gaps, selected outside of the figure, created a new layer, inverted the selection and filled. I thought there would be an easy way to close these gaps, but when googling the problem am finding a lot of stuff for illustrator and vector work, not photoshop.
Im hoping someone has a quicker way that would help me remove the step of drawing in the gaps. Any other tips or resources related to rotoscoping workflow also greatly appreciated!

sidewalk.jpg
 

thebestcpu

Guru
Messages
2,988
Likes
2,747
Do you have an example sketch without the gaps left in that you could post. Depending on the number and size of the gaps the recommended approach would be different. Best to provide an example of one that shows that maximum gaps you expect. Just a suggestion.
John Wheeler
 

thebestcpu

Guru
Messages
2,988
Likes
2,747
Hi 16mmWaste

All I did was click with the magic wand in the boundary area with a tolerance of zero and it created a perfect outline around the sketch drawing. So there must not have been any gaps in the perimeter than mattered. If this is your worst gap image then you don't have a problem based on what I just tried.

The image below was making the selection as indicated, inverting the selection, I then created A solid fill Layer which automatically included the mask from the selection and I set the blend to Darken so the interior sketch lines would show up.

NOTE: I may have asked my question incorrectly or with at least confusion. Please post the worst case image with gaps (not with gaps filled).

Hope this helps
John Wheeler

outline-pasted.jpg
 

16mmWaste

Member
Messages
5
Likes
0
Thanks for the help. It looks like the tolerance of the wand was the biggest thing I was missing here. It was defaulting to 32--once changed to zero it solved my problem. Thanks for pointing that out!
 

16mmWaste

Member
Messages
5
Likes
0
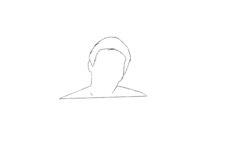
Actually, this example here might be a better one, as the mentioned tolerance adjustments weren't enough to make the selection as easy. There are a couple of gaps that appear to be around 2-5 pixels.

Maybe the answer is simply to take my time and draw better to avoid the gaps in the first place...and if thats the case so be it. but in the interest of time Im still hopeful there may be a shortcut here. Any thoughts greatly appreciated.

outline2.jpg
 

thebestcpu

Guru
Messages
2,988
Likes
2,747
Yes there are ways to handle this as well. Just need to know the maximum gap you will create for setting the parameters.
Note that in your second image, I also did not have a problem selecting as I said before yet will assume that there are pure white gaps that will cause selection problems.

To simulate the problem, I used the pencil tool at 3 pixels size with pure white color and drew several white strips through the boundaries of the sketch. This guaranteed a problem with selection. Then I followed the following steps

1) Duplicated your sketch to another Layer as a temporary Layer.
2) Used the Select > Color Range Tool with the dropdown set for shadows and fuzziness and range sliders set mid range and creating a selection of the sketch marks
3) Expand that selection by 1/2 the maximum gap size rounded up one pixel Select > Modify > Expand (2 pixels in my case)
4) Contract the expanded selection by the same amount Select > Modify > Contract (2 pixels in my case)
5) Fill the selection with gray (fills in the gaps of the sketech on the temporary Layer
6) Turn off the selection
7) Select with zero tolerance outside your sketch and now the outside boundary is properly selected
8) Delete the Temporary Layer and now you can invert the selection and fill the interior of your sketch even with the gaps and blend as desired.

So all you need to know or experiment with is what is your maximum gap to know how to set the selection expansion and contraction.

NOTE: most of the above could be done in an action to make it easier since you will be doing this quite a bit

This worked for me and hope it works for you
John Wheeler
 

16mmWaste

Member
Messages
5
Likes
0
Thanks John, this makes sense and seems to be working. Im wondering if my attaching a jpeg rather than a .psd was resulting in the issues not being present when you tested? Either way thanks so much for your input--this is workable and what I was looking for.
 

thebestcpu

Guru
Messages
2,988
Likes
2,747
Your welcome 16mmWaste and glad might be a good solution for you. Bet you are right about converting to JPEG as it hides the artifacts most in the darker and brighter areas. Just enough there to create a barrier and let the selection work. Probably could not count on that though :)
 

SCTRWD

Power User
Messages
457
Likes
239
Convert your example to Smart Object. Add Minimum Filter with 3 px radius. Then add Maximum Filter with 3 px radius.
Now grab Magic Wand and click outside of the figure. Invert selection. Turn off SO filters.
Create new layer with the selection as mask. Open it's Layer styles dialog, uncheck Transparency Shapes Layer in Blending Options and add inside Stroke of 1 px size. Sample the color of the stroke from the image.
 

thebestcpu

Guru
Messages
2,988
Likes
2,747
Based on SCTRWD's post and also the funny behavior differences in selection between the PSD file vs JPEG version, I thought of another way to consider
Note, this could be done with a Smart Object yet not sure what the best workflow would be for the project

1) duplicate original Layer to temporary Layer
2) On temporary Layer, use Gaussian Blur with setting to about 1/3 the maximum gap (this closes the gap)
3) Select outside figure with tolerance set to 0
4) Select > Modify > Expand (amount o pixels depends on blur amount yet it would be just a few pixels). This step may be optional depending on need
5) Invert selection
6) Delete temporary Layer

Lots of ways to achieve the goal
John Wheeler
 

Top