
Photoshop Gurus Forum
Welcome to Photoshop Gurus forum. Register a free account today to become a member! It's completely free. Once signed in, you'll enjoy an ad-free experience and be able to participate on this site by adding your own topics and posts, as well as connect with other members through your own private inbox!
You are using an out of date browser. It may not display this or other websites correctly.
You should upgrade or use an alternative browser.
You should upgrade or use an alternative browser.
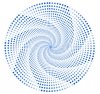
Radial Dot Pattern following outward contour - gulp!!
- Thread starter RussH
- Start date


As for dots:
1. Make a circular path the size of the outer circle
2. Stroke it with the blue circular brush with Spacing around 116%
3. Hold Alt key and choose Edit->Free Transform. Scale down the dots circle. Press OK.
4. Press Ctrl-Alt-Shift-T as many times as needed.
As for gradients:
1. Maке a gradient layer with seven black to white, black to white sections.
2. Convert it to Smart Object. Set its Blend mode to Screen.
3. Apply the Twirl filter.
- Messages
- 24,252
- Likes
- 13,718
SCTRWD said:As for dots:
1. Make a circular path the size of the outer circle
2. Stroke it with the blue circular brush with Spacing around 116%
3. Hold Alt key and choose Edit->Free Transform. Scale down the dots circle. Press OK.
4. Press Ctrl-Alt-Shift-T as many times as needed.
This worked for you RussH? I could not get this to work for me. On step 3, the only thing that transforms is the circular path which you have to stroke again. The blue dots remain the same size.
I did get this to work.
1. Make a circular path.
2. Stroke path with small blue brush.
3. Turn off path
4. Command + J to copy layer.
5. Command + T to make the copied layer smaller than the first. Enter or click checkmark.
6. command + J to copy this layer
7. Shift + Command + T to Step and repeat.
8. Repeat steps 6 and 7 until done.
Group or merge all layers when done.

Working on the twirl part.
- Messages
- 1,825
- Likes
- 1,101
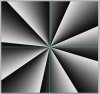
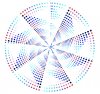
I did something a bit like the ones before, but different and in Illustrator.
View attachment 27623
View attachment 27623
Tom Mann
Guru
- Messages
- 7,125
- Likes
- 4,312
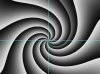
The next to the last step would be to use the "twirl" filter to get the image shown in my 1st post in this thread.
My final step would be to convert that to an alpha channel / mask and apply it to any adjustment layer to modulate the opacity of that adjustment layer. Below, I used that mask on a simple "levels" adjustment layer and put that adjustment layer above the pattern IamSam just posted.
HTH,
T
PS - To convey the general approach, I took no care whatsoever to get the number and angle of each sector to fill a complete circle, or do other similar tidying-up operations. Obviously, to get it to look nice, one would have to be careful about such things.
PS#2 - To give credit where credit is due, the above is exactly the 2nd part of the approach SCTRWD described very early in this thread, just spelled out, step-by-step.
Attachments
Last edited:
- Messages
- 1,825
- Likes
- 1,101
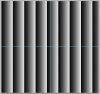
Well good luck with doing it like that, but it is possible to do what I did in Photoshop.
Instead of using one circle to stroke a circular path, I used a string of little circles with ever decreasing levels of opacity. In fact the opacity in my version went up in increments of 4% for each circle. This is what gives the impression of a gradient.
If the opp so wishes, they can have the outer ring as a vector file, so they can reduce the size and choose how tightly the spiral twirls for themselves.
Tom Mann
Guru
- Messages
- 7,125
- Likes
- 4,312
I love your method, Spruce and agree with your comments.
As they say, there's usually more than one way to skin a cat, and if you have Illustrator, you can save yourself lots of file size, have your product be scalable to any size with no loss of sharpness, etc. My assumption was that the OP probably only has PS, and everyone else in the thread went with a PS-based approach, so I stuck with that.
Cheers,
T
- Messages
- 1,825
- Likes
- 1,101
You can do what I did in Photoshop. The only question is, to what degree of perfection is the opp willing to achieve?
View attachment 27640
View attachment 27640
Guys,
Thanks for your help on this. In regards to the illustrator method, I dont have much experience with illustrator, so not sure I will be able to do it in that.
However, I have followed most of the steps in photoshop (loving the step and repeat option!). But Im not sure how you apply the gradient layer as a mask to the dot layer??
See below where I am
You don't have to apply no mask layer. Just follow the steps below:
1. Maке a gradient layer with seven black to white, black to white sections:

Set its Style to Angle.
2. Convert it to Smart Object. Set its Blend mode to Screen.
3. Apply the Twirl filter to it.
1. Maке a gradient layer with seven black to white, black to white sections:
Set its Style to Angle.
2. Convert it to Smart Object. Set its Blend mode to Screen.
3. Apply the Twirl filter to it.
