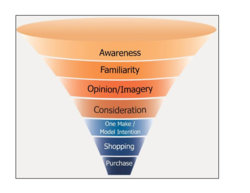
What's new
Photoshop Gurus Forum

Welcome to Photoshop Gurus forum. Register a free account today to become a member! It's completely free. Once signed in, you'll enjoy an ad-free experience and be able to participate on this site by adding your own topics and posts, as well as connect with other members through your own private inbox!

Recreating Funnel Shape in Layers


Daf57

Member
Messages
21
Likes
2
Hi all!

Attached an image I need to recreate - either Illustrator or Photoshop - if Illustrator I need to be able to export to photoshop layers. Looking for advice/suggestions on methods, please - each section of the funnels and text needs to be it's own layer - as the result will later be animated in Photoshop.

I've tried using pen tool in PS to "trace" each section then create selection and fill with gradient - I found it difficult to get consistent crisp edges between the segments. Same with using warp with shapes.

Thank you so much!
Daf
 

Attachments

  • funnel.jpg
    funnel.jpg
    33.7 KB · Views: 0
I will do this in steps. It may take me awhile due to other work, so please be patient.
Please note that I'm not trying to match the exact dimensions or shape of your example. I'm working fast so that I can get you going on your own project.

We are making templates that we will use for the final image.

Create a large square document. I used 5000 x 5000......Work Big! You can always make it smaller!
Set up center guidelines.
Set up guidelines to define boundaries of one half of the funnel shape.
Use the Pen Tool set to PATH to create the half shape of the funnel.
Screen Shot 2018-02-02 at 9.17.20 PM.png

Make a selection of the path.
Screen Shot 2018-02-02 at 9.17.42 PM.png

Fill the selection with any color (it does not matter at this point), I used black.
Hit Cmd/Cntrl + D to deselect.
Screen Shot 2018-02-02 at 9.17.58 PM.png

Hit Cmd/Cntrl + J to duplicate the half.
HIt Cmd/Cntrl + T to enter free transform. Right click and choose "flip horizontal". Click OK when done to accept the state change.
Use the Move Tool to move the half to the other side.
Screen Shot 2018-02-02 at 9.18.10 PM.png

When you have positioned the two halves, select both layers, hit Cmd/Cntrl + J to duplicate them and then hit Cmd/Cntrl + E to merge them. Turn the original half layers off............we will save them just in case we need them.

On a new layer, use the Ellipse Tool set to shape to create an ellipse at the top. Hold down the Opt/Alt key to make it proportional to the center guideline. Color does not matter for the moment.
Screen Shot 2018-02-02 at 9.18.42 PM.png

You may have noticed that I have already divided the funnel into 7 equal parts. Here's how I did it.
I first added a guideline to the bottom of the funnel and one at the bottom of the ellipse.
I then used the ruler tool to measure from the bottom of the ellipse to the botttom of the funnel.
In mine it measured 3948 in height. I divided 3948 by 7 and got 564.
I then used the Rectangle Tool and created a rectangle that was 5000 in width and 564 in height.
I placed/snapped the rectangle at the guideline at the bottom of the ellipse.....
Screen Shot 2018-02-02 at 9.58.50 PM.png

I then placed a new guideline at the bottom of the rectangle.
I used the Move Tool to move and snap the rectangle down to the new guideline and repeated the process all the way to the bottom.
Once done you can turn off the rectangle layer but save it in case we need it later.

More to come later.
 
For the next step we need to separate the funnel into 8 different layers.

Select/highlight the Funnel layer.
Make a selection of the Ellipse Layer by holding Cmd/Cntrl and mouse clicking the layers thumbnail.
Turn the Ellipse Layer off.
You will never hear me say this again because it's destructive................but hit delete.........it's needed for this InfoGraphic.
Screen Shot 2018-02-03 at 8.40.30 AM.png

Turn the Ellipse Layer back on and select/highlight.
Duplicate the Ellipse by hitting Cmd/Cntrl + J

Select/Highlight the duplicated Ellipse layer.
Choose your Move Tool.
Move the Duplicated Ellipse down to the next guideline.
Screen Shot 2018-02-03 at 8.40.54 AM.png

Make a selection of the duplicated Ellipse Layer by holding Cmd/Cntrl and mouse clicking the layers thumbnail.
Turn the duplicated Ellipse Layer off.
It will look like this........
Screen Shot 2018-02-03 at 8.41.16 AM.png

Select/Highlight the Funnel Layer.
We need the selection to include upper potion of the funnel as well as the Ellipse.
Choose your Lasso Tool.
Hold down the shift key and add a selection around the top of the funnel and the ellipse.
Should look like this........
Screen Shot 2018-02-03 at 8.42.26 AM.png

When you complete your addition to the selection Go to LAYER > LAYER VIA CUT (Shift + Cmd/Cntrl + J)
Screen Shot 2018-02-03 at 10.17.51 PM.png

This will "cut out" the selection and add it to it's own layer.
Rename the new layer "Funnel Layer 1".
Your layers panel will look like this.........
Screen Shot 2018-02-03 at 8.45.37 AM.png

Select both the new Funnel Layer 1 and the Ellipse Layer (as seen above).
Choose your Move Tool (V) and click the up directional arrow on your keyboard 5 times (or however many you like).
This will move the two layers up and create a small space.
Screen Shot 2018-02-03 at 8.45.47 AM.png

Repeat the above steps until you have all seven layer separated.
Remember...........on the last step explained above, before you move...........make sure you have all the new Funnel Layers and the Ellipse layer selected/highlighted so they move as one unit. Each time you repeat the process, you will have to include all of the previous layers in the move.

Screen Shot 2018-02-03 at 10.38.53 PM.png

Screen Shot 2018-02-03 at 10.45.22 PM.png

Let me know when you have completed your funnel template and I will begin to explain how to make the final image.

With colors and no highlights....
Screen Shot 2018-02-04 at 1.56.06 AM.png
 
Okay - great tutorial. I have finished the funnel shape. :) I believe I can fill the sections with a gradient of the needed color, add the text be done. I would not want to take up any more of your time - thank you so much!!
 
Your very welcome.

You need to know that it does not bother me at all to explain things, so your not wasting my time at all. With a little patience, I will just need to find the time.
 
Looks great - thanks so much again for all the help. I was able to finish the project - I'm attaching a copy of the finished piece.

Take care!
Daf
 

Attachments

  • purchasefunnel.jpg
    purchasefunnel.jpg
    85.2 KB · Views: 0

Back
Top