What's new
Photoshop Gurus Forum

Welcome to Photoshop Gurus forum. Register a free account today to become a member! It's completely free. Once signed in, you'll enjoy an ad-free experience and be able to participate on this site by adding your own topics and posts, as well as connect with other members through your own private inbox!

remove background help


Status
Not open for further replies.

rudbeckia

Member
Messages
8
Likes
0
Hi PS folks,

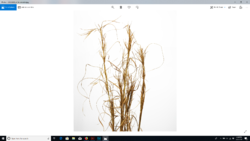
Can I get some advice on how to remove the background of this image or blow it out to all white without removing or washing out parts of the plant? I am not new to photoshop, but can not figure out a good method. Everything I try either washes out the plant, or removes the thinner lines of the plant.

Thanks for any tips
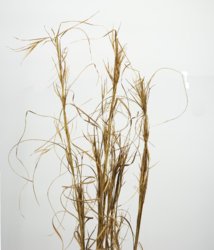
DSC00328_needs white background.jpg
 

colleague

Guru
Messages
824
Likes
1,254
I would use a "selective color" adjustment layer and choose for adjusting the "Whites"
and make the slider for black to -100% (all to the left)
 

rudbeckia

Member
Messages
8
Likes
0
Thanks, I tried that once before. It works, pretty well but doesn't seem to get the entire background to a true white

You can still see a "box" around the left size of the image. Possibly there is a step I am missing?Screenshot 2019-02-02 15.26.48.png
 

rudbeckia

Member
Messages
8
Likes
0
I have also tried then going and just erasing, but the non white areas overlap with some of the more fine plant lines making it hard
 

rudbeckia

Member
Messages
8
Likes
0
I should also add, I am looking for a relatively quick method b/c i will have a ton of photos that will need this
 

Rich54

Guru
Messages
1,733
Likes
3,417
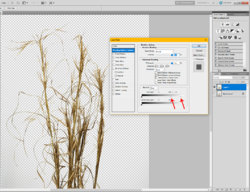
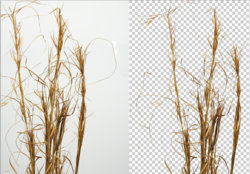
Have you tried using the Blend If sliders? I got the background to disappear very quickly by adjusting the blend-if sliders as shown where the red arrows are pointing. I attached a tutorial down below.

Rich

Blend If.jpg


rudbeckia

Member
Messages
8
Likes
0
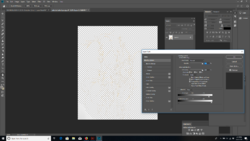
Rich, what you are showing is what I am going for, I seem to lose the whole plant when I match your settings?

Screenshot 2019-02-02 17.47.25.png
 

Rich54

Guru
Messages
1,733
Likes
3,417
In the image you attached, you moved the dark slider (controlling the dark tones) about 70% of the way toward the right. That's your mistake. In your image, the dark tones are the stalks that you need to keep, so you need to leave that slider alone (the left one) and keep it all the way to the left where it started. What you want to do is get rid of the lighter background tones, which are controlled by the right-hand (white) slider.

The right-hand slider is really two different sliders that start off glued together, but you need to separate them. Hold down the Alt key and put your mouse on the left side of the white trangular slider and move it to the left. That will split it into two pieces, and each can now be moved independently. Set those two pieces similar to my screen shot and you should be ok. (The black slider can also be split in two the same way if you ever need to adjust the dark shades. You should go back into the tutorial and focus on the part where he explains splitting each slider into two pieces.
 

rudbeckia

Member
Messages
8
Likes
0
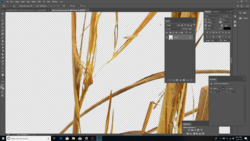
Thanks, did it correctly this time around. I am still loosing parts of the plant, is there a way to set a tolerance so it will not remove the parts of the stalks that are really light?

Screenshot 2019-02-03 09.25.00.png
 

Rich54

Guru
Messages
1,733
Likes
3,417
In this particular image, the background gets slightly darker toward the bottom, so perhaps you can try two different blend-if attempts: one that does the best job for the top half of the image and then another for the bottom half. You can then stitch the two together using layer masks.

Another approach is to temporarily darken the flower stalks using a Levels adjustment, a blend mode like Multiply, or using one of the Channels (the blue channel has the best contrast between object and background). That darkened version might give you better separation between object and background. Then use Blend-If on the darkened version and create a layer mask of the result that you can then apply back to the original, undarkened image.
 

Rich54

Guru
Messages
1,733
Likes
3,417
One more thing to try... the blend-if sliders have four color channels to work in: gray scale luminosity (default), red, green and blue. Your flower stalks are yellowish, so the information is mostly in the green channel. Try changing the blend-if channel to Green and see if that gives a better result.
 
Status
Not open for further replies.

Top