What's new
Photoshop Gurus Forum

Welcome to Photoshop Gurus forum. Register a free account today to become a member! It's completely free. Once signed in, you'll enjoy an ad-free experience and be able to participate on this site by adding your own topics and posts, as well as connect with other members through your own private inbox!

Remove glare from photo


WarrenG

Well-Known Member
Messages
46
Likes
15
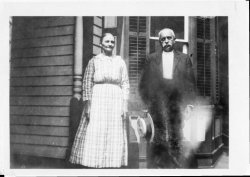
I'm trying to restore this old photo for a friend and can't seem to find a way to remove the bright glare / overexposure across the man. Would appreciate help in doing this - workflow, tools, filters and settings to use. I've tried Camera Raw - dehaze, curves, cloning, light painting but nothing works. Also tried scanning the photo, then rotated 180 degrees and scanned again. Combined the 2 scans using PS Scripts - Statistics - Mean to get the photo to begin restoration work.

Merged Man & Woman.jpg
 

thebestcpu

Guru
Messages
2,989
Likes
2,752
Hi @WarrenG
It is quite possible that the detail is not in the print in which case there is nothing that you can do to extract out detail. If that is the case, you would need to replace the suit with some sort of paint over of similar suit from another picture.

However, before giving up there are a few things that I usually try for very light images.
- Do you have access to the original negative (if there is one associated with the image). Extraction from the negative typically has more detail than the print.
- Is this an overexposure on the print material or is there some overcoat on the print. If the later, a backscan through the print might help
- Scan to TIFF and not to JPEG as the later as lossey compression and detail can be lost especially when trying to extract out details
- Scan in 16 bit mode (not 8 bit mode). Any detail to be extracted (if there) would need higher resolution to get it out
- Does you scanner support different "scan exposures" (not the same as adjusting after the fact). One can do HDR techniques by scanning at very low exposure to not clip out those highlights.

Just some possibilities yet none of the above will help if the detail is just not there to extract.
Best of skill on your project
John Wheeler
 

WarrenG

Well-Known Member
Messages
46
Likes
15
Thanks, John. I scanned it in 48 bit mode at 600 dpi and saved as a Tiff to work on. Uploaded here as a jpg to limit size and get ideas. I don't have access to the negative, just the small glossy print. I'm not familiar with a back scan. What is it and how do you do it?

I'm using an Epson Perfection V-550 scanner. The software allows histogram adjustments. Is this what you're talking about for different scan exposures?
 

JeffK

Guru
Messages
2,486
Likes
2,890
Hi Warren:
John gave you some excellent tips but you've also done some good work setting up the scan.
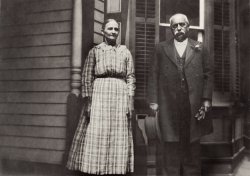
There is some detail there. I just tried some old school burning tool work but just to test.
I did it in a very heavy handed way just to see what could be brought back:

Merged Man & Woman edited.jpg
This at least would give you a start.

Take your time with this - not an easy one...

- Jeff
 

thebestcpu

Guru
Messages
2,989
Likes
2,752
Hi @WarrenG
@JeffK 's work shows some promise.

From a flatbed scanner what you have done sounds good to me.
I am assuming that the bright glare spot is not due to the light reflection from the scanning (or you would probably see it elsewhere in the scan as well)
If the actual glossy picture does not have this glare, then instead of using a flatbed scanner using a copy stand and a camera with the lights off to the side could get rid of the glare. Yet the impression I have is the issue is embedded into the print itself.

For a given resolution scan, if you can also control the speed of the scanning, then that is an exposure control of the scanner. The depends on the scanner and the scanner software. This ties into the back scanning technique that I have used in limited cases.

The only time I have used back scanning is with silvered images which often were images on thick card stock (style at the time).
The silvering would reflect back from flatbed scanners and often with copy stand work as well (sometimes polarized light approaches help)
Yet what I did was scan the card stock treating as scanning a negative (with the light in the lid of the scanner). If you can get just some preceptible light through the card stock and set the scanning for super high exposure (very slow scanning with the same amount of light), I have been able to have the light pierce through the card and see the print detail through the silvering.
I then had to invert the image (left to right) and combine it with the original print scan. Also had to remove artifacts that you can pick up from within the card stock. In particular if there was writing on the back of the card stock that becomes visible in the back scan as well.
My wife had a heavily silvered wedding picture from the card stock where many areas looked solid black, yet was able to pull out details not seen for a hundred years including a little bumble bee that was on the bouquet of flowers.

This technique only is helpful if there is image data hiding underneath some overlying material. In my case it was surface silvering. If you have some white reflective material that was deposited on top of the image, you might be able to back scan (I was really reaching as this is not likely yet wanted all options out on the table)

Other than that, it might take looks at the 16 bit image (or just a portion that includes the glare area) for forum members to try it on the 16 bit TIFF file to see what tricks our up their sleeves. Sharing a link to a file sharing site can be done for very large files

You do have a tough project there.
John Wheeler
 

WarrenG

Well-Known Member
Messages
46
Likes
15
Thanks, Jeff. I tried using the dodge & burn tools but didn't bring back the amount of detail you did. I was only burning at 20% opacity. Will try upping the opacity to 50% and see what happens.
 

JeffK

Guru
Messages
2,486
Likes
2,890
Thanks, Jeff. I tried using the dodge & burn tools but didn't bring back the amount of detail you did. I was only burning at 20% opacity. Will try upping the opacity to 50% and see what happens.

Takes a lot of patience. Just keep going over the areas and change your range as well - work on shadows and midtones. I think I kept my exposure low but kept going over the areas.
Desaturating the image can also help. You can come back after you're done and add some overall tone.
Really interesting shot - amazing that we still have these records.
- Jeff
 

thebestcpu

Guru
Messages
2,989
Likes
2,752
Thank again, John. You are correct that the glare is on the print itself. The actual photo is 2 1/2 by 3 1/2 on glossy paper but I'll try doing the back scan you mention and see what happens. I've also uploaded the photo to my Google Drive in the Tiff format. Here is a link - https://drive.google.com/file/d/1znE3jtRmcSXGXunjGtiqrZ-hevnMWLfy/view?usp=sharing
Hi @WarrenG
The link did not allow direct access to the file. All it allowed was leaving a message to request access so the link did not have the correct permissions for public access I believe.
John Wheeler
 

WarrenG

Well-Known Member
Messages
46
Likes
15
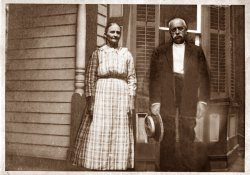
I searched the vintage stores for some cloths for the man.

View attachment 119901
WOW, Chris. This is great. Did you have another photo you borrowed the clothes from or is there a site that has stock images? I'll share your version with my friend. I think she will like it.

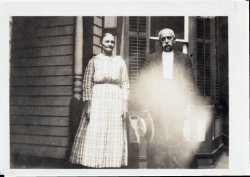
I tried to restore the original by rescanning at 1,200 dpi in Tiff format twice - rotating 180degrees. I merged the two scans using File-Scripts-Statistics (Mean) and rastorized the layer. I dehazed the photo with a camera raw filter at 70 strength. Next I split the channels and chose the blue channel to restore. I again used the camera raw filter twice to dehaze the blue channel even more - 70 and 40 strengths. That allowed me to see some detail behind the glare. From there I used the clone stamp to get a large enough section of the coat to copy and paste to fill out the rest of the coat. Then used spot healing brush, curves adjustments, etc. to get a furthwr restore the image. I added a sepia tone which was common in that period. Below is my result. Any suggestions to improve it even more?

Merged Man & Woman 1200 dpi Sepia.jpg
 
Messages
4,139
Likes
6,062
Hi @WarrenG
I'm glad you like what I did.
And yes I'm good at finding what I want in the internet. (No stock fotos). Though in this case I searched for more than 2 hours. And another 2 hours to blend it in your provided image.

I think your version can't be topped by anyone.
It's nearly perfect. Maybe you could adjust the arms and shoulder of the man bit. They're just a little too dark.
 

WarrenG

Well-Known Member
Messages
46
Likes
15
Hi @WarrenG
I'm glad you like what I did.
And yes I'm good at finding what I want in the internet. (No stock fotos). Though in this case I searched for more than 2 hours. And another 2 hours to blend it in your provided image.

I think your version can't be topped by anyone.
It's nearly perfect. Maybe you could adjust the arms and shoulder of the man bit. They're just a little too dark.
Thanks. I'll see if I can lighten them a bit.

I sent your version to my friend and she loved it. She thinks it's great to have a forum like this where people share their talents. Working on a phot of my grandmother, aunt & her 2 boys from 1948. I might post it to the forum for help getting rid of what looks like a cloudy, dusty layer over the detail of the photo.
 

Top